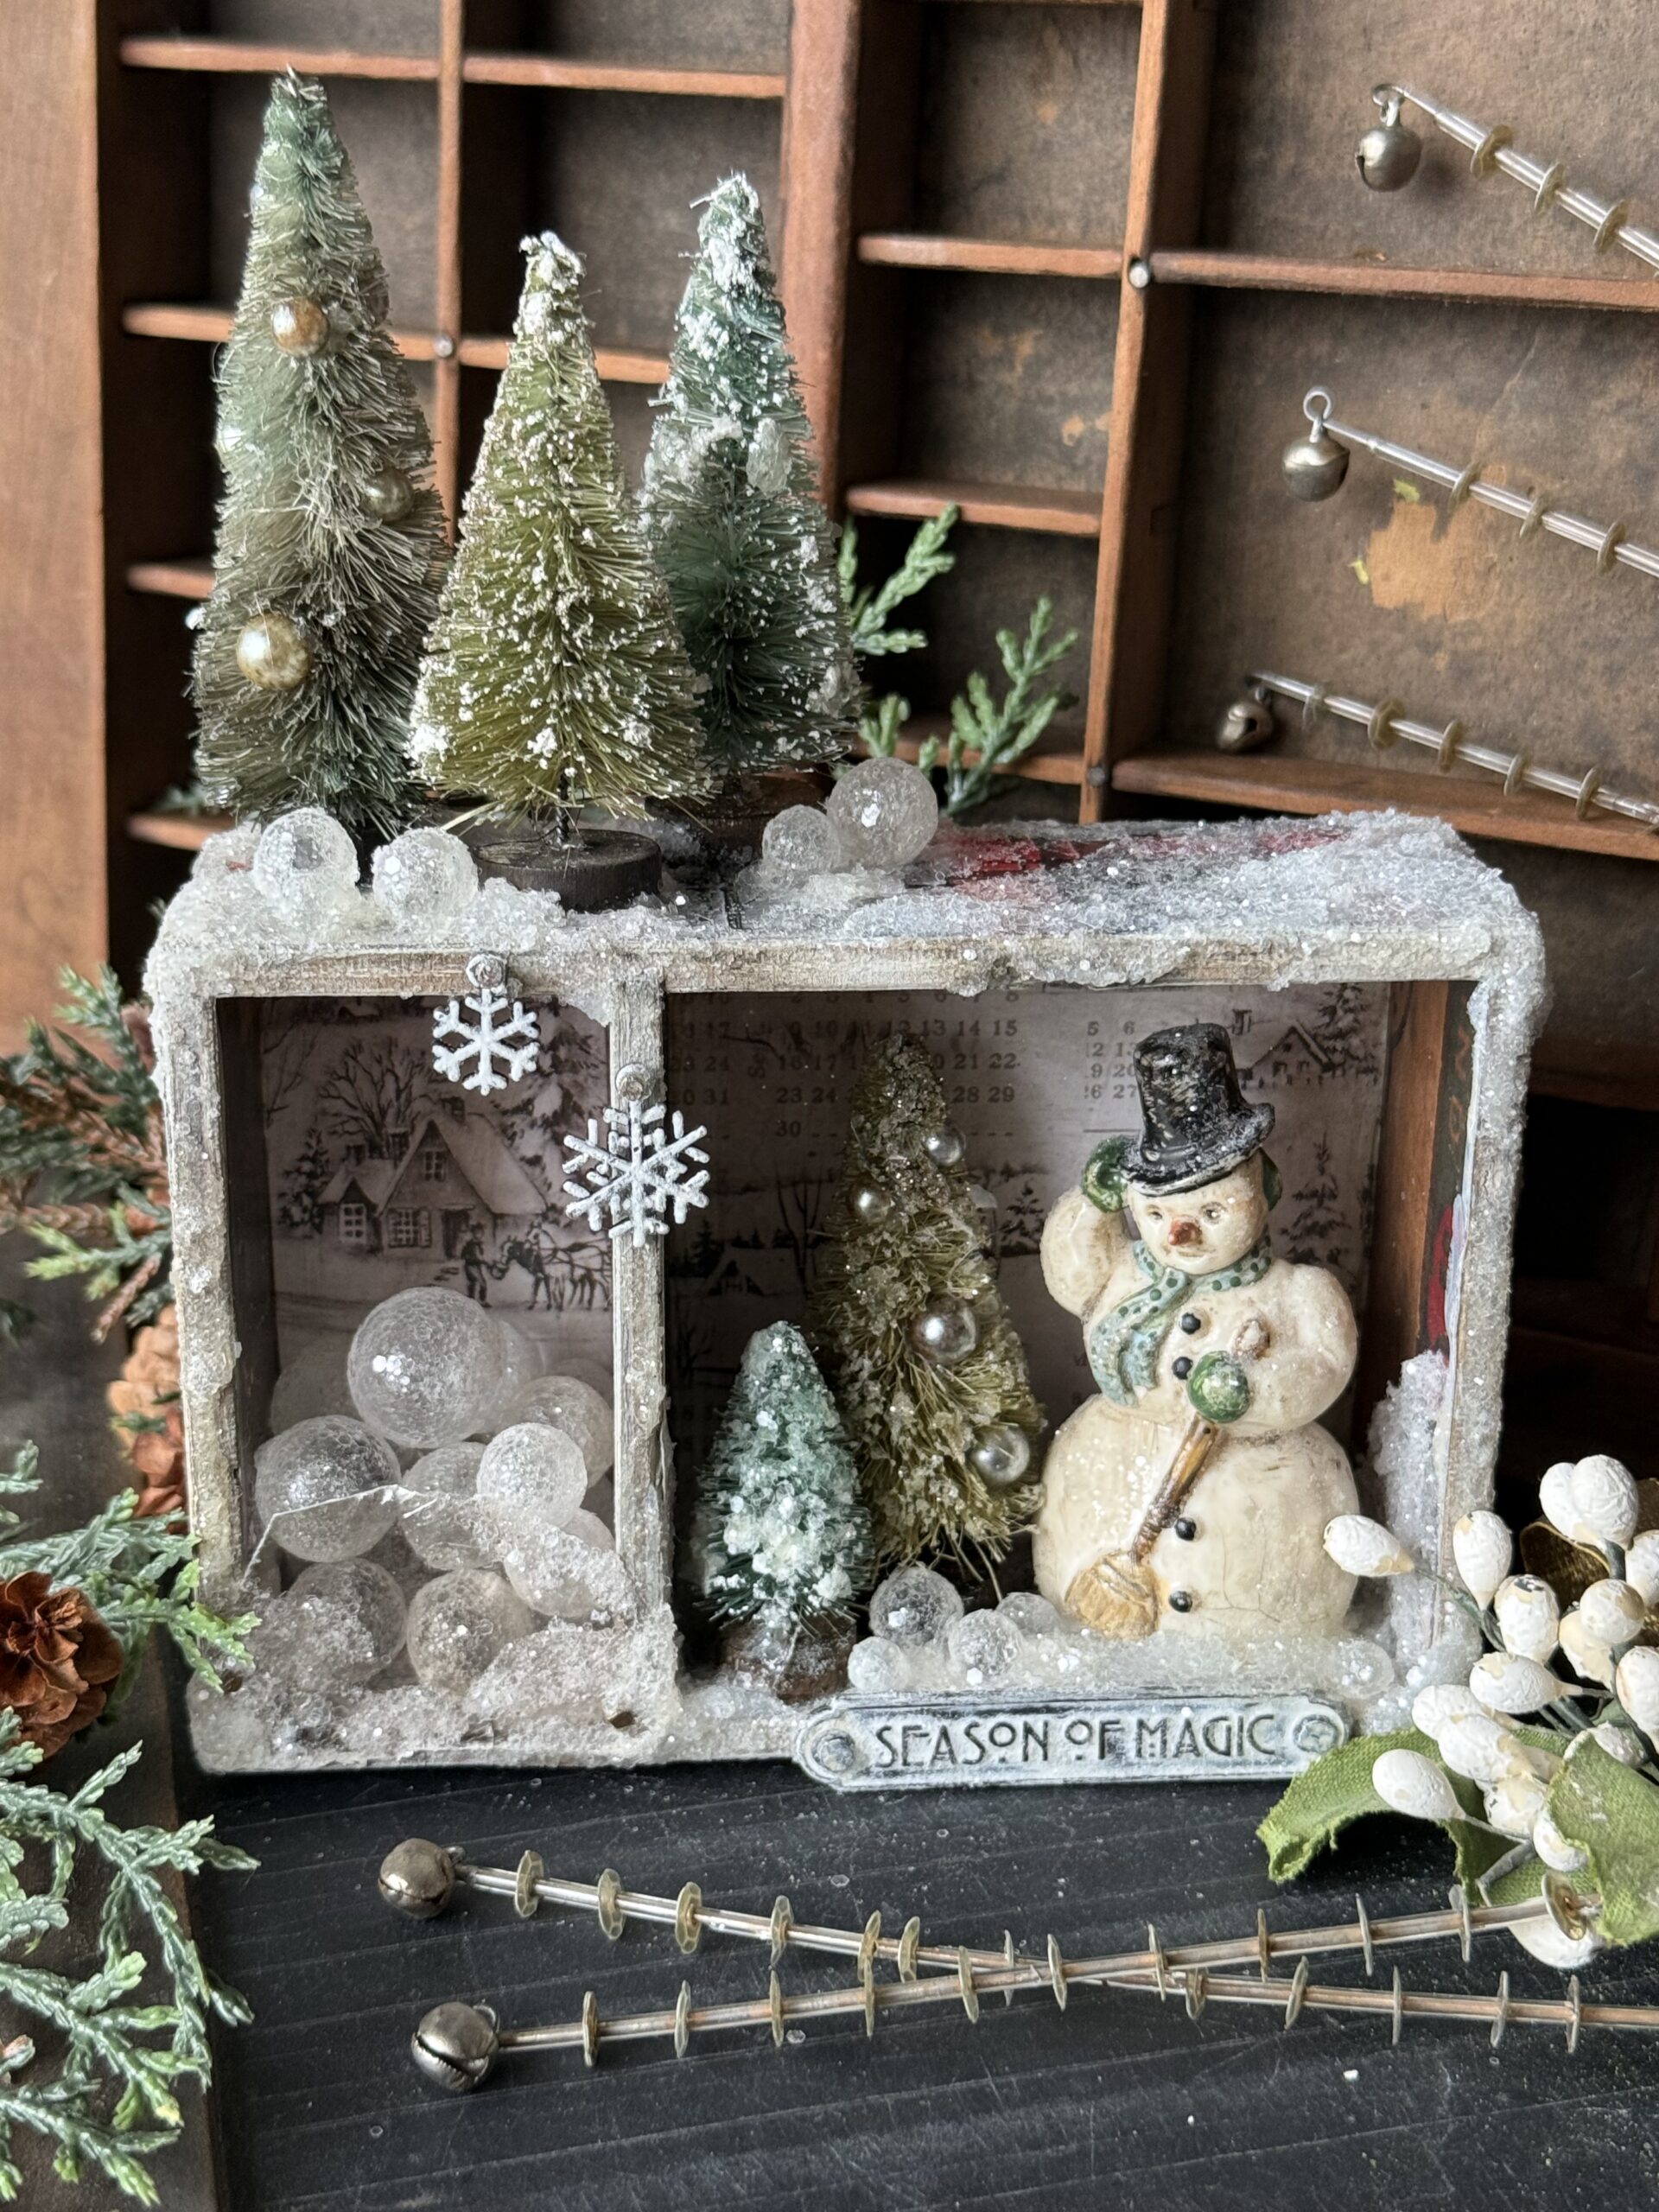
Hello friends…Happy Holidays! It sure is hard to believe that December 1st is right around the corner, this year has flown by so fast! I am back today sharing a project that I made using some of the new Tim Holtz Christmas idea-ology…every year Tim Holtz releases goodies for us to use, making sure crafty time is filled to the brim with holiday making goodies, and this year was not an exception! Tim Holtz has brought us another combination of holiday products that have been re-released and re-imagined in combinations that are sure to get those creative juices flowing..
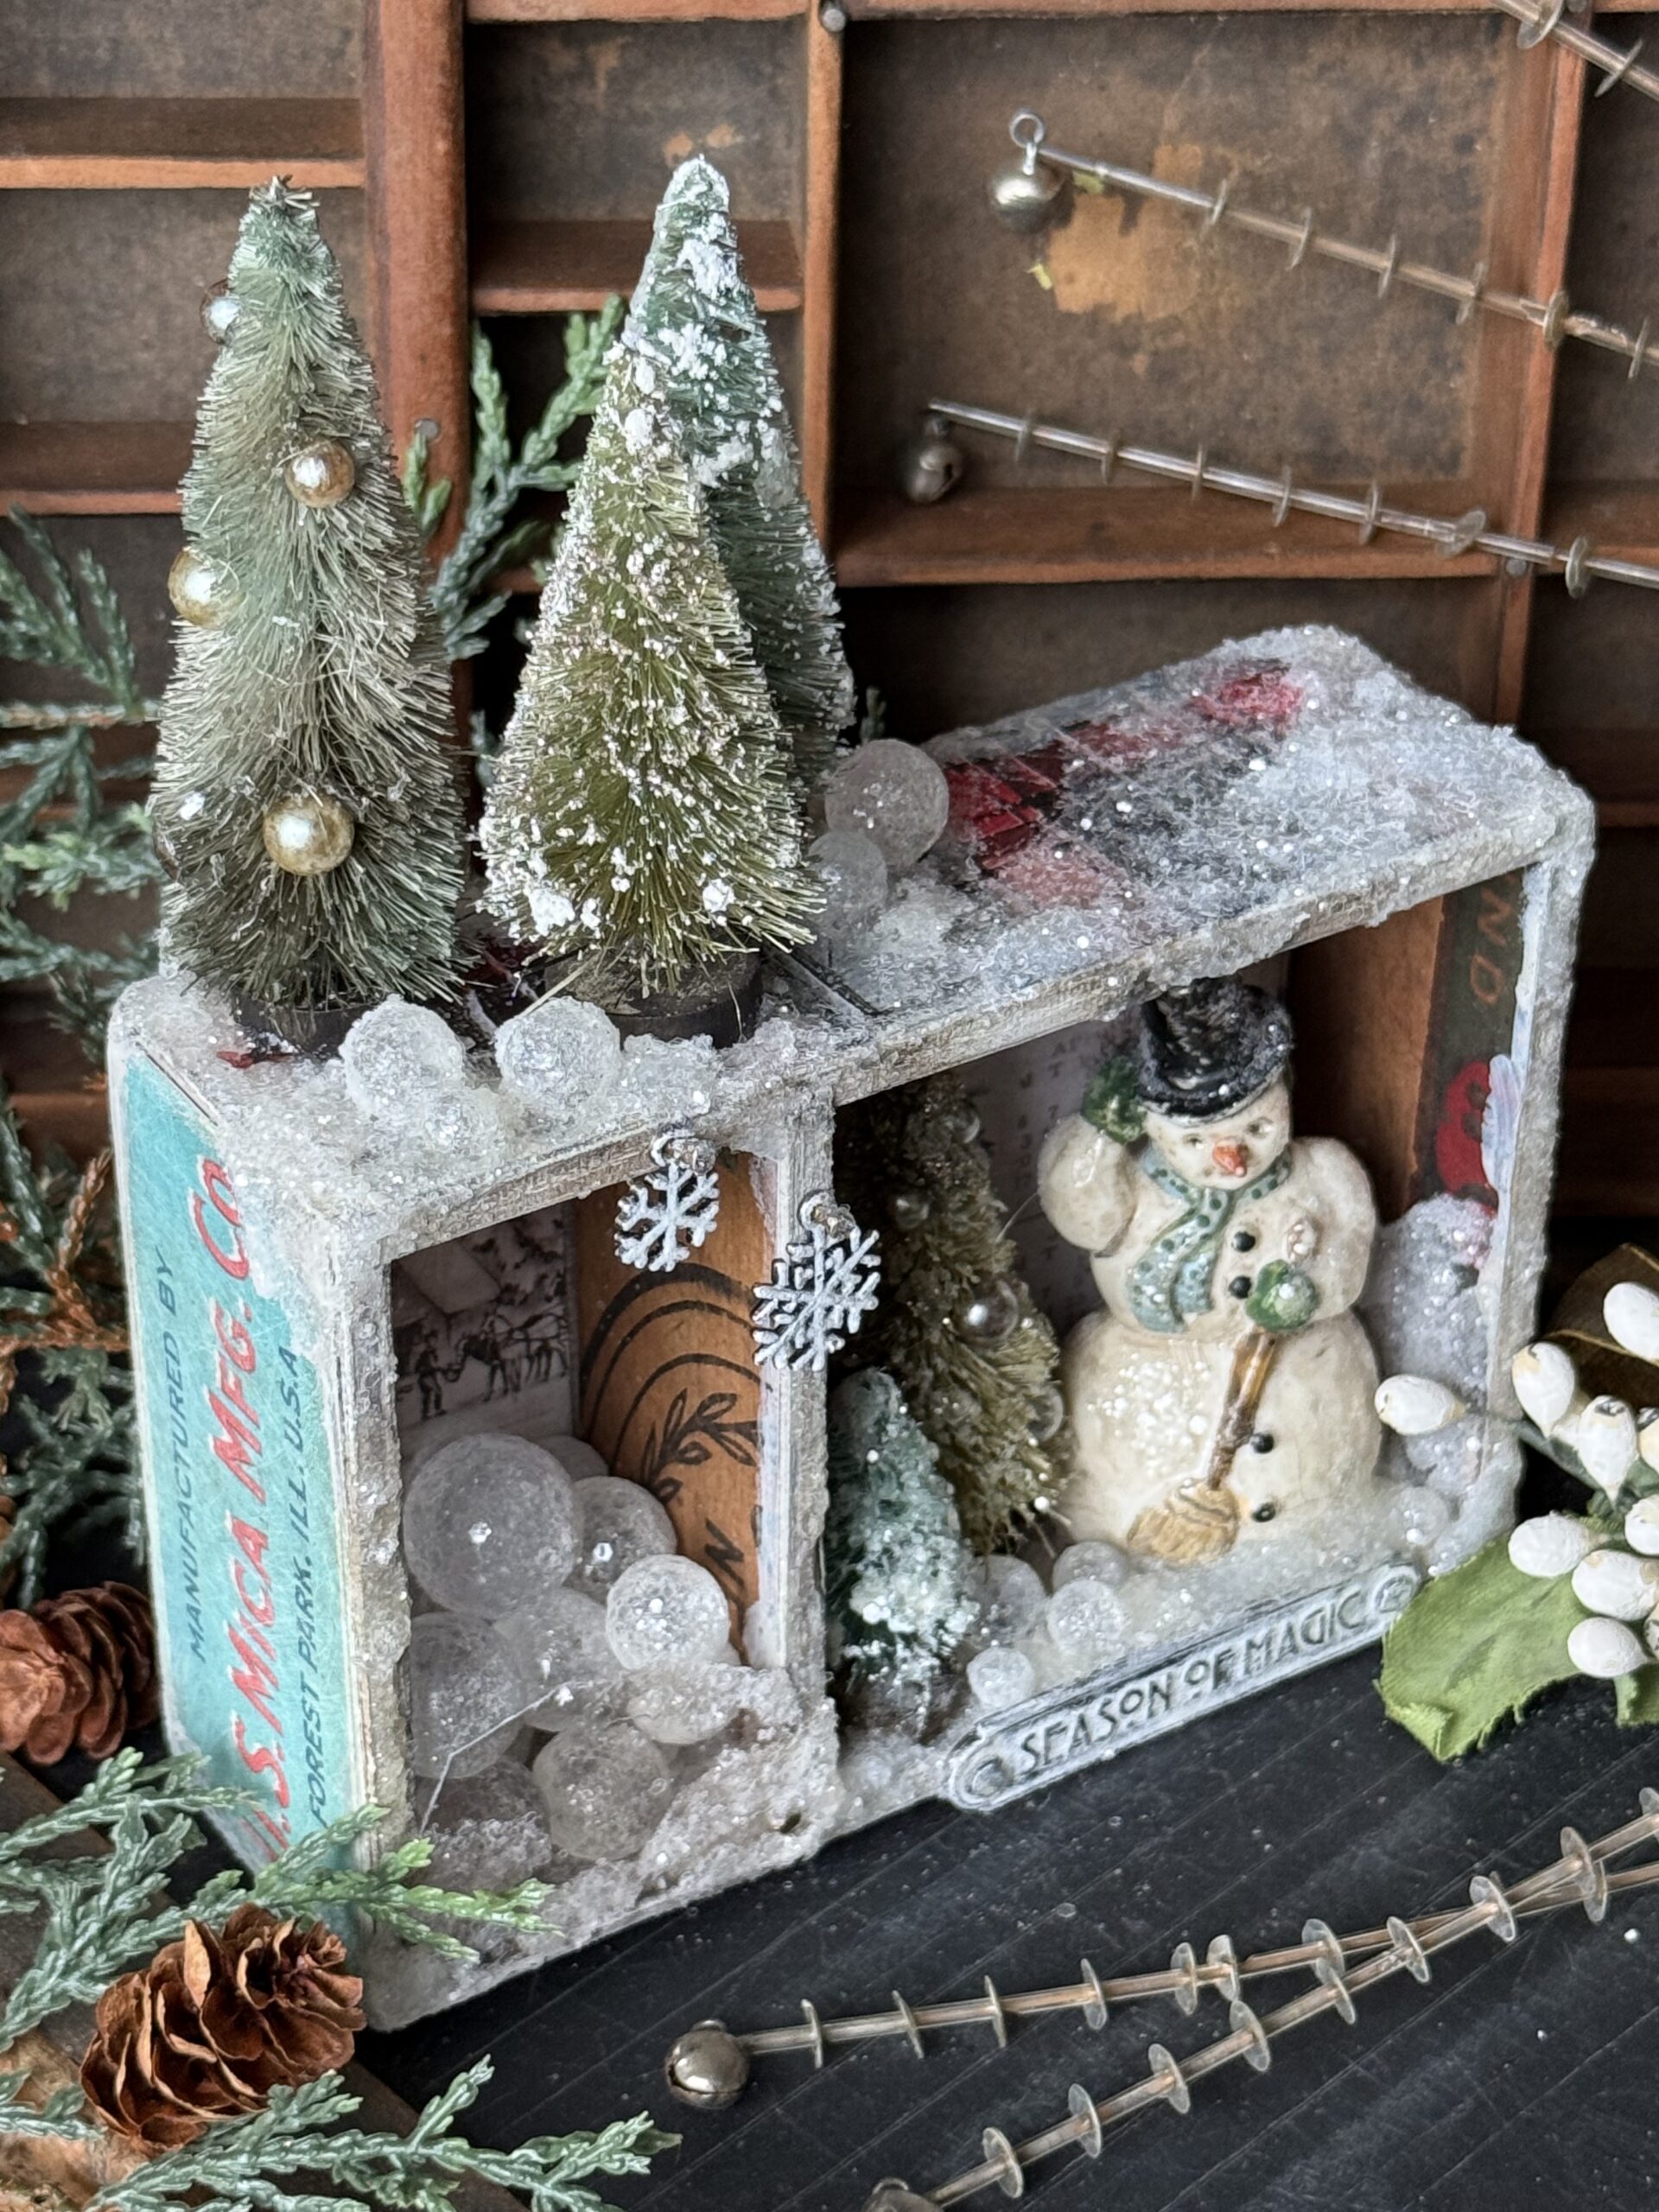
My project today features the mini Salvaged Snowman which is one of 3 figures in the mini Salvaged Figures Collection. I LOVE him and always have fun re-imagining him in different ways each year. He is so fun to paint and has the cutest little features…and his frosty little features are on full display with this project.
Snowballs anyone?

You know they are Frosty’s favorite…to make, to play with or perfect to decorate a frosty little scene.
So, let’s get to making!
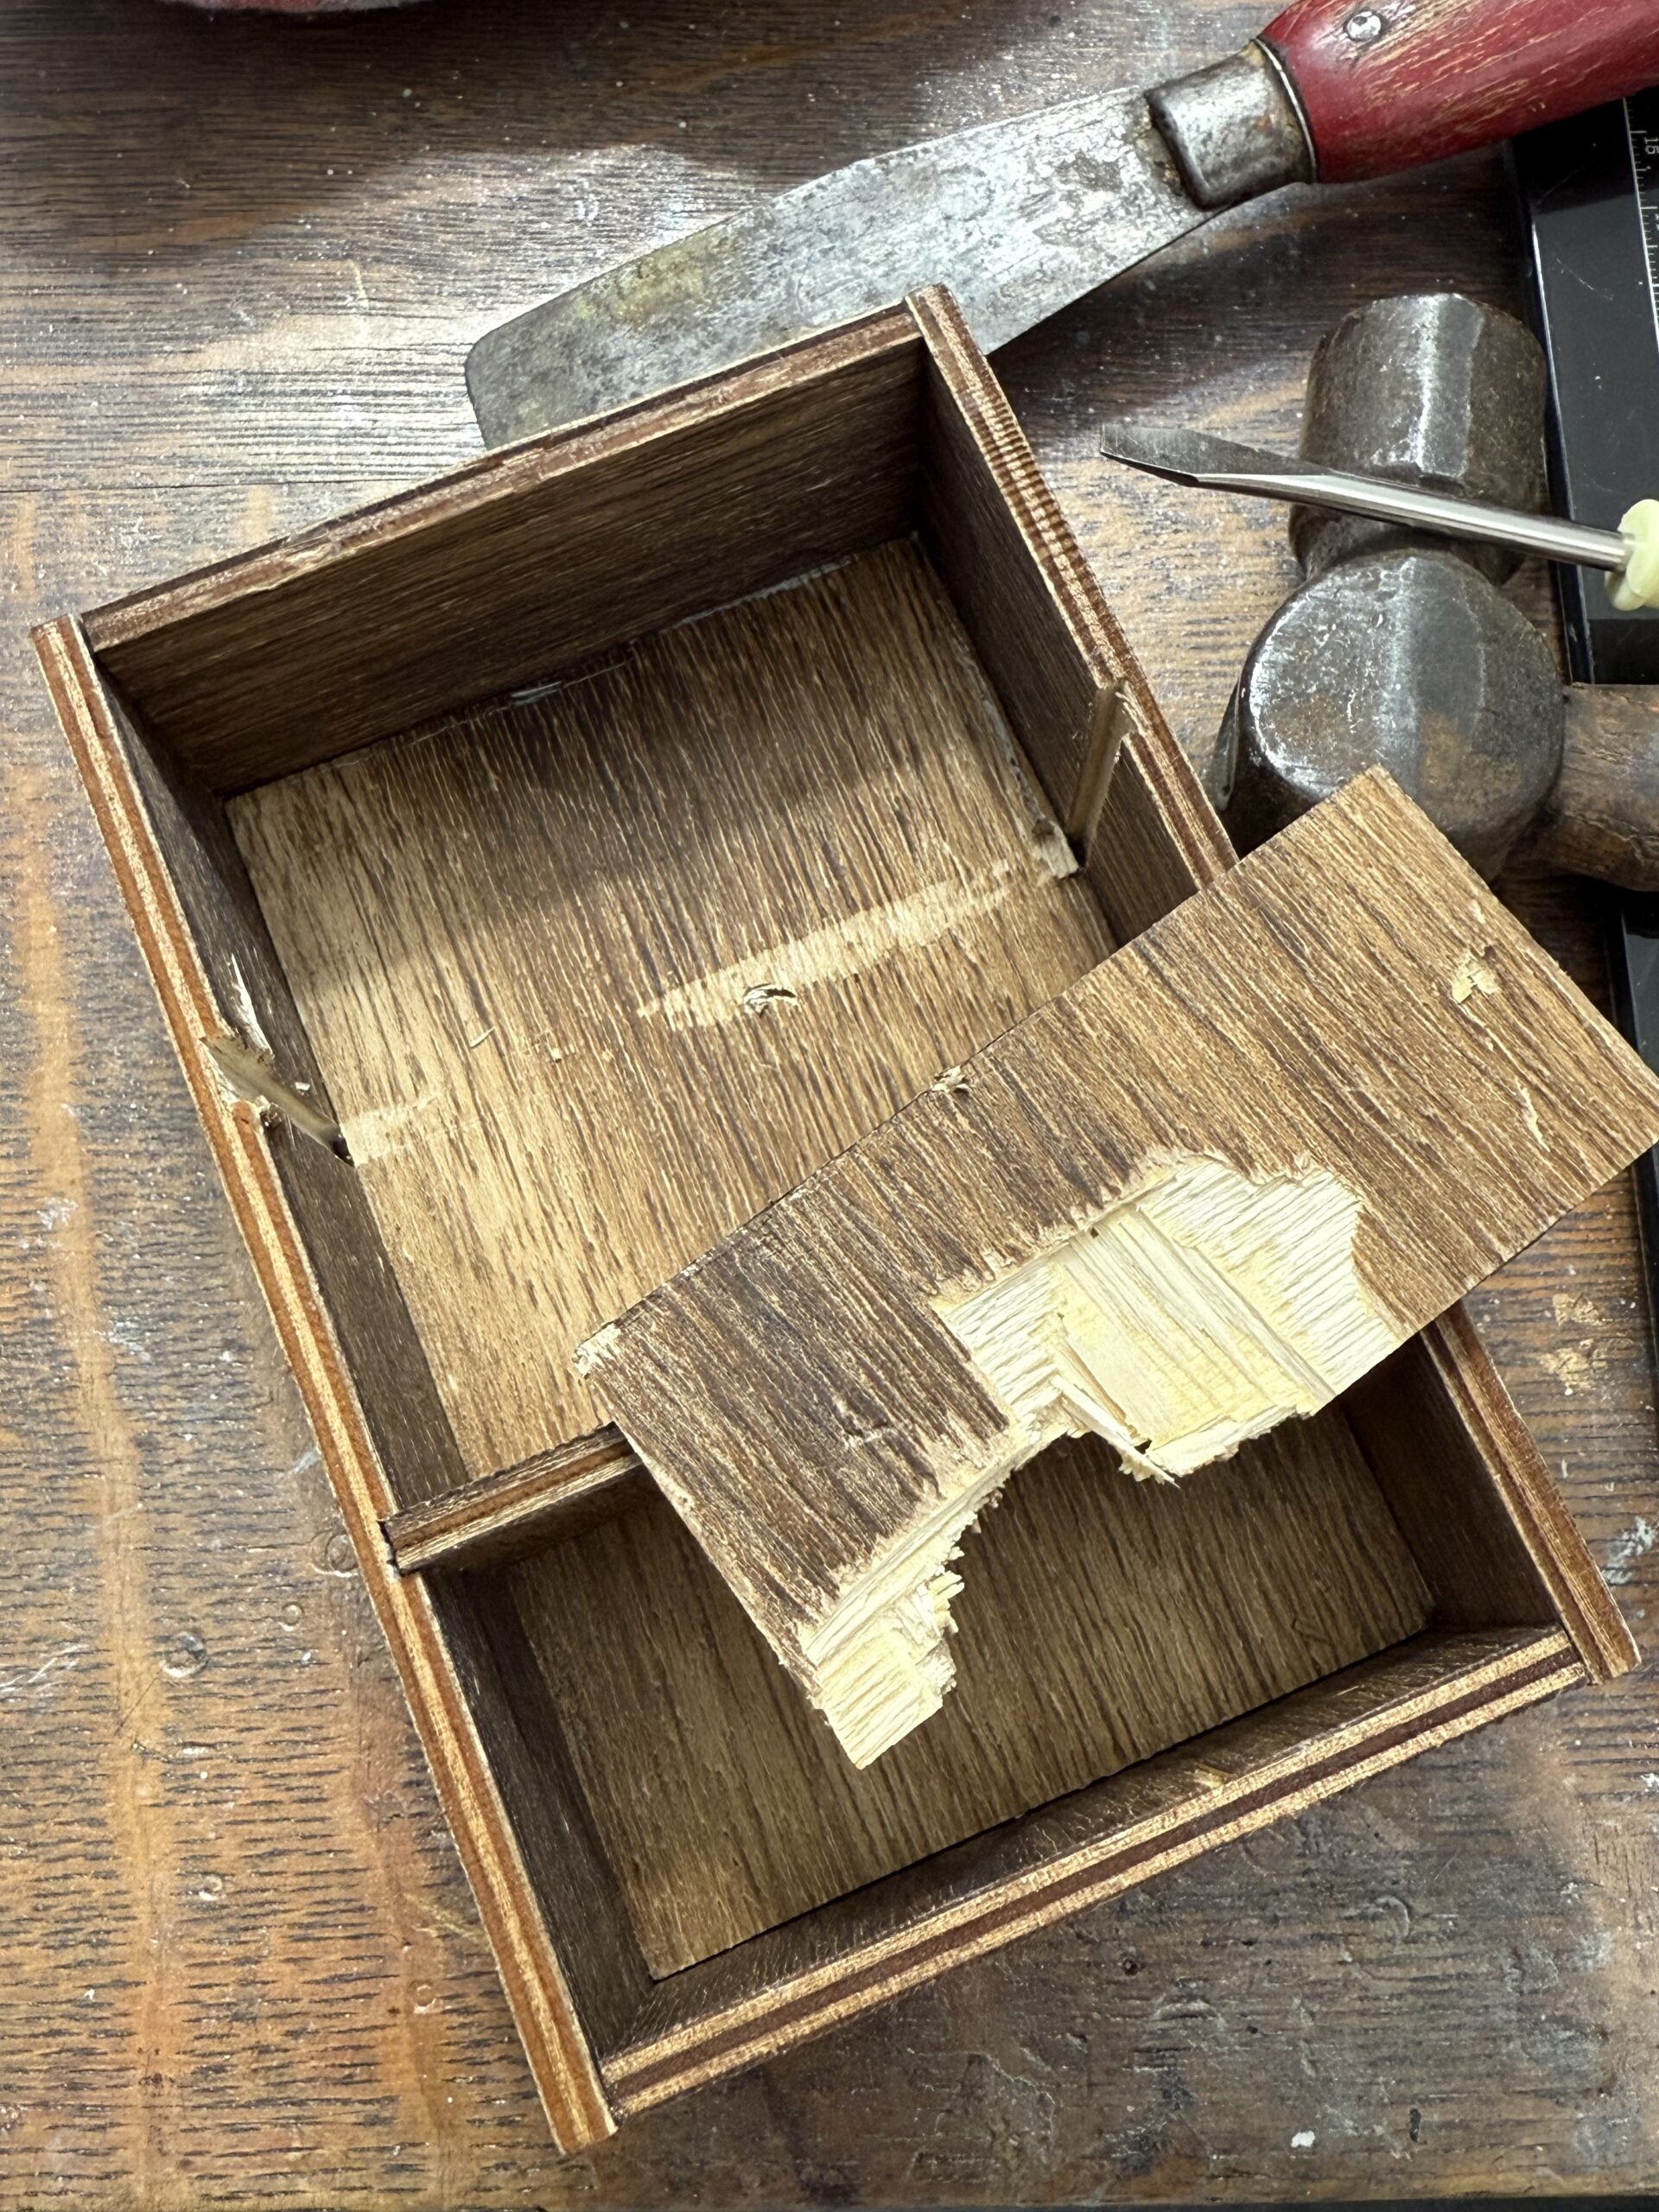
I started with an idea-ology card file that I used as the base of my project. I just tweaked the vignette a little by removing one of the sections using a couple hand tools to loosen it, and then pulled it out to make room for the little guy and his trees. The vignettes are the perfect bases for projects, but sometimes they need some renovating when the imagination takes over.
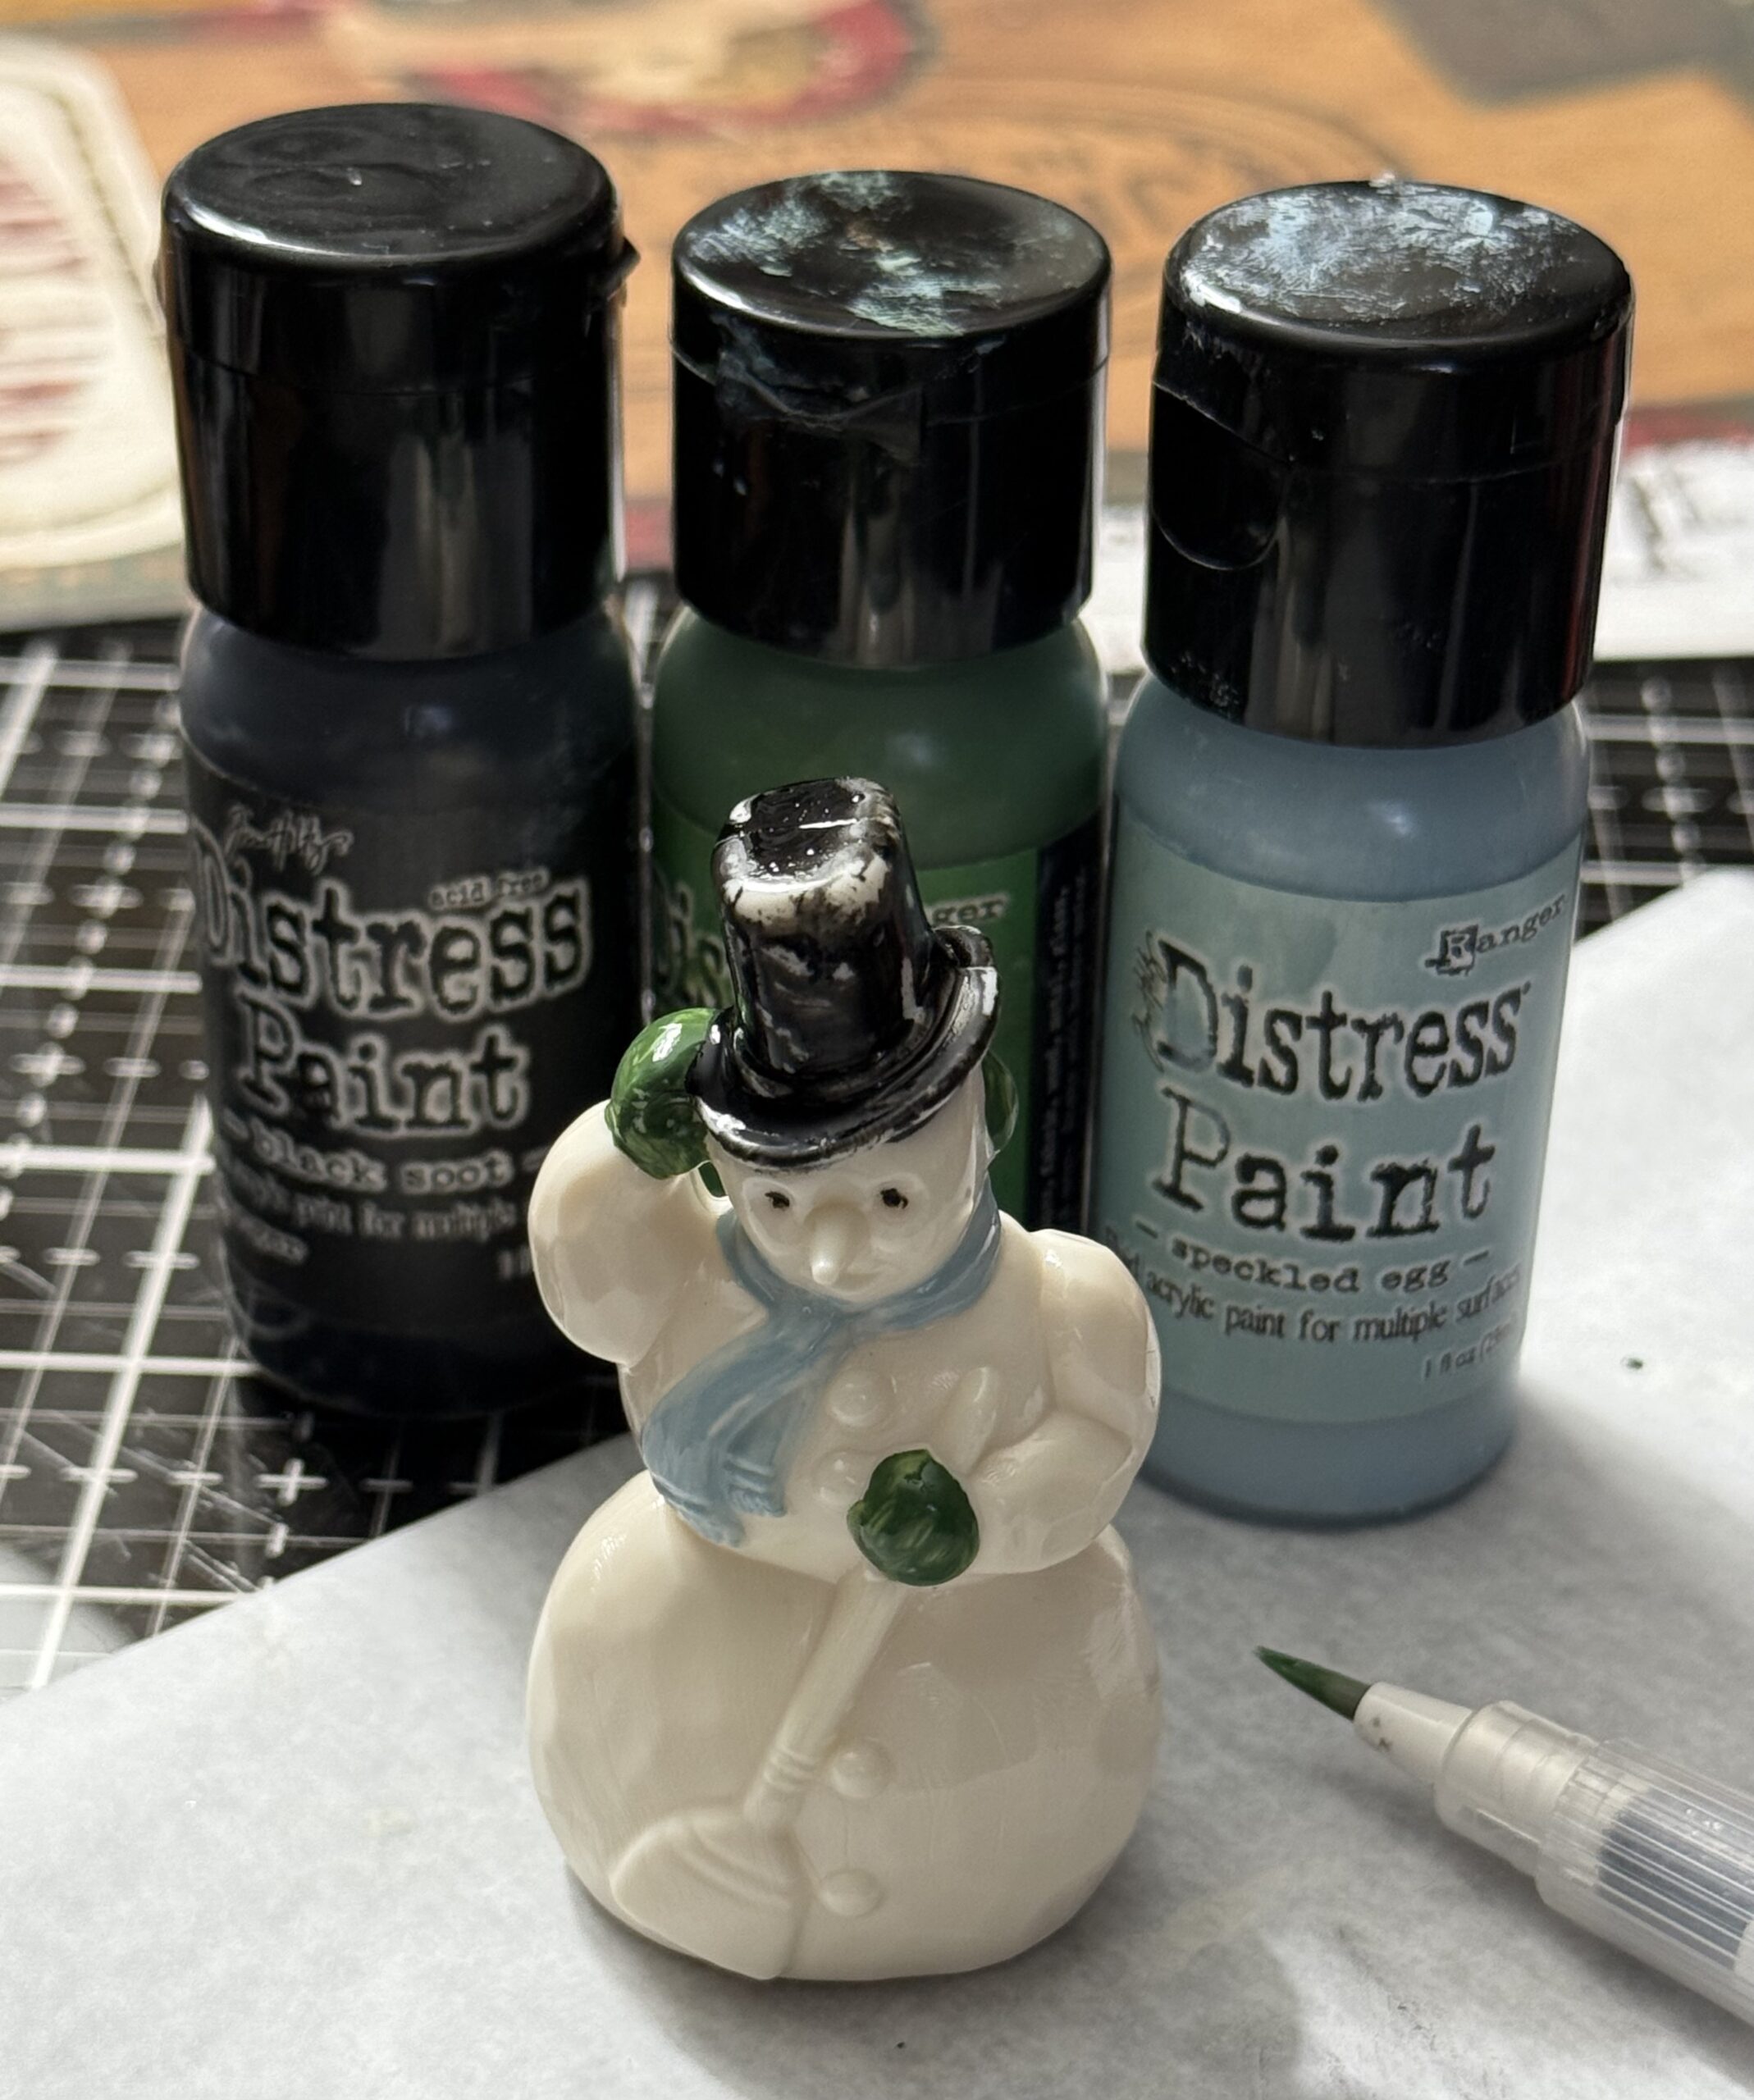
Once I had the self removed, I set it aside and began working on my snowman…I knew I wanted to go with a frosty theme, so I chose some cooler colors. His scarf and mittens were painted first using Speckled Egg and Rustic Wilderness. His Hat was (of course) painted black.
Before the paint was dry on his hat, I used a dry cotton towel to rub off some the paint to create a distressed look, then I set him aside to dry. Working in layers and letting them dry in-between, is the best way to paint these little guys…for more painting ideas for the snowman, you can CLICK HERE to see some of my other posts featuring them.
After the first layer of paint was dry, I added paint to the broom, his buttons, his nose and to give him some more personality, some polkadots on his scarf. This was done by using a stylus. I just dipped the stylus into some paint that I had on my craft mat, then randomly added dots to create the look. Once I was done, I set him aside to dry before moving on to the next step, distressing him.
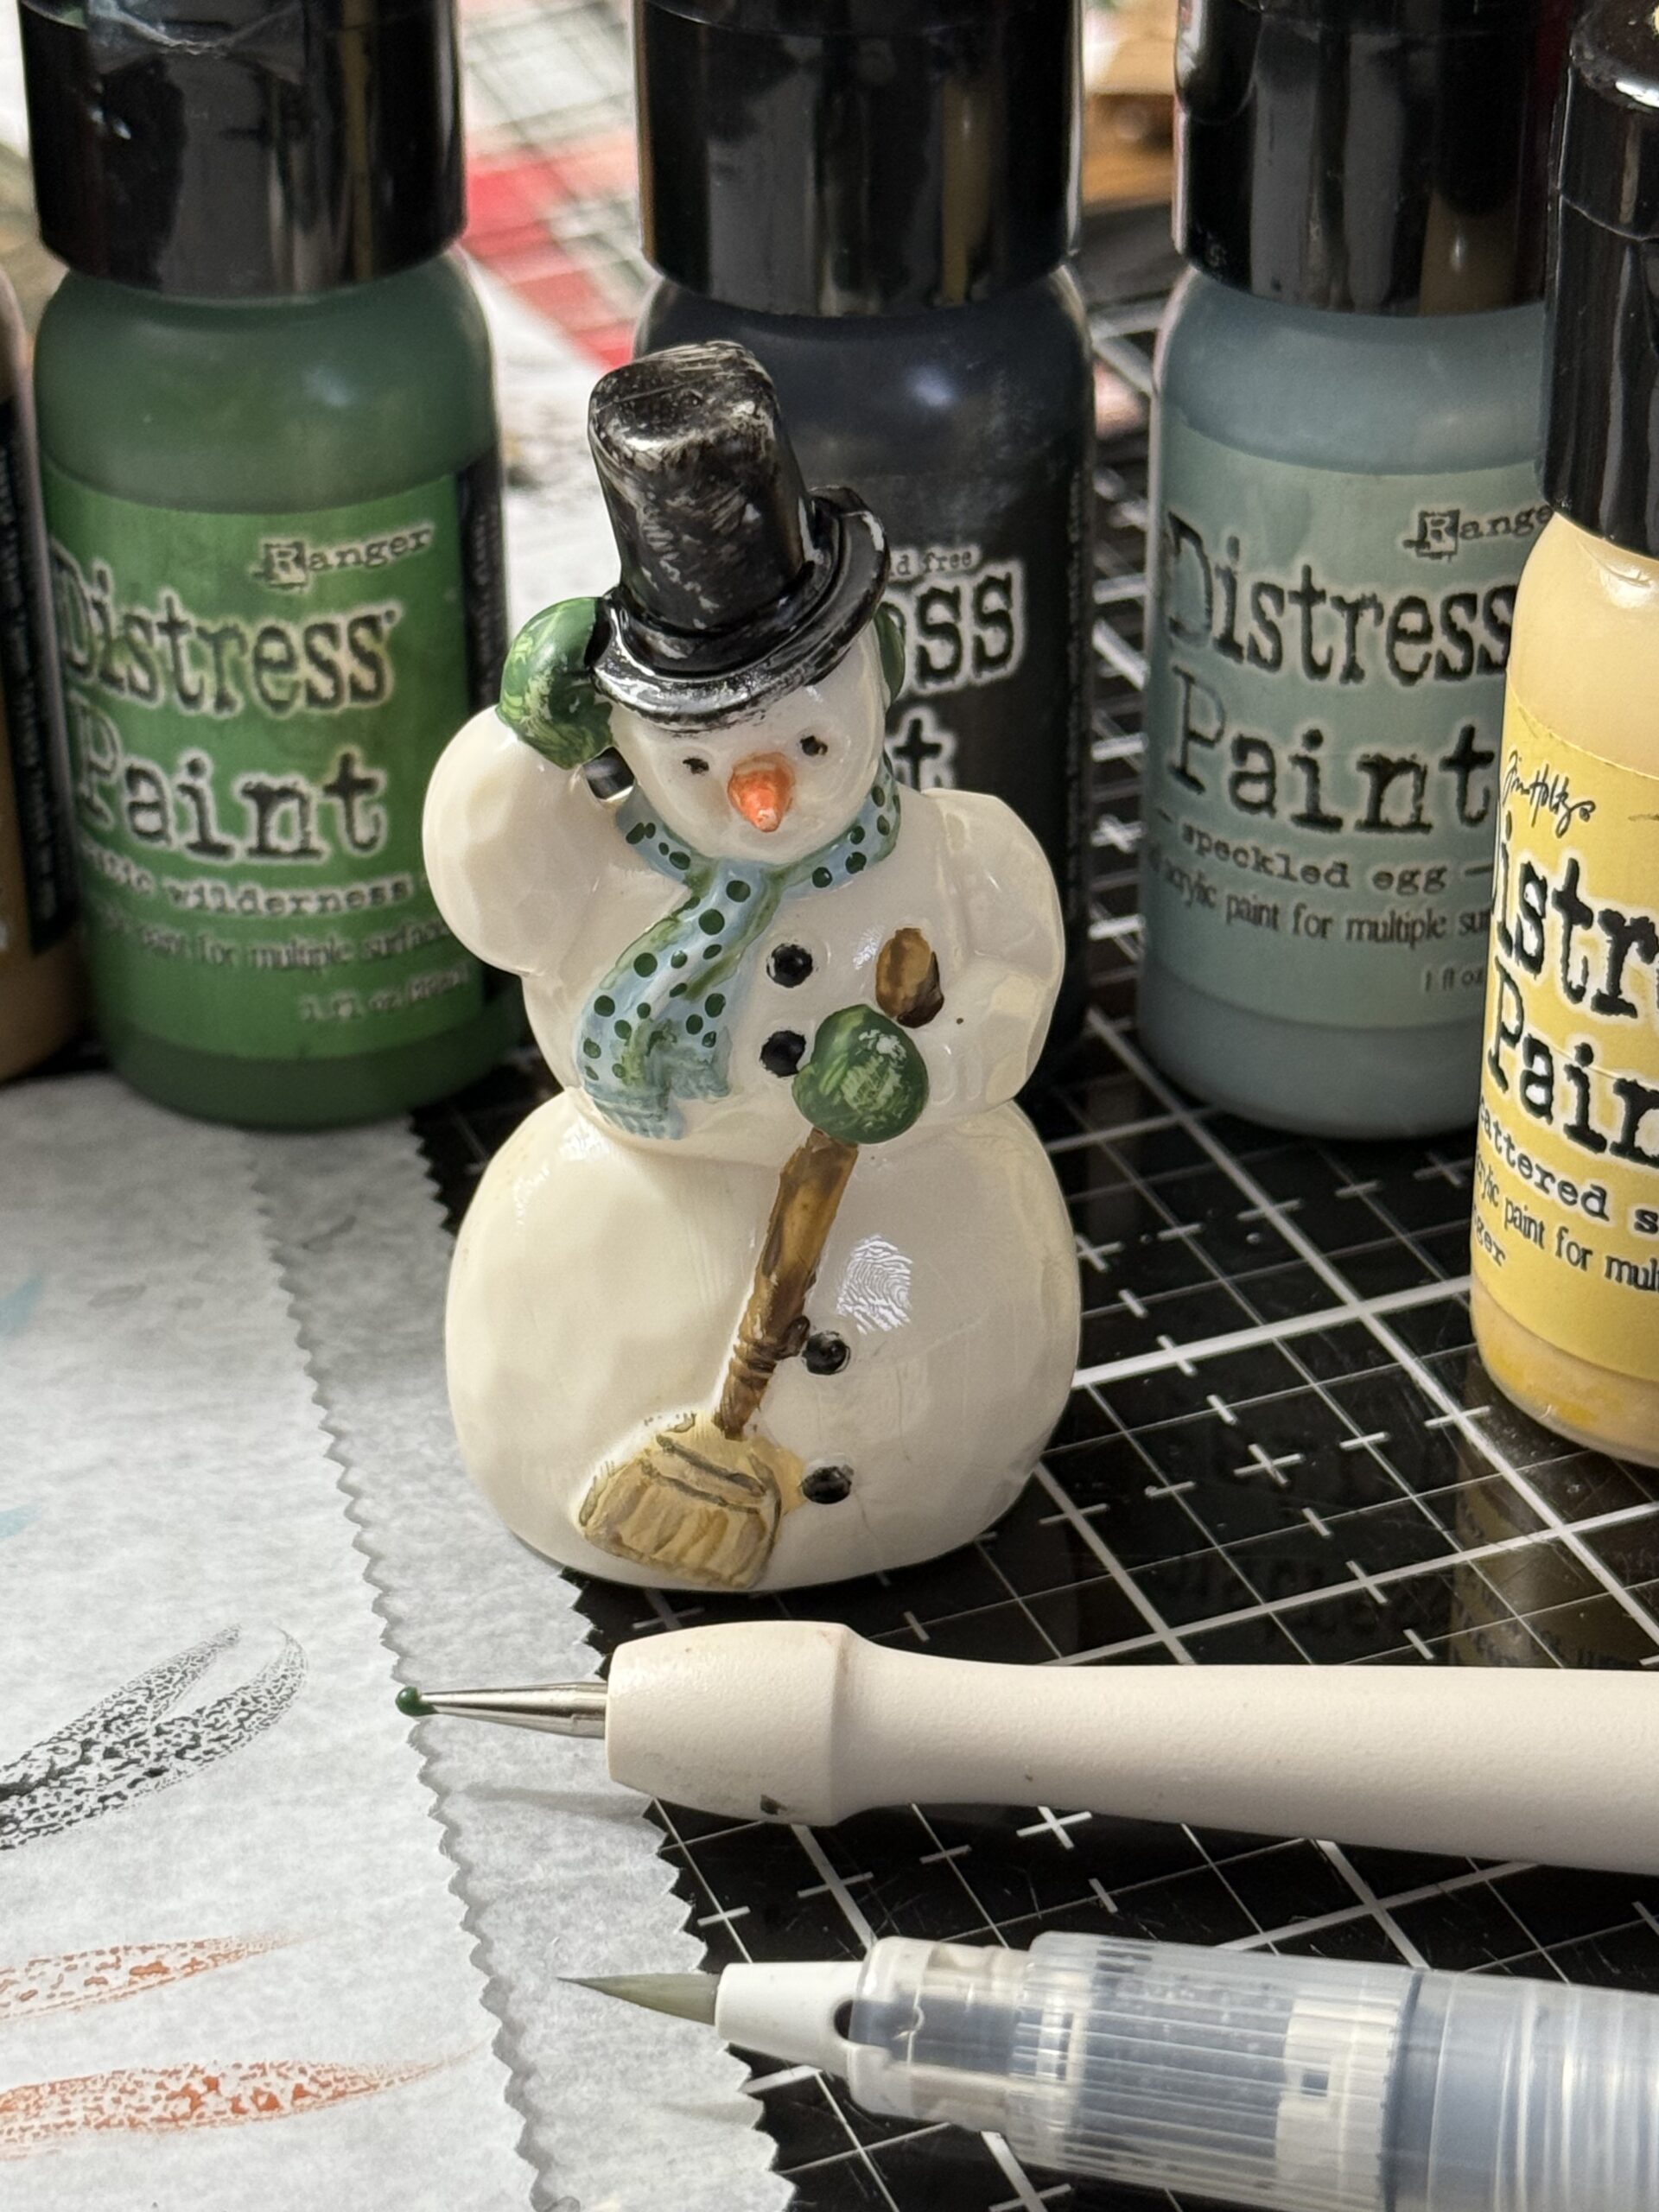
To add some age to him, I scribbled some Walnut Stain Distress Crayon onto my craft mat, then, using a damp paint brush, picked up some of the color and applied it into all the crevices on the snowman. You can see that the crayon/grunge rubs into the indentations on his body creating a little more personality and giving him an aged look.
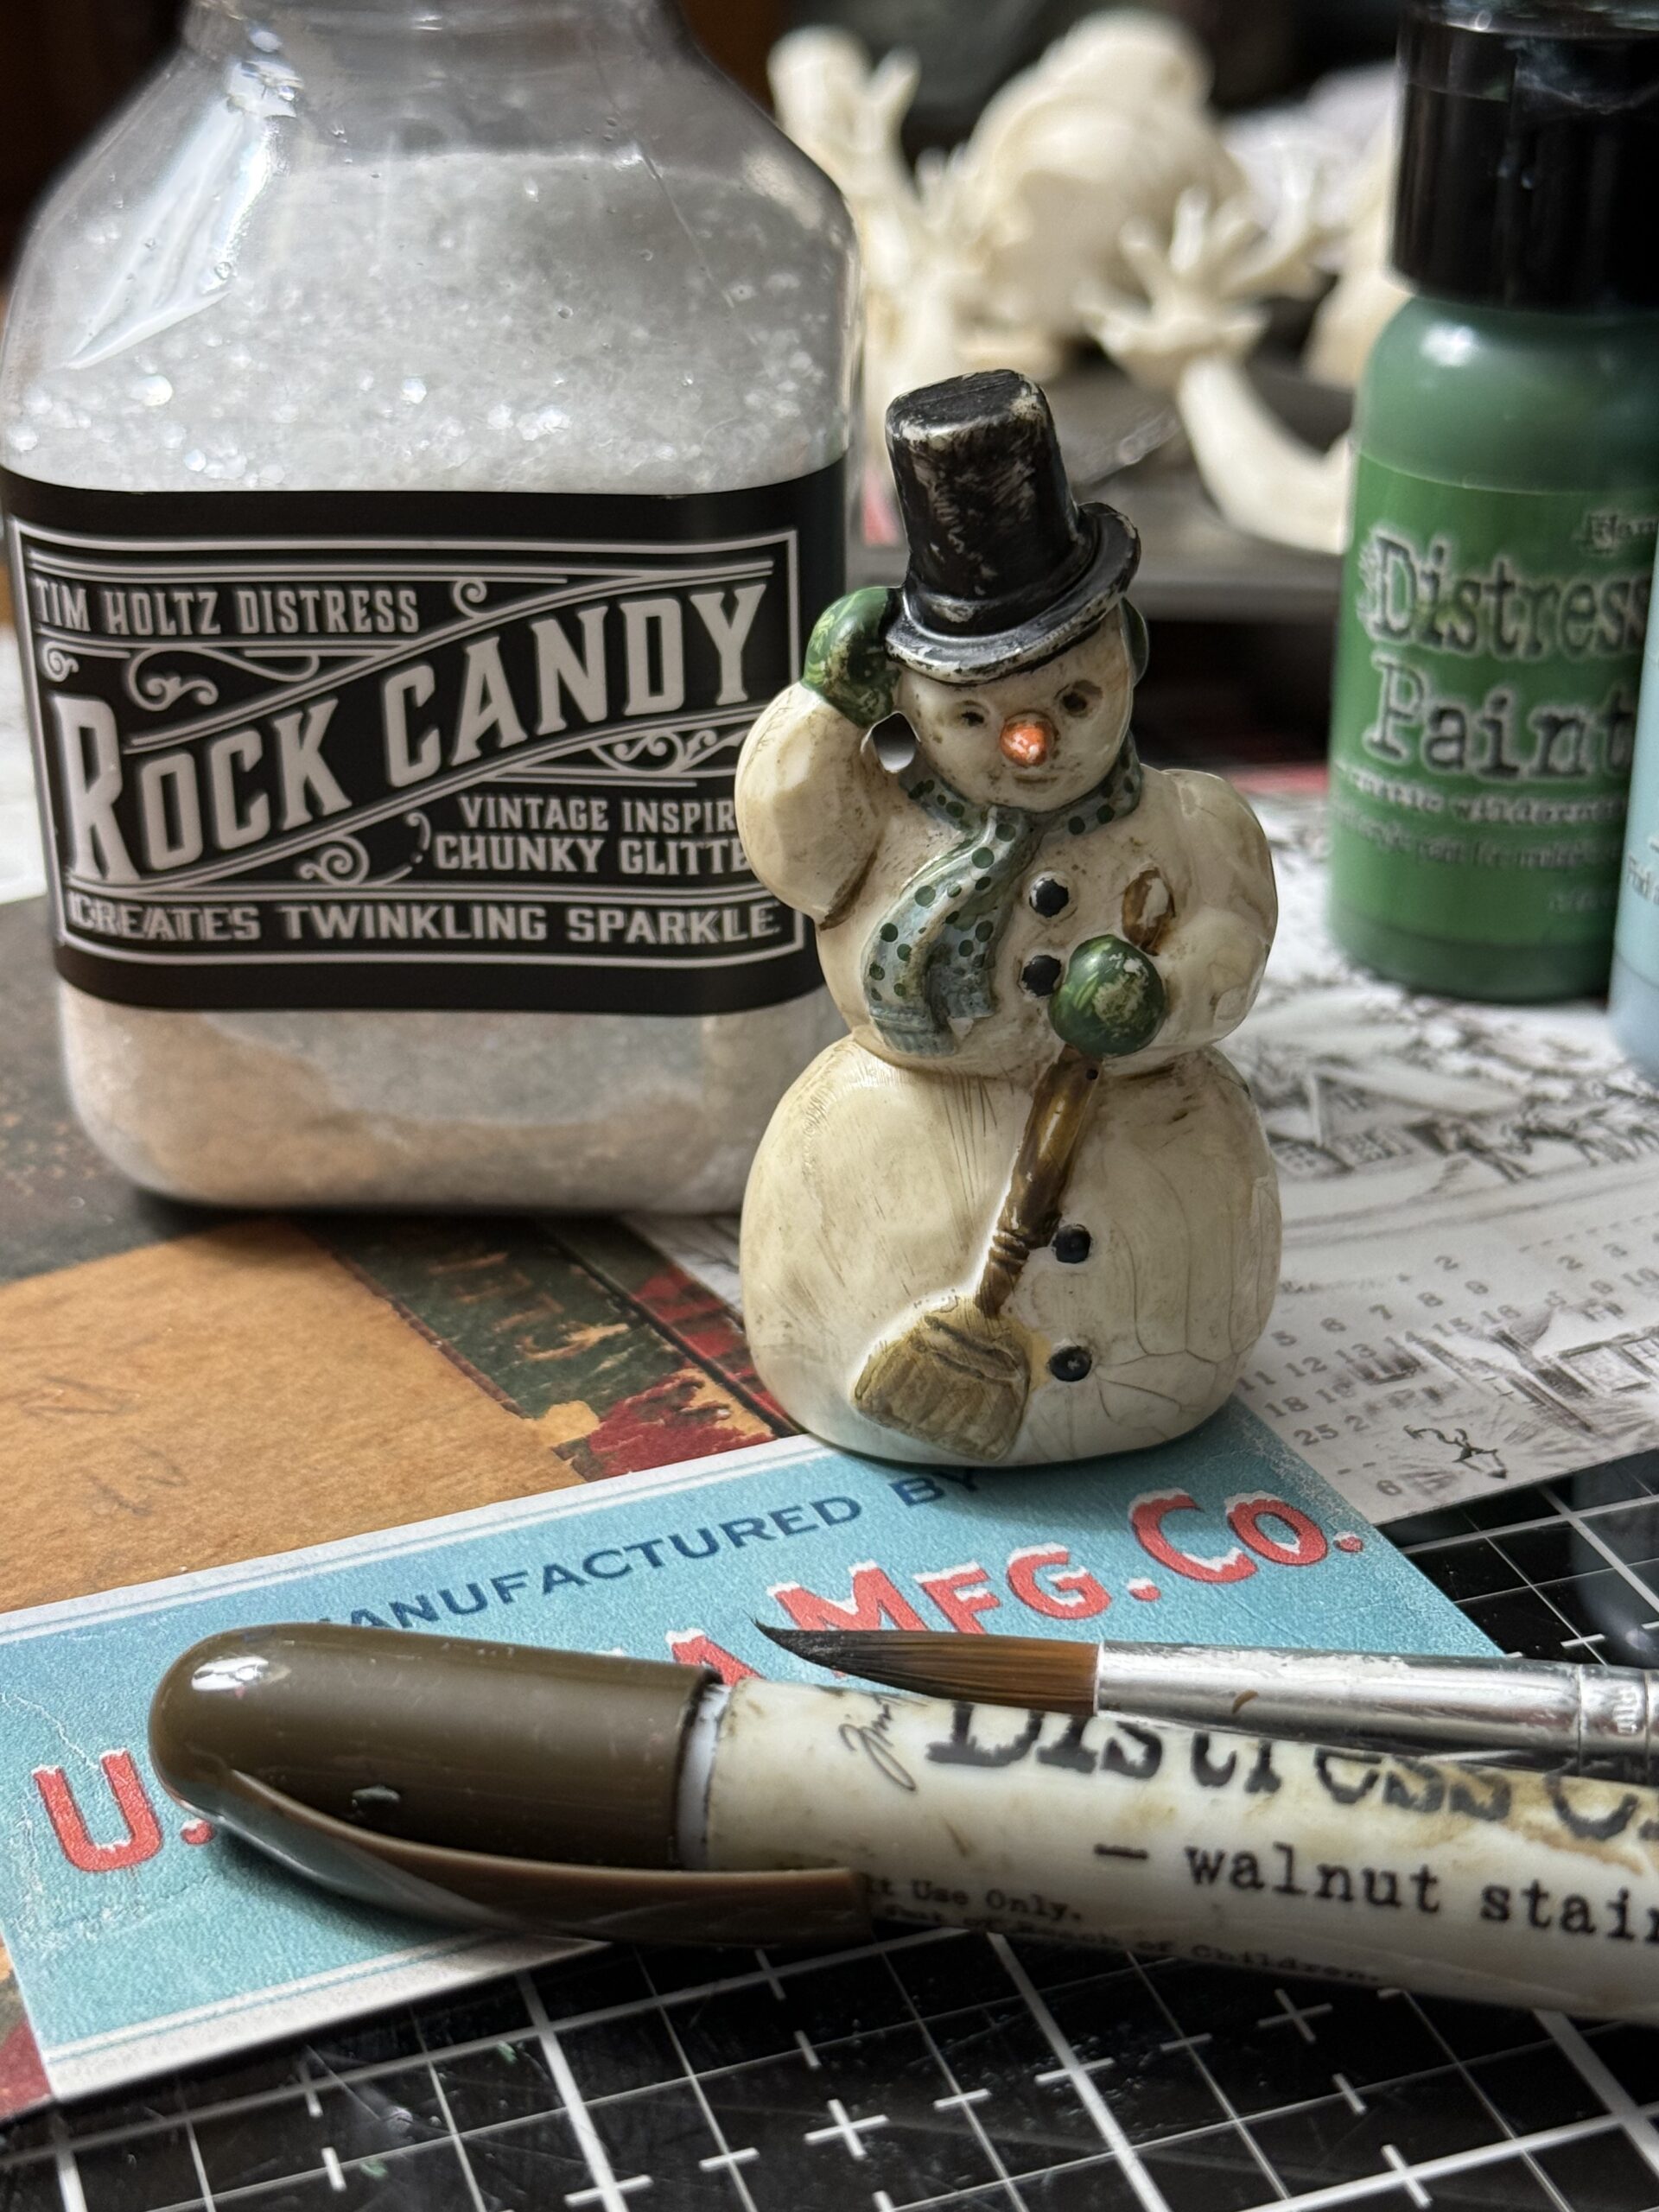
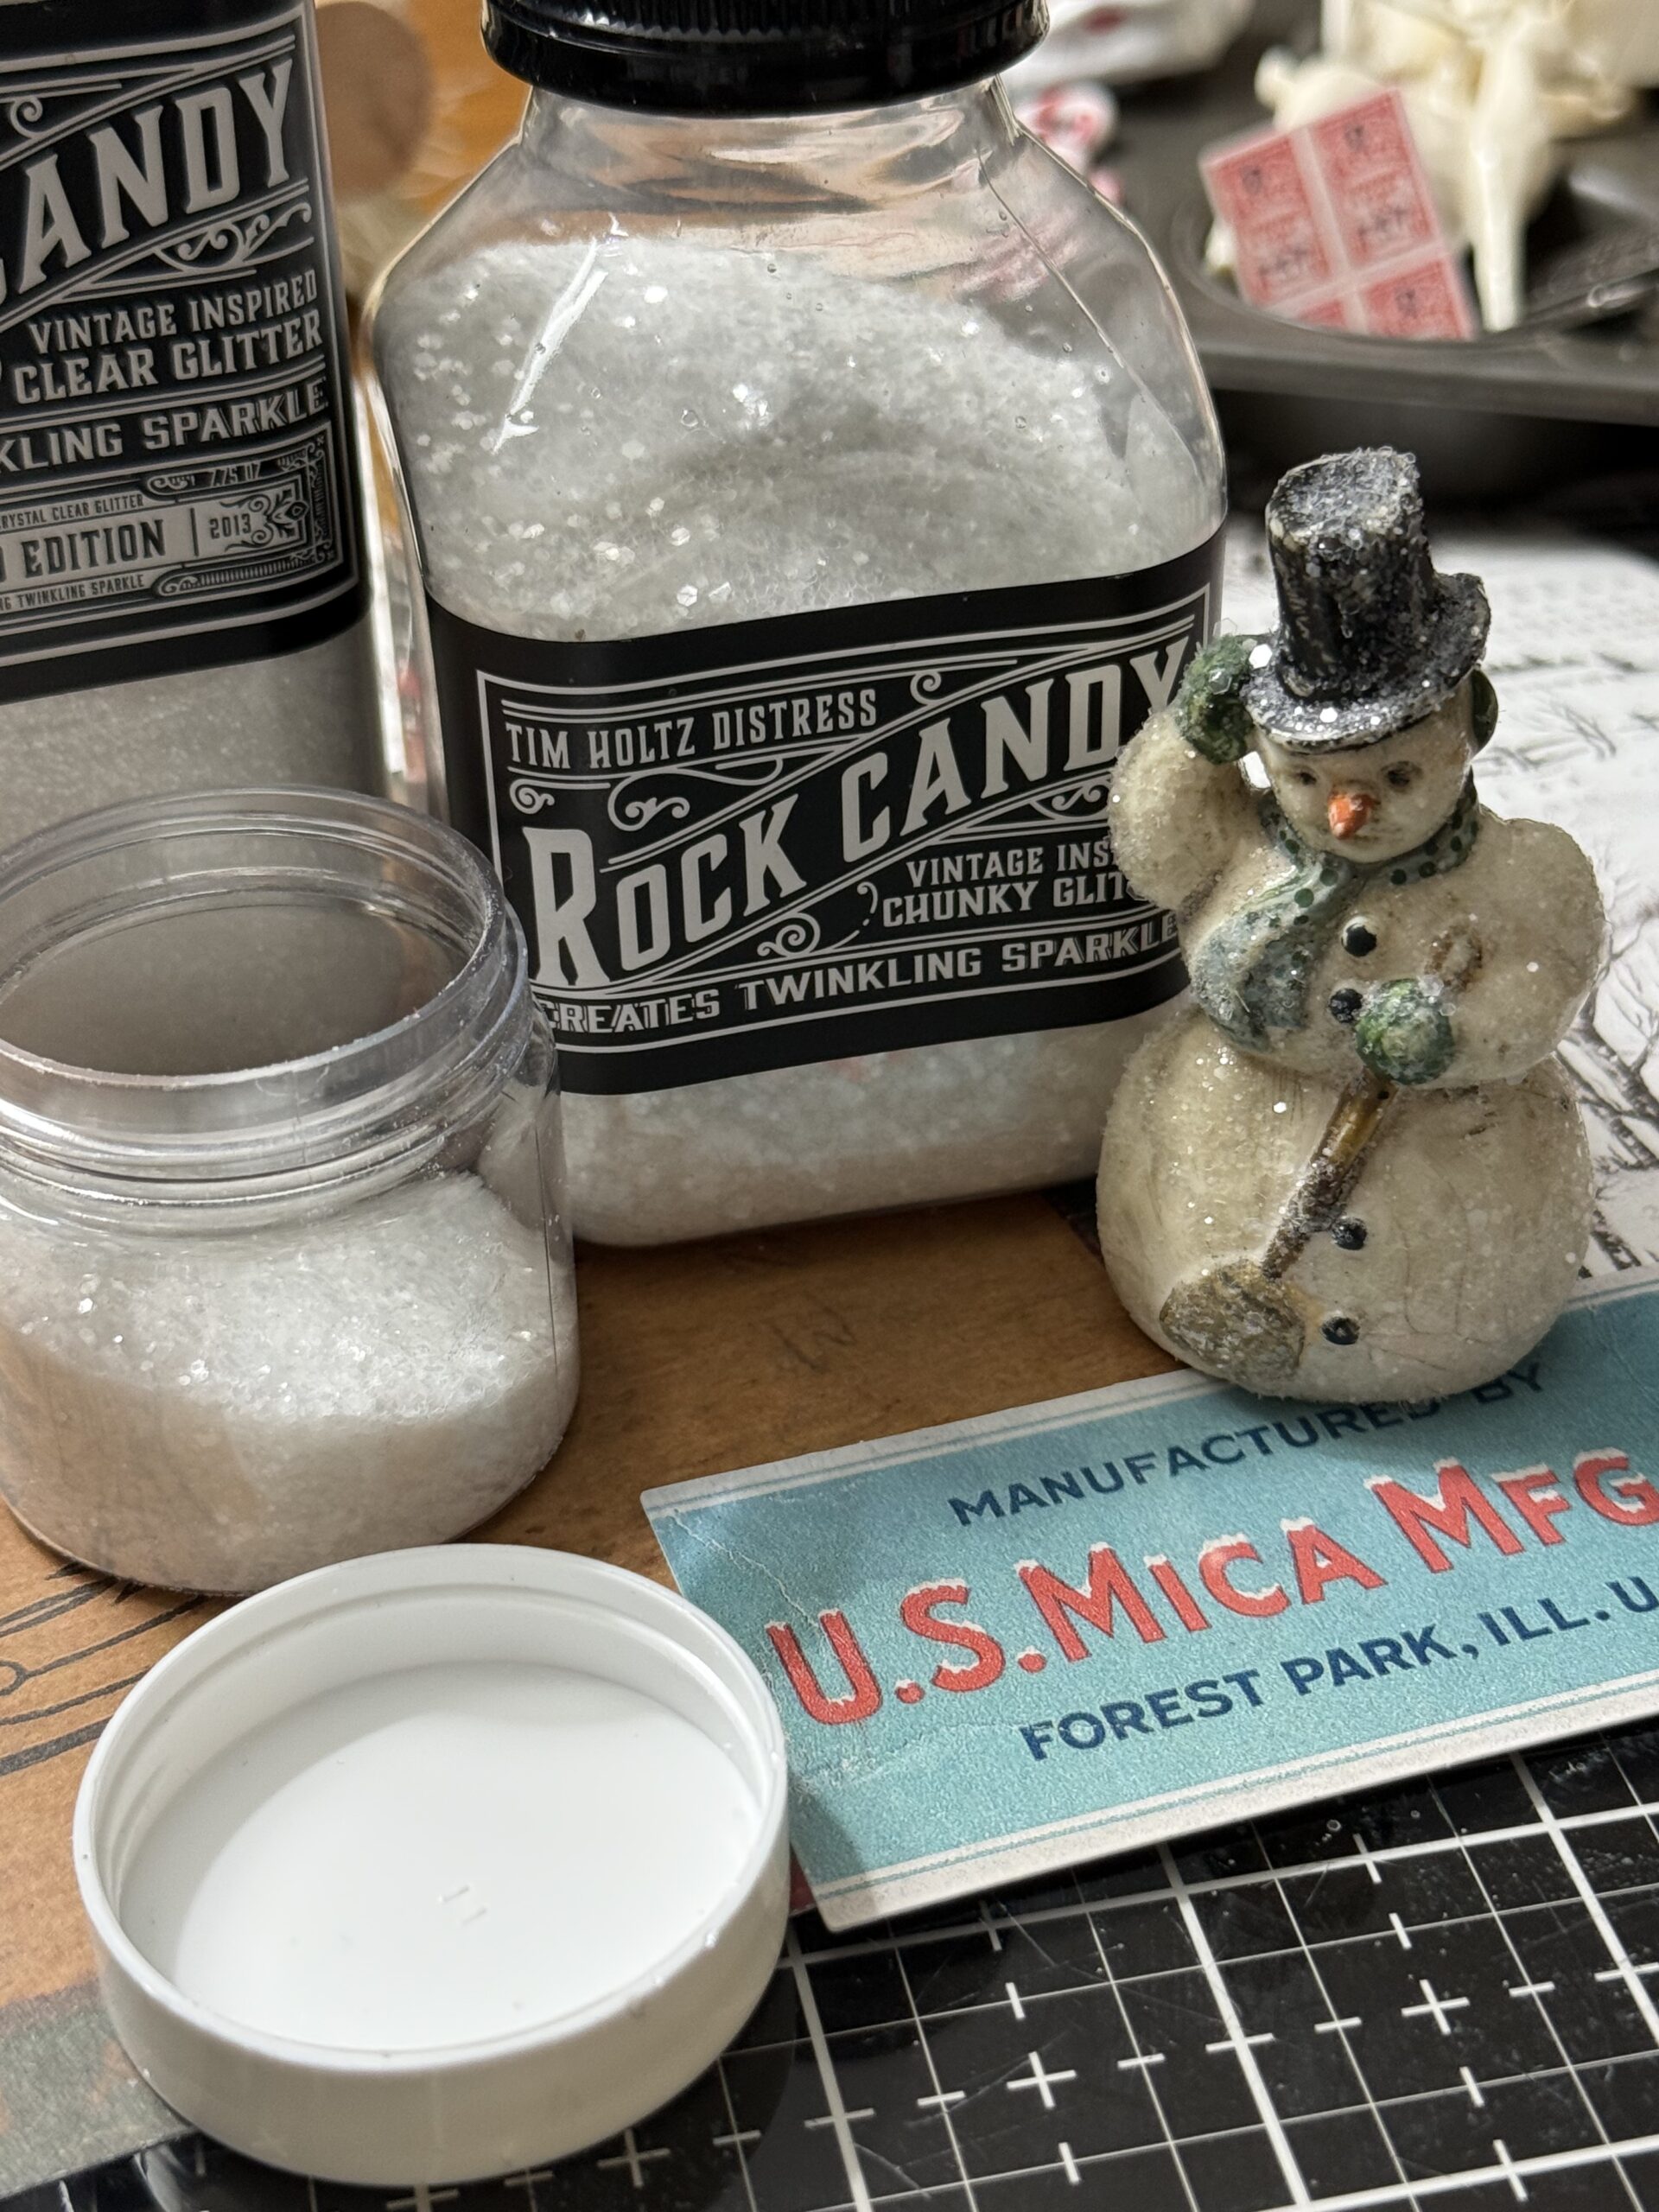
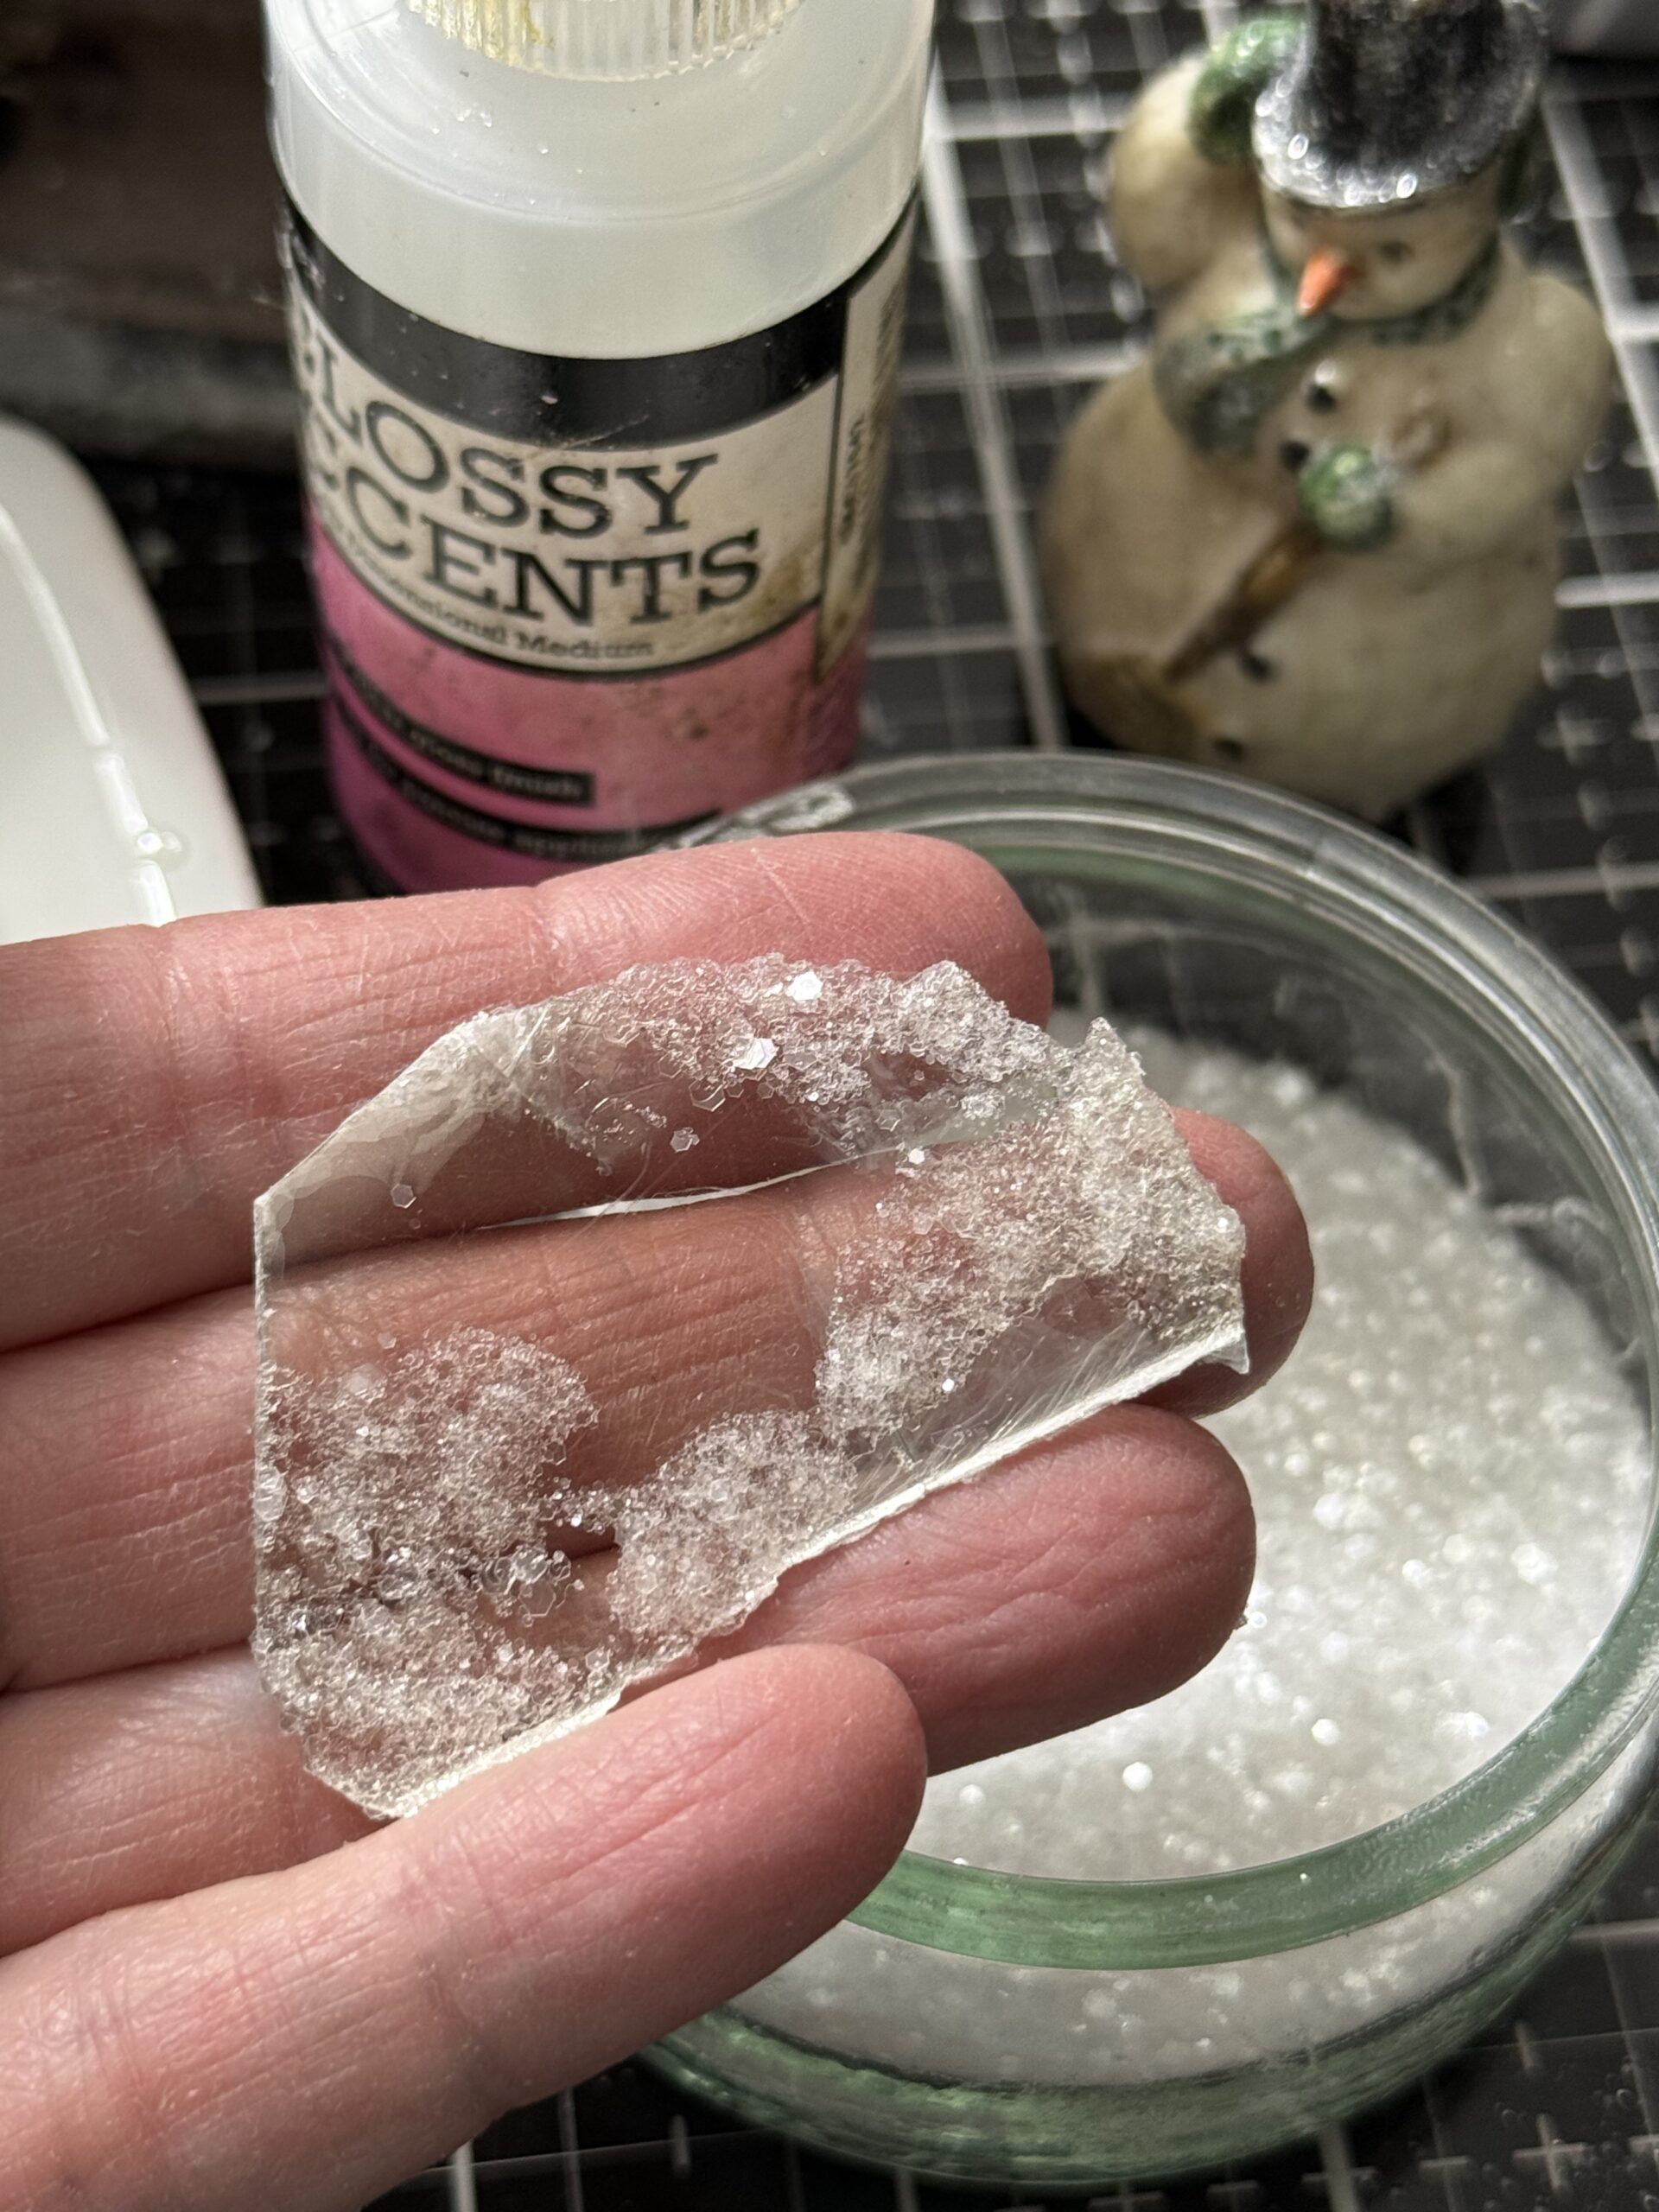
Next, it was bling time… using a little glossy accents, I rubbed the snowman, then sprinkled him with some glitter. The glitter I used was a combination mix of both Clear Rock Candy and the new Chunky Clear Rock Candy Glitter. It is the perfect way to add vintage bling to a project. I keep a little jar of the combo at the ready for all sorts of holiday makes!
Next, I went back to creating the vignette base for his little home. Using some Old Paper Distress Paint, I rubbed all the edges of the box, then dried it with a heat tool. After the painting was done, I decided on the papers for inside and outside of the box. I chose paper from the idea-ology Christmas Back-drops collection..the one specifically for inside featured some little winter scenes. It made the cutest backdrop for the Snowman.
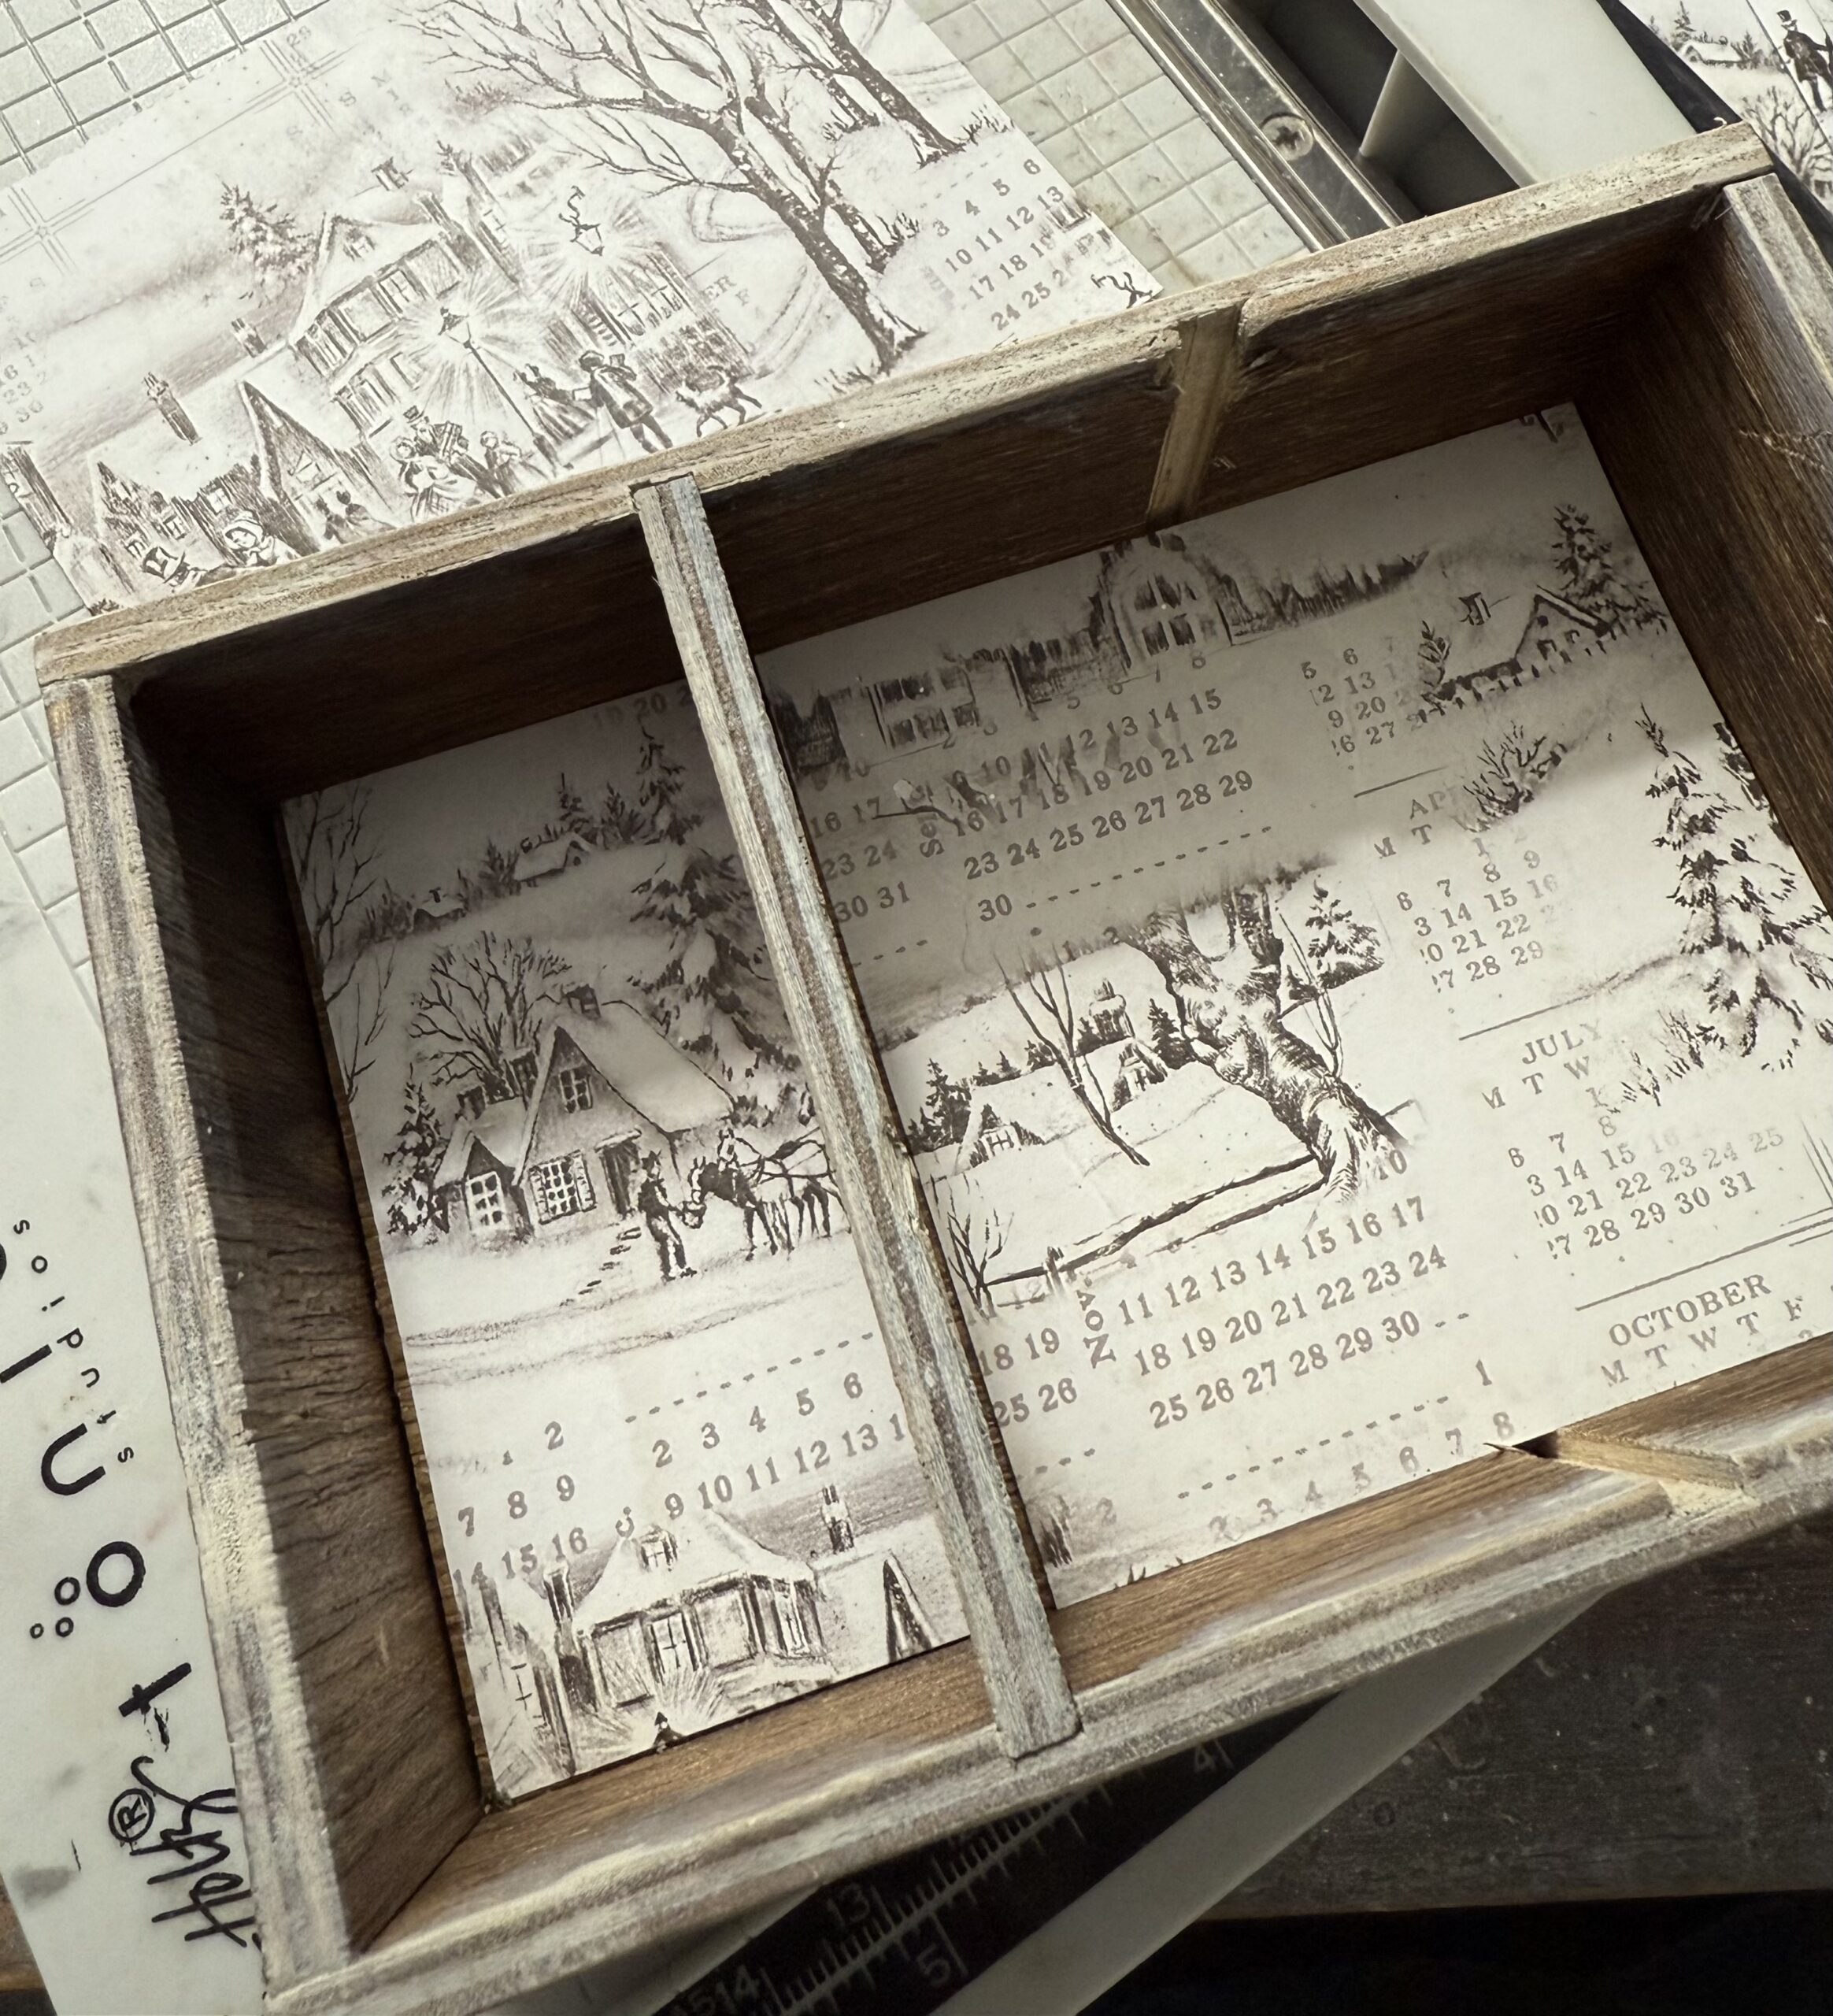
I trimmed all the papers down for each of the insides and outsides of the box using a paper trimmer. These pieces were then adhered using Distress Collage Medium, then the box was set aside to dry. You’ll notice that I found a “US Mica Mfg. Co.” Ephemera piece in the Emporium Layers Pack, so I used that as one of my finished outsides of the box…it was just trimmed a bit to fit the left hand outside of the box.

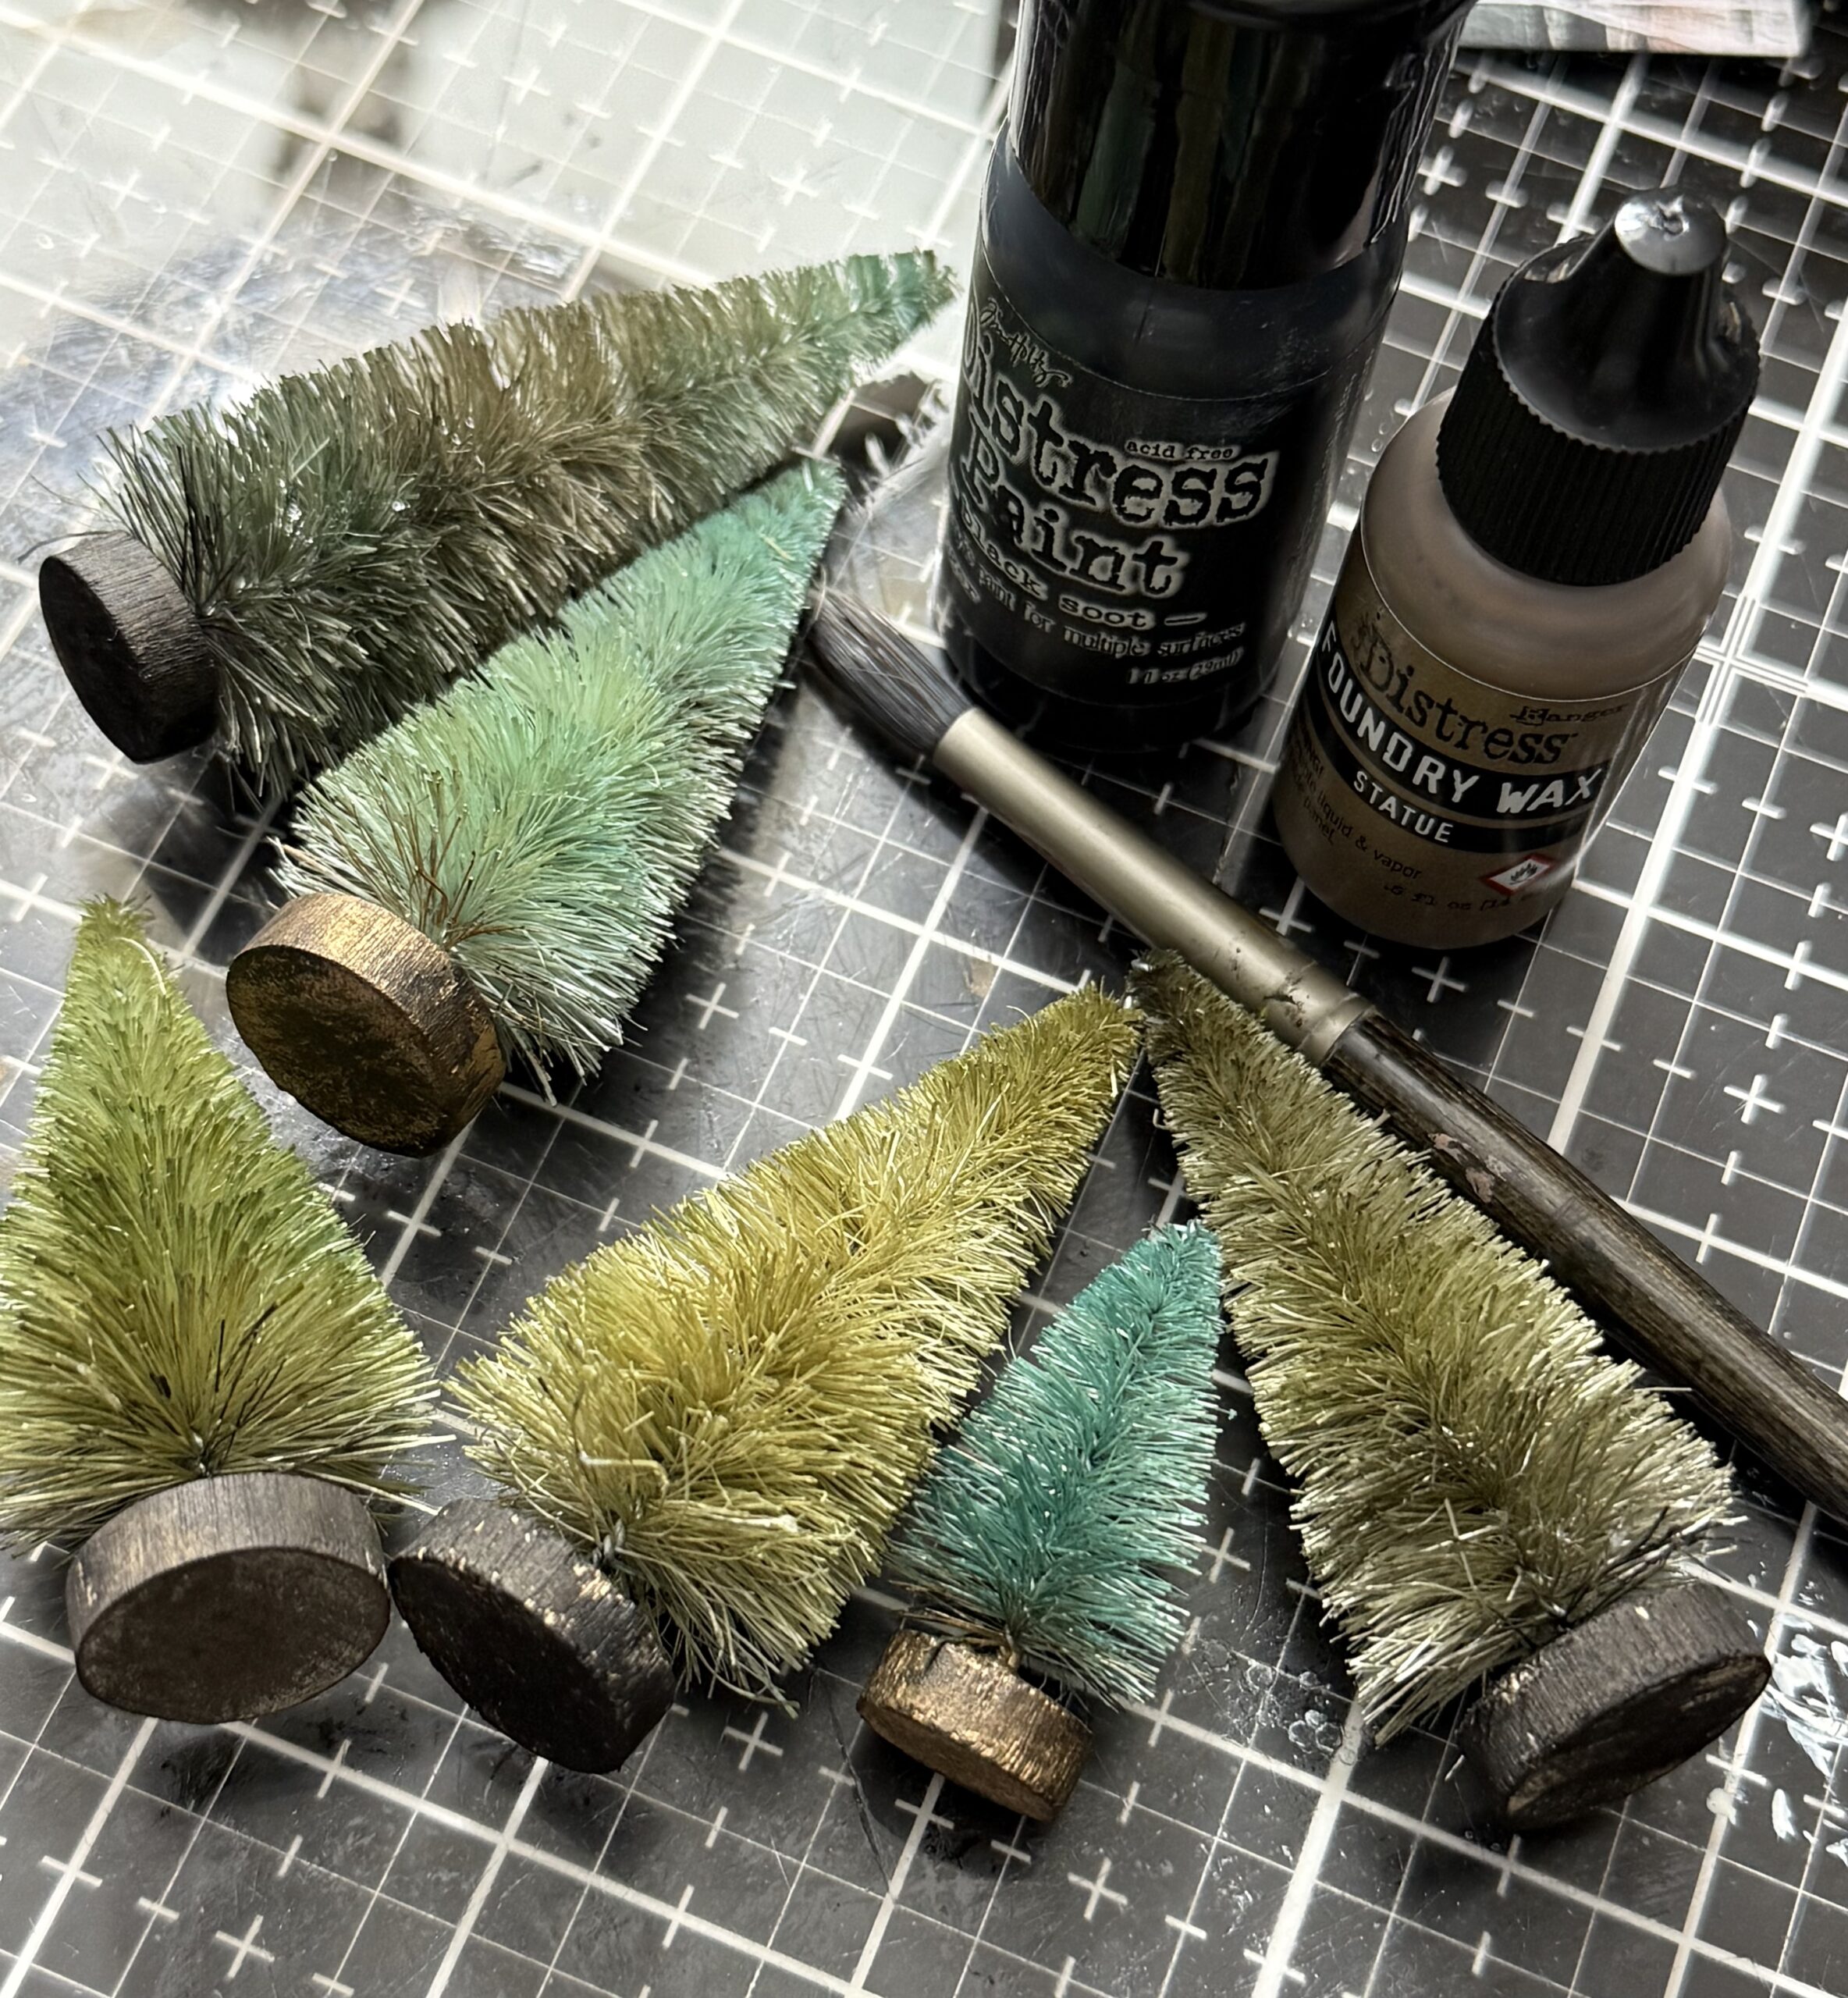
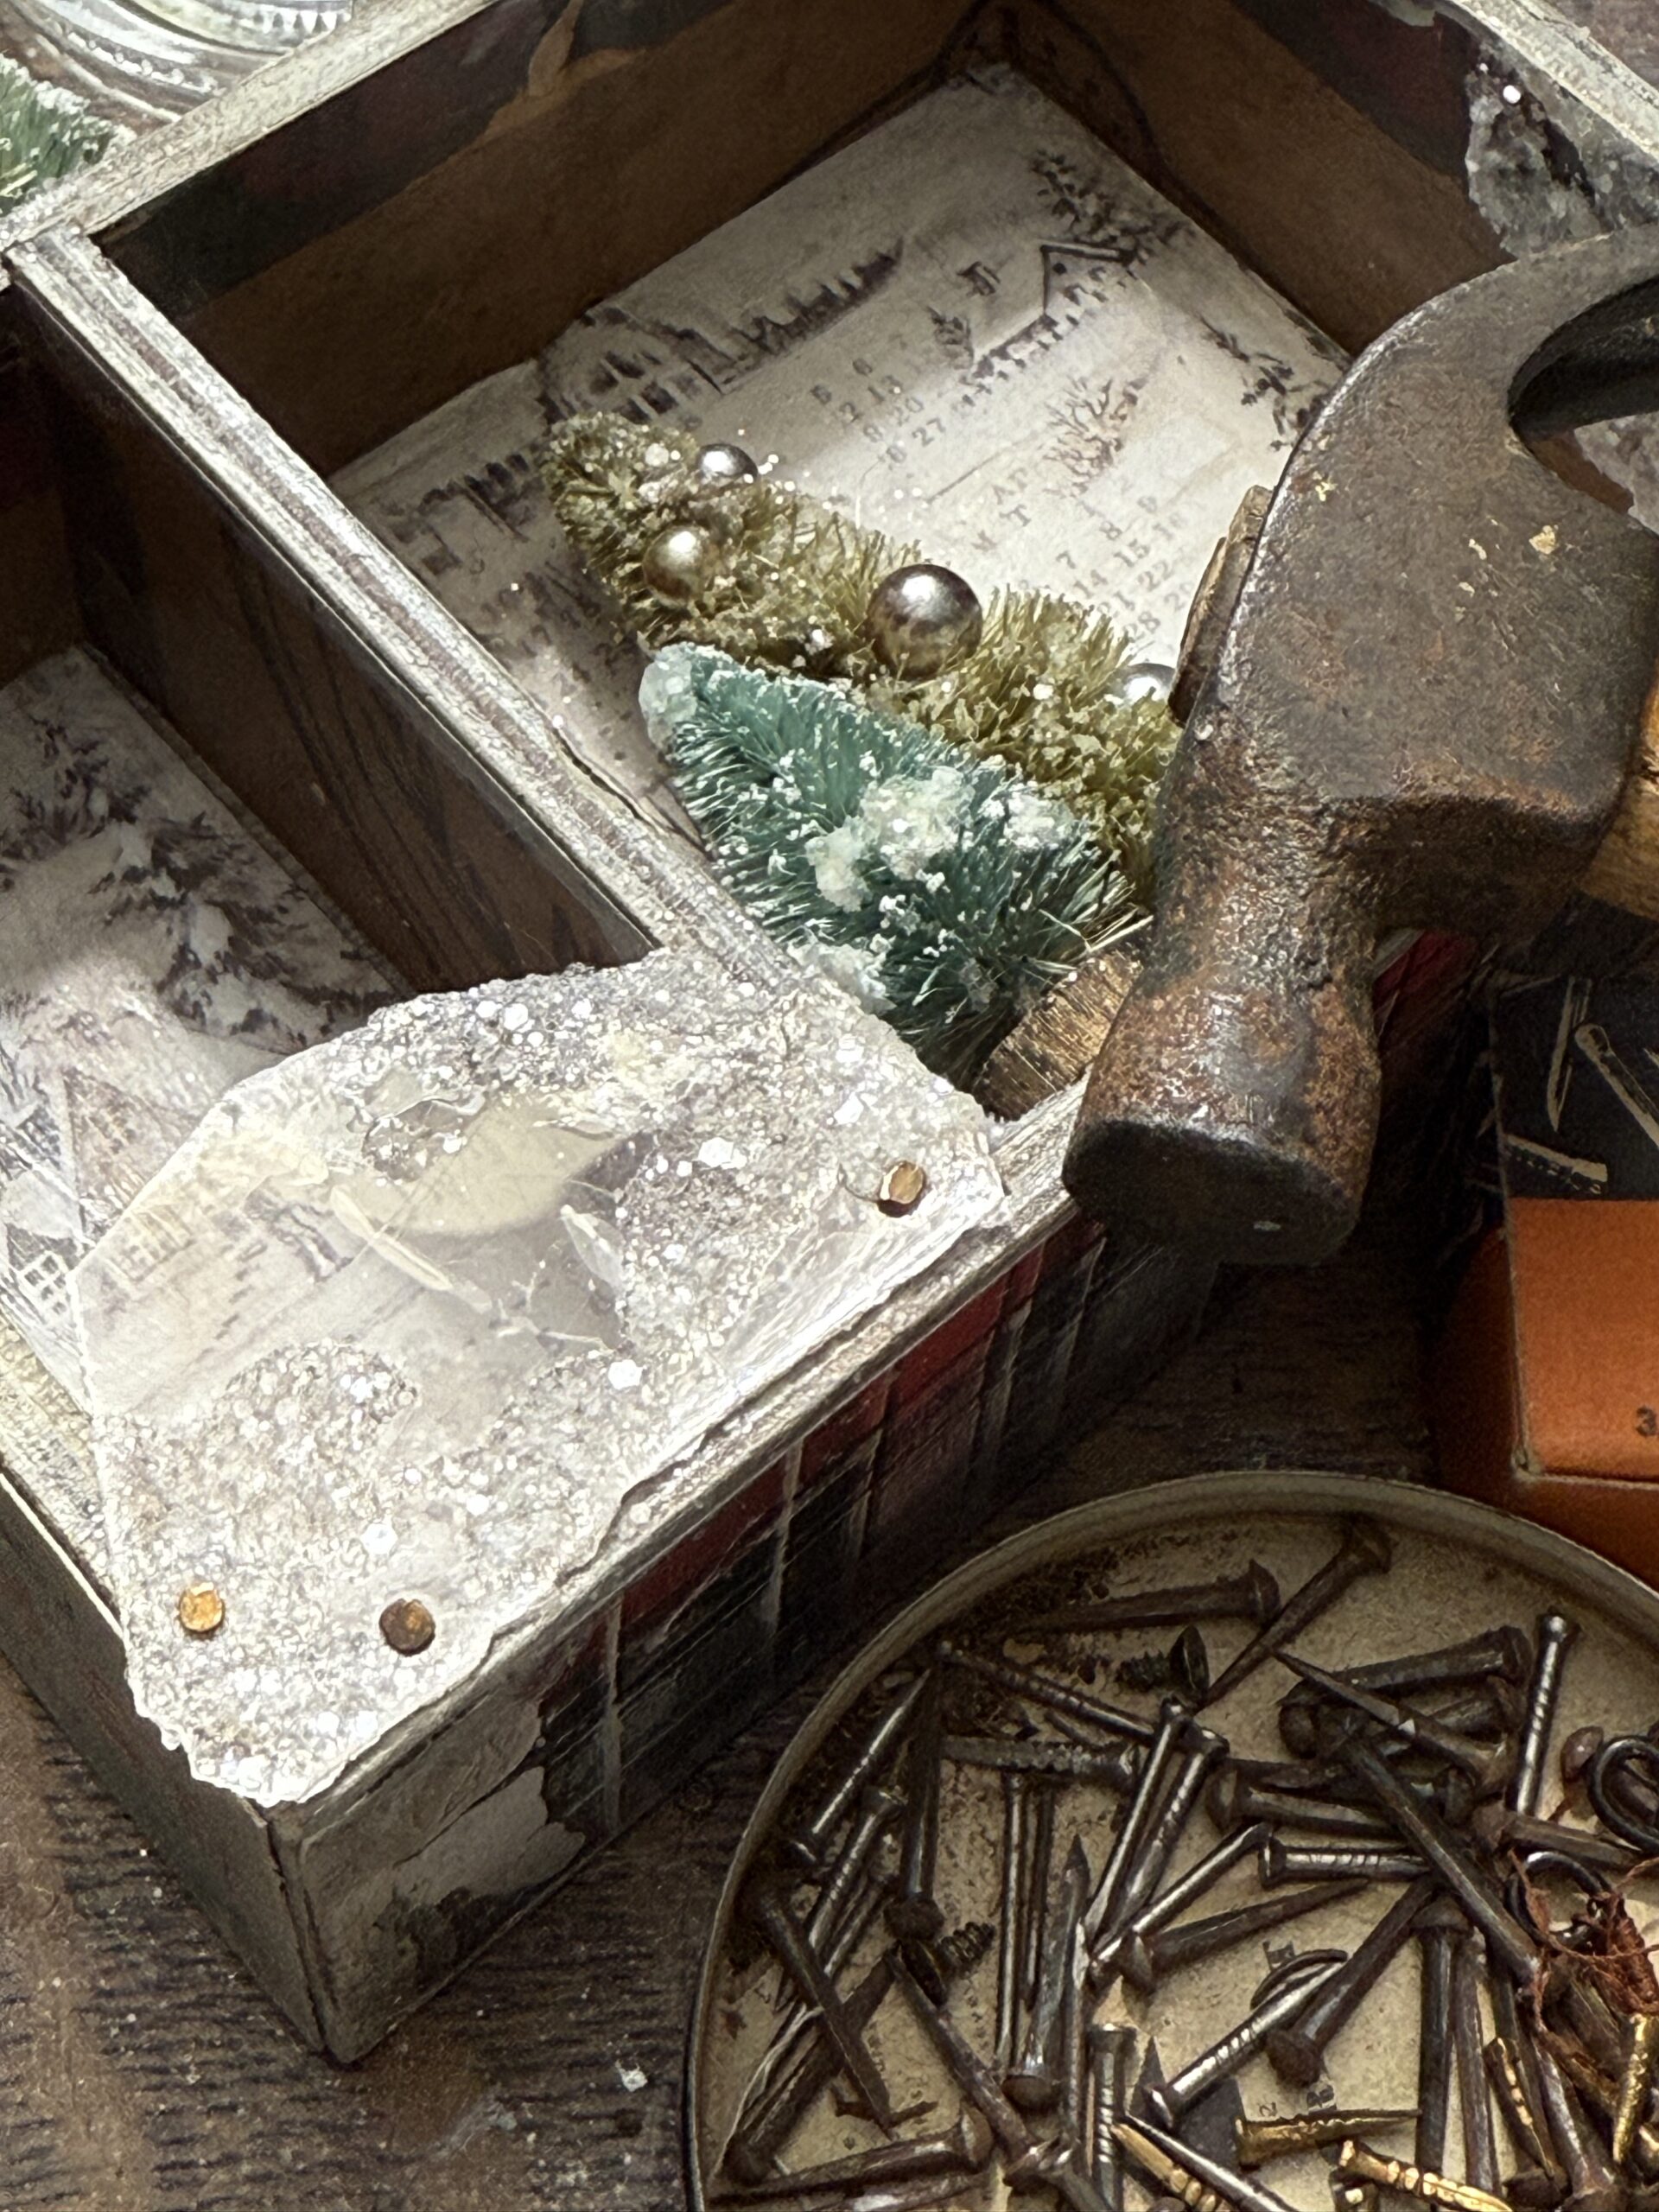
While the box dried, I moved on to creating some bottle brush trees.
Again, in keeping with a “cooler” color palette, I chose some faded looking colors for the trees…
Speckled Egg, Pumice Stone and Old Paper were the perfect colors for the trees, I sprayed them with some water, then sprayed them with a combination of these colors, then dried them with a heat tool.
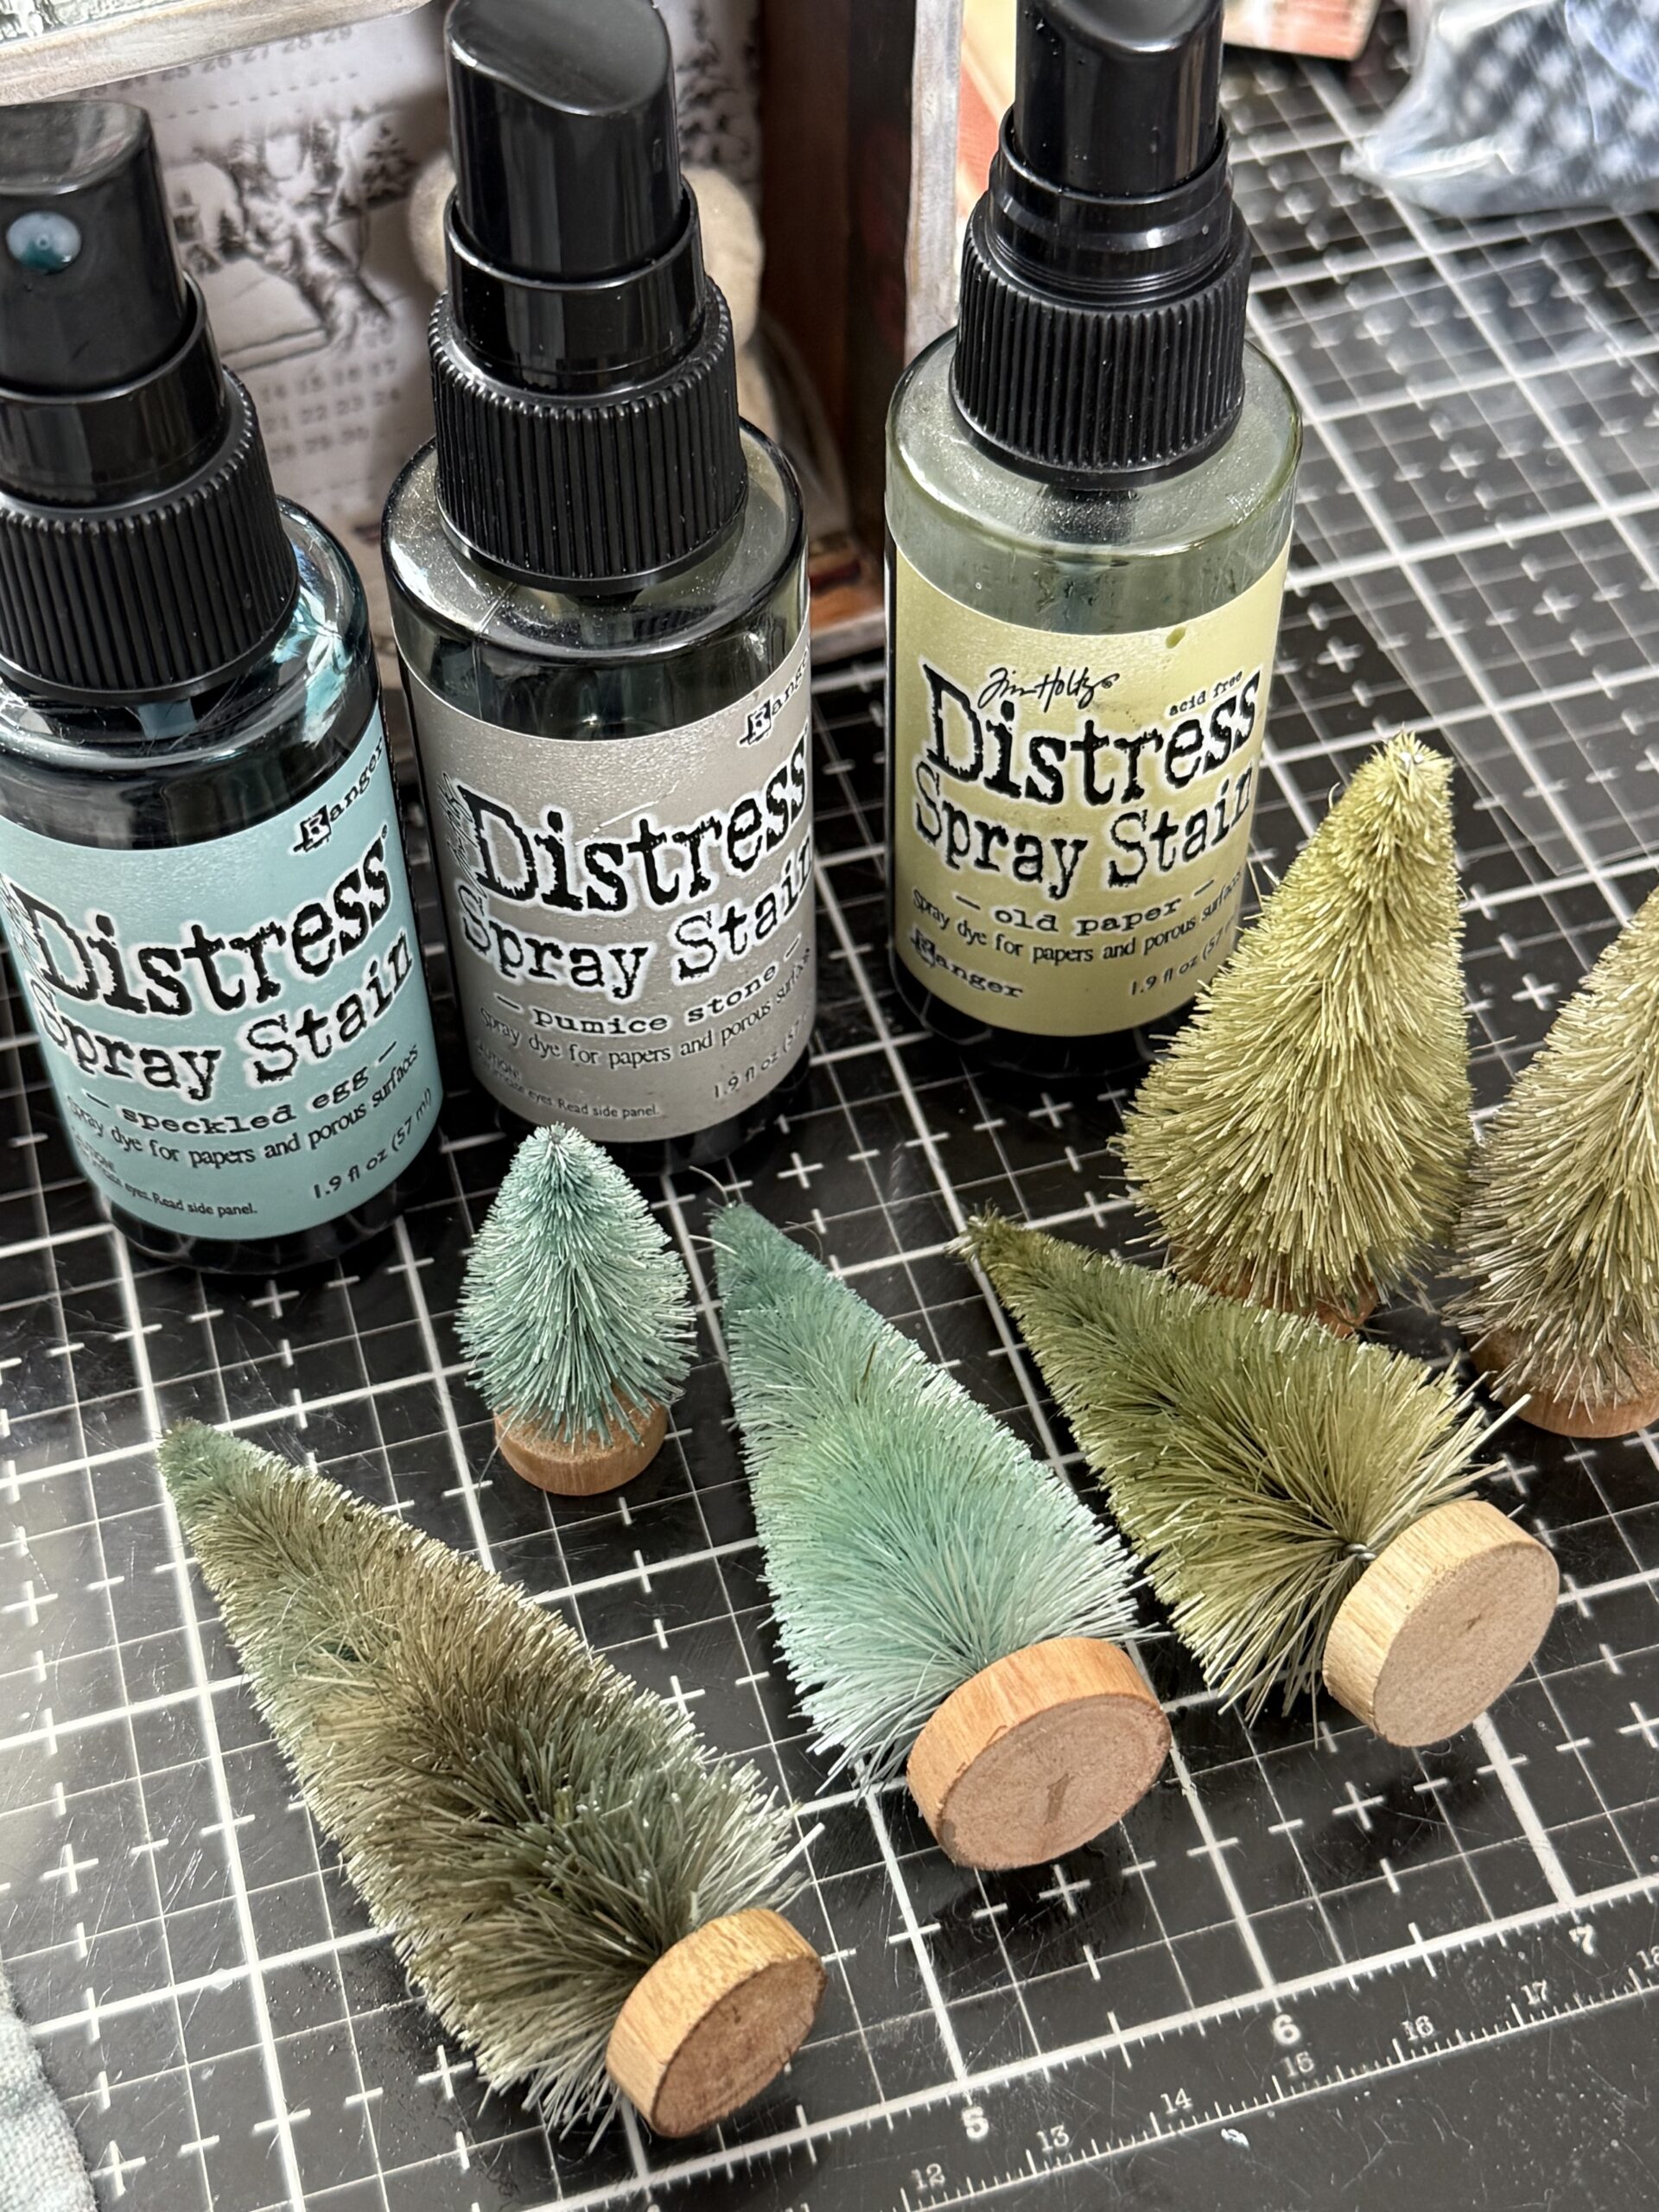
After the trees were dry, I used a paint brush and painted the bases of each of them with Black Soot Distress Paint. Once the paint was dry, I dry brushed on some Statue Foundry Wax, then set the color using a heat tool to bring out some vintage shine.
Next up, some vintage bling for the trees… I colored a variety of sizes of idea-ology baubles using Alcohol Ink. These two colors were featured by Tim Holtz on one of his latest Holiday Demos, you can CLICK HERE to check it out.
I fell in love with the look of them as soon as I saw the vintage gold and silver made with Alcohol Ink Flannel and Chronicle, and I had to give it a try. These two colors together with Mushroom Alcohol Ink, create the best mercury glass look.
In the demo, Tim shared the process of making the baubles. (It is at time marker 1:51:00 or so.)
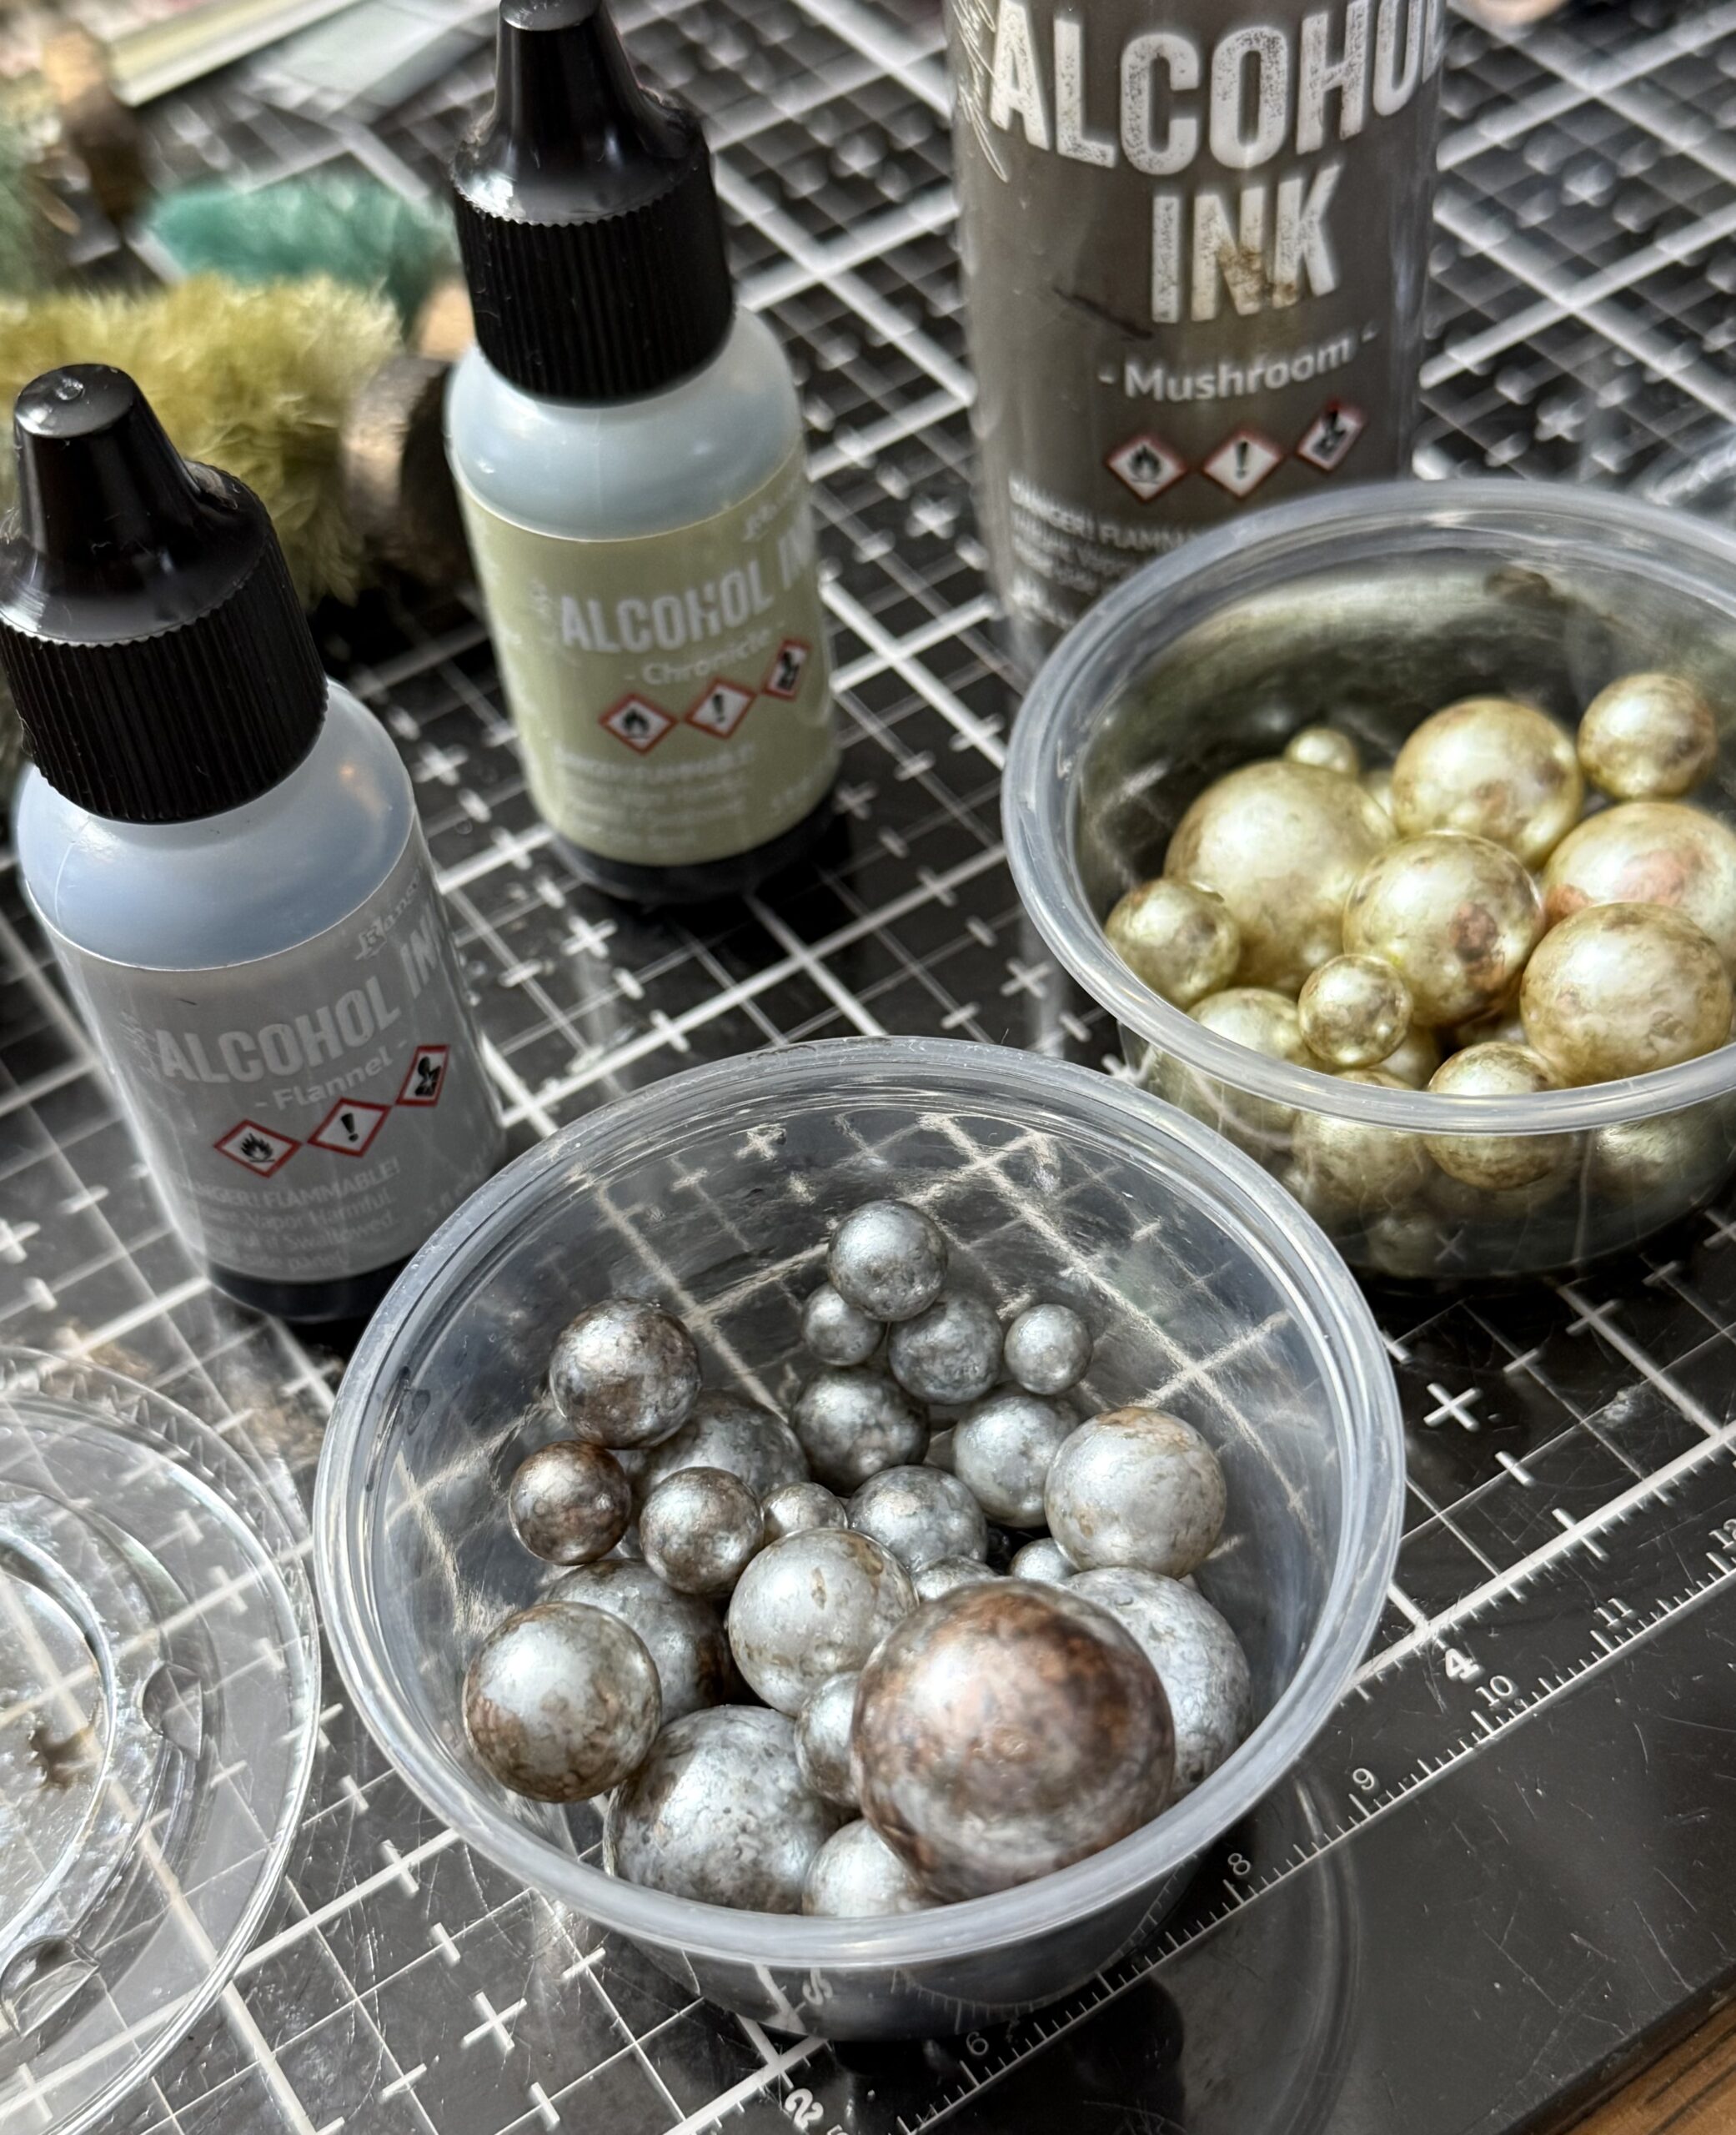
I then used the baubles to decorate the trees. Using a hot glue gun, I daubed on some glue, then placed the baubles into the trees until they were set. After they were set, I rubbed the bristles of the trees with Glossy Accents and sprinkled a couple of the trees with the Clear Rock Candy Glitter Combo.

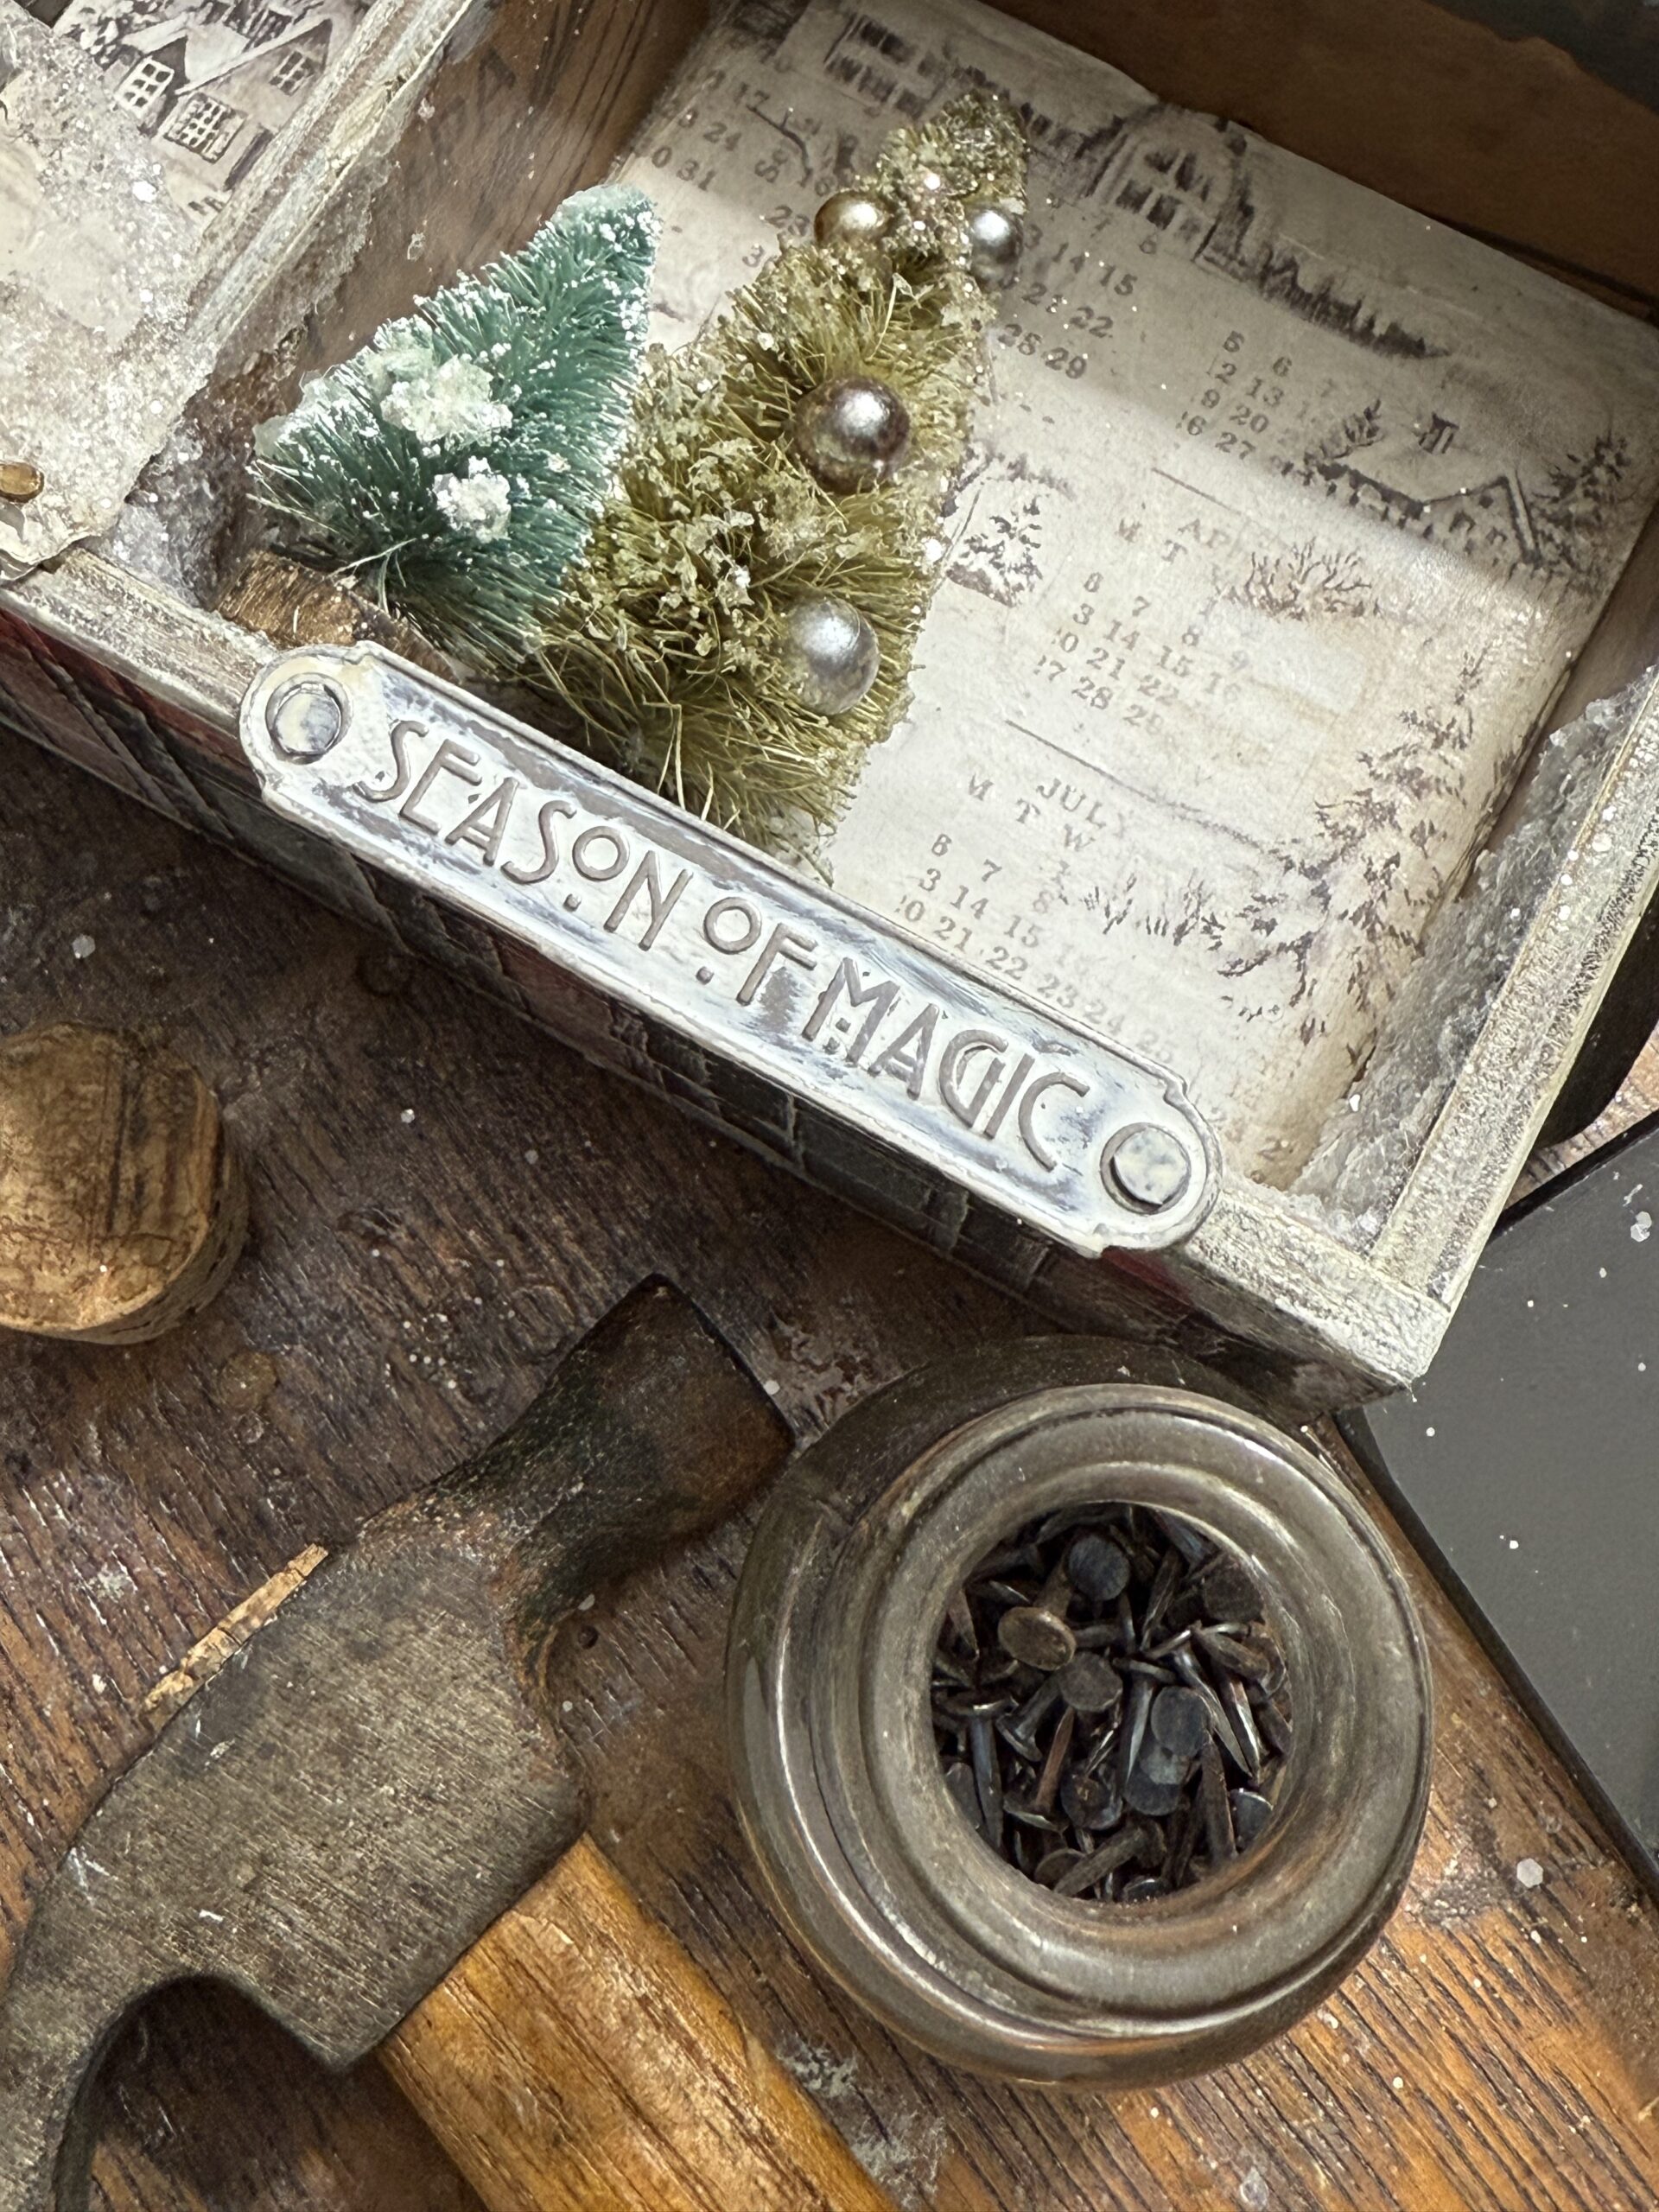
Here’s a look at the trees… I placed 3 on top of the vignette and then added a couple within the vignette.

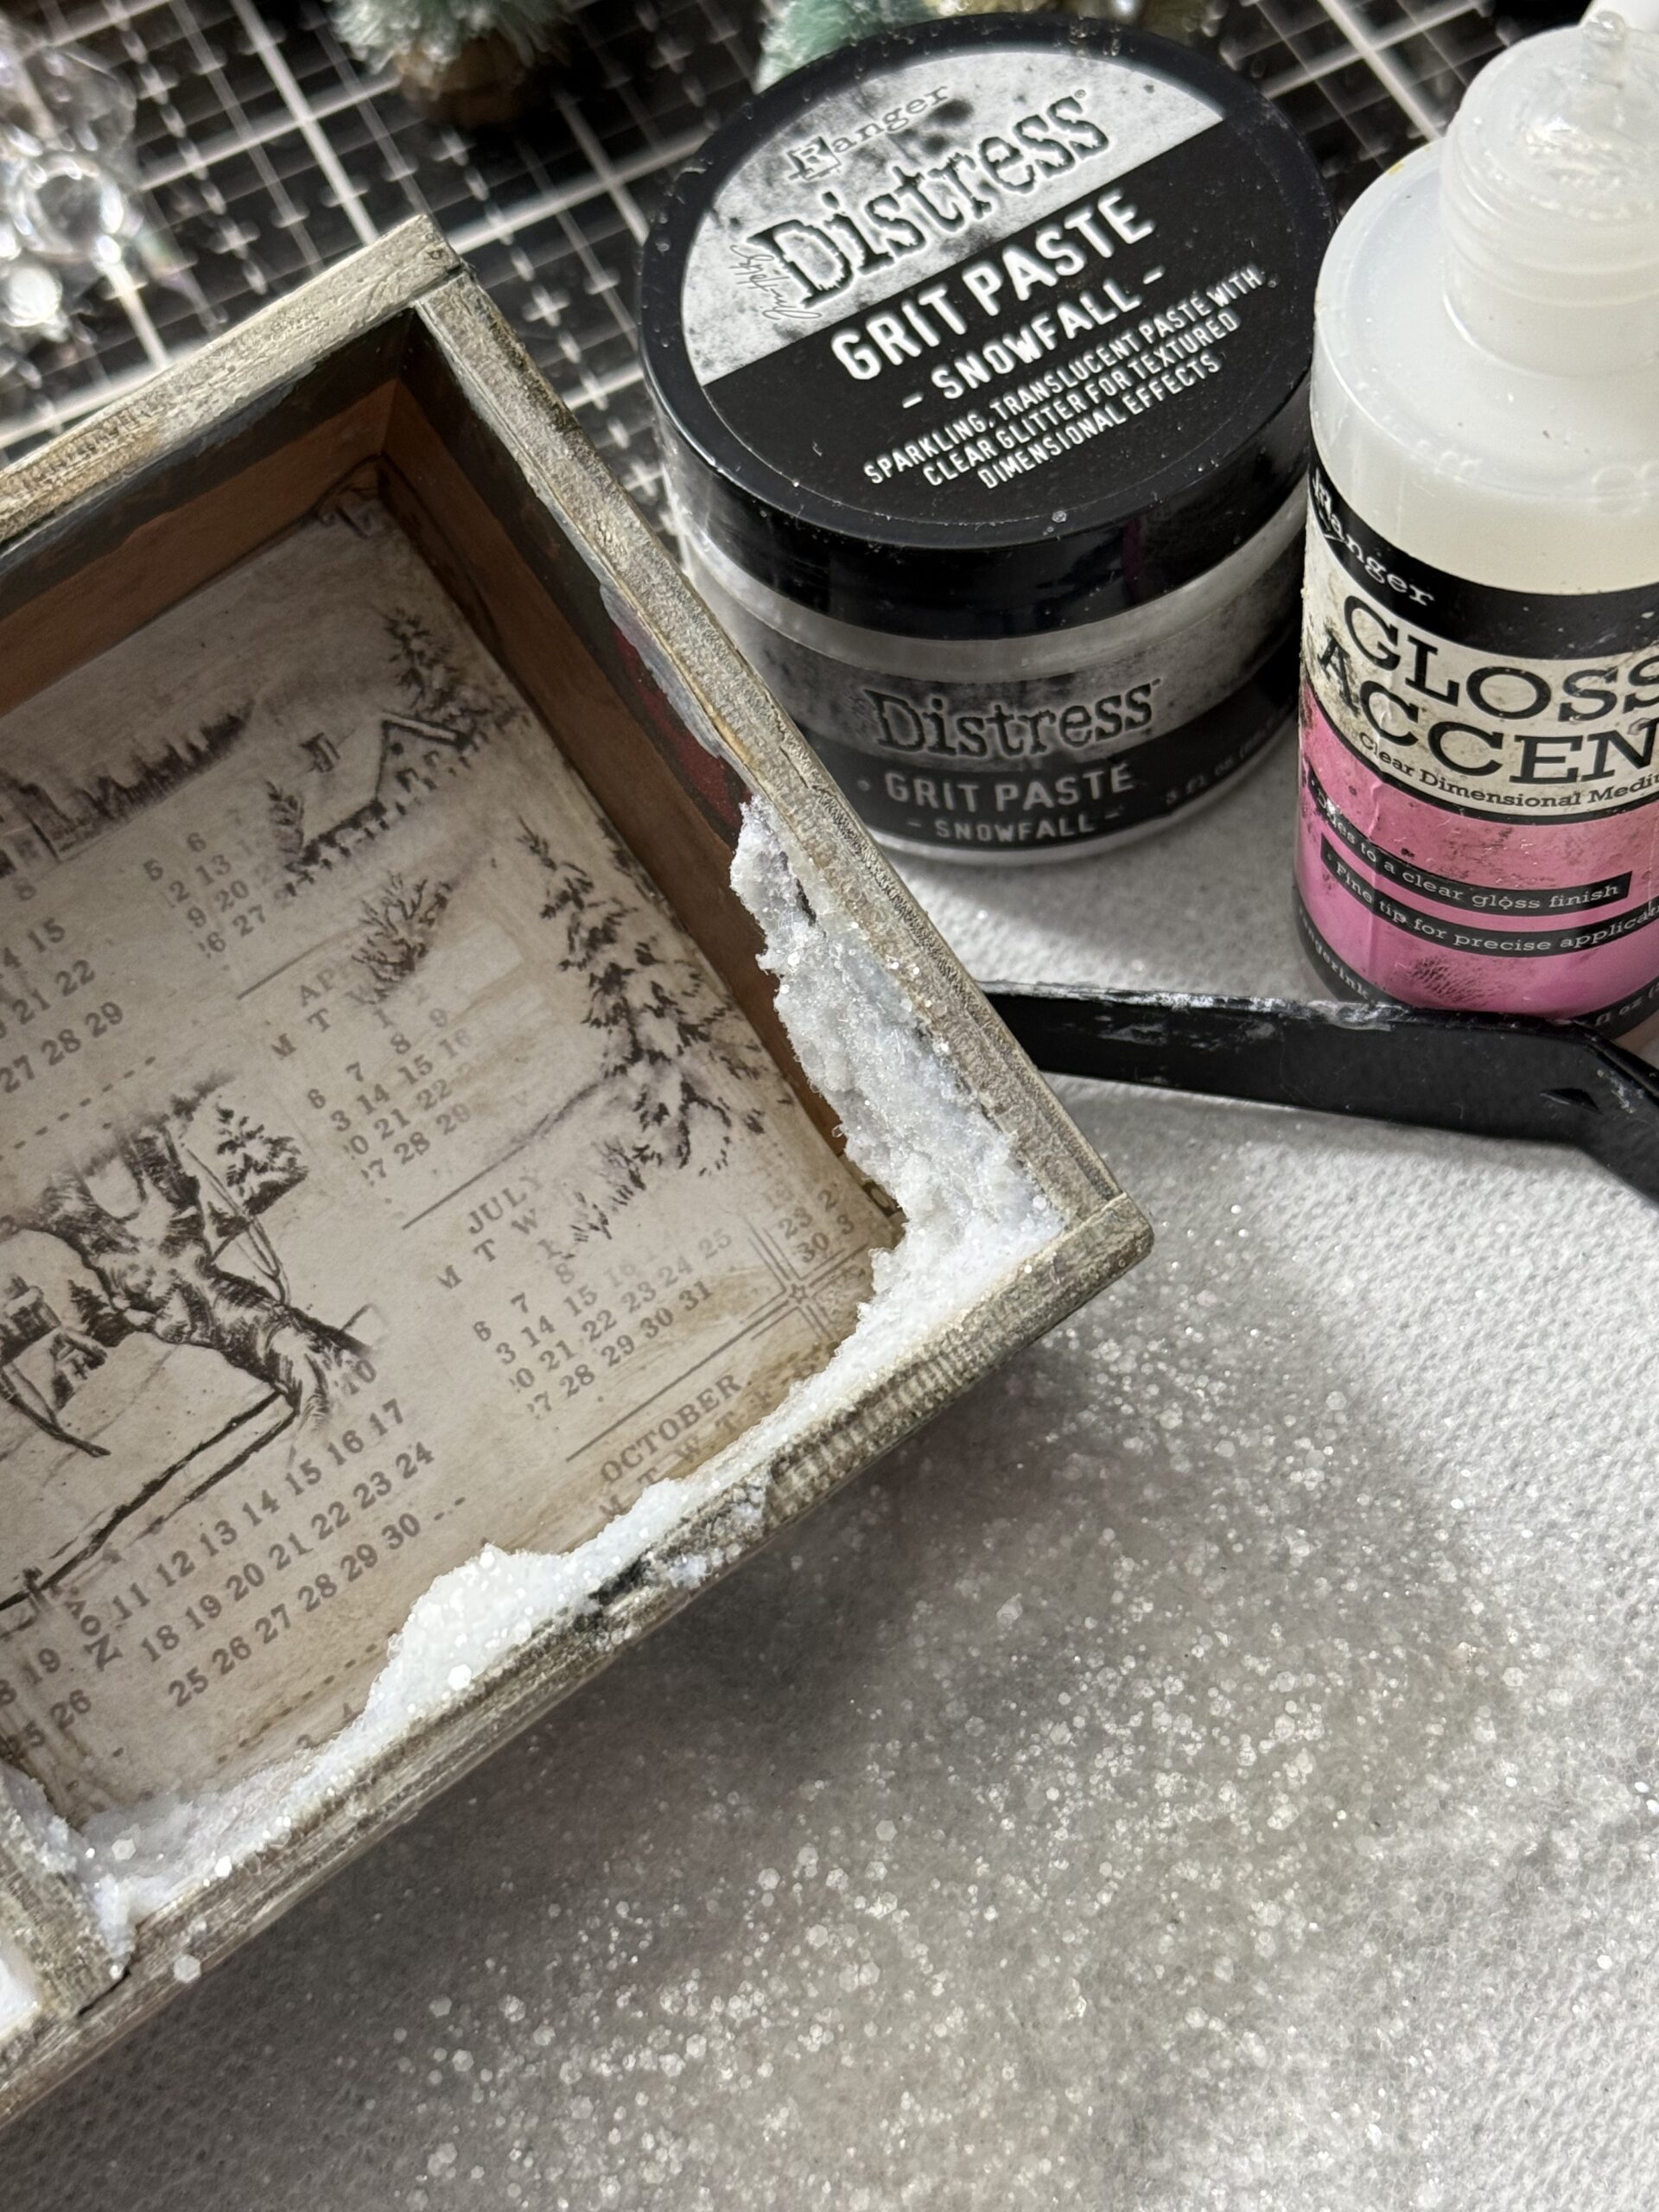
A couple of the trees were rubbed with Grit Paste Opaque to give them the look of snow clumps, then the trees were rubbed with Glossy Accents, and sprinkled with glitter.

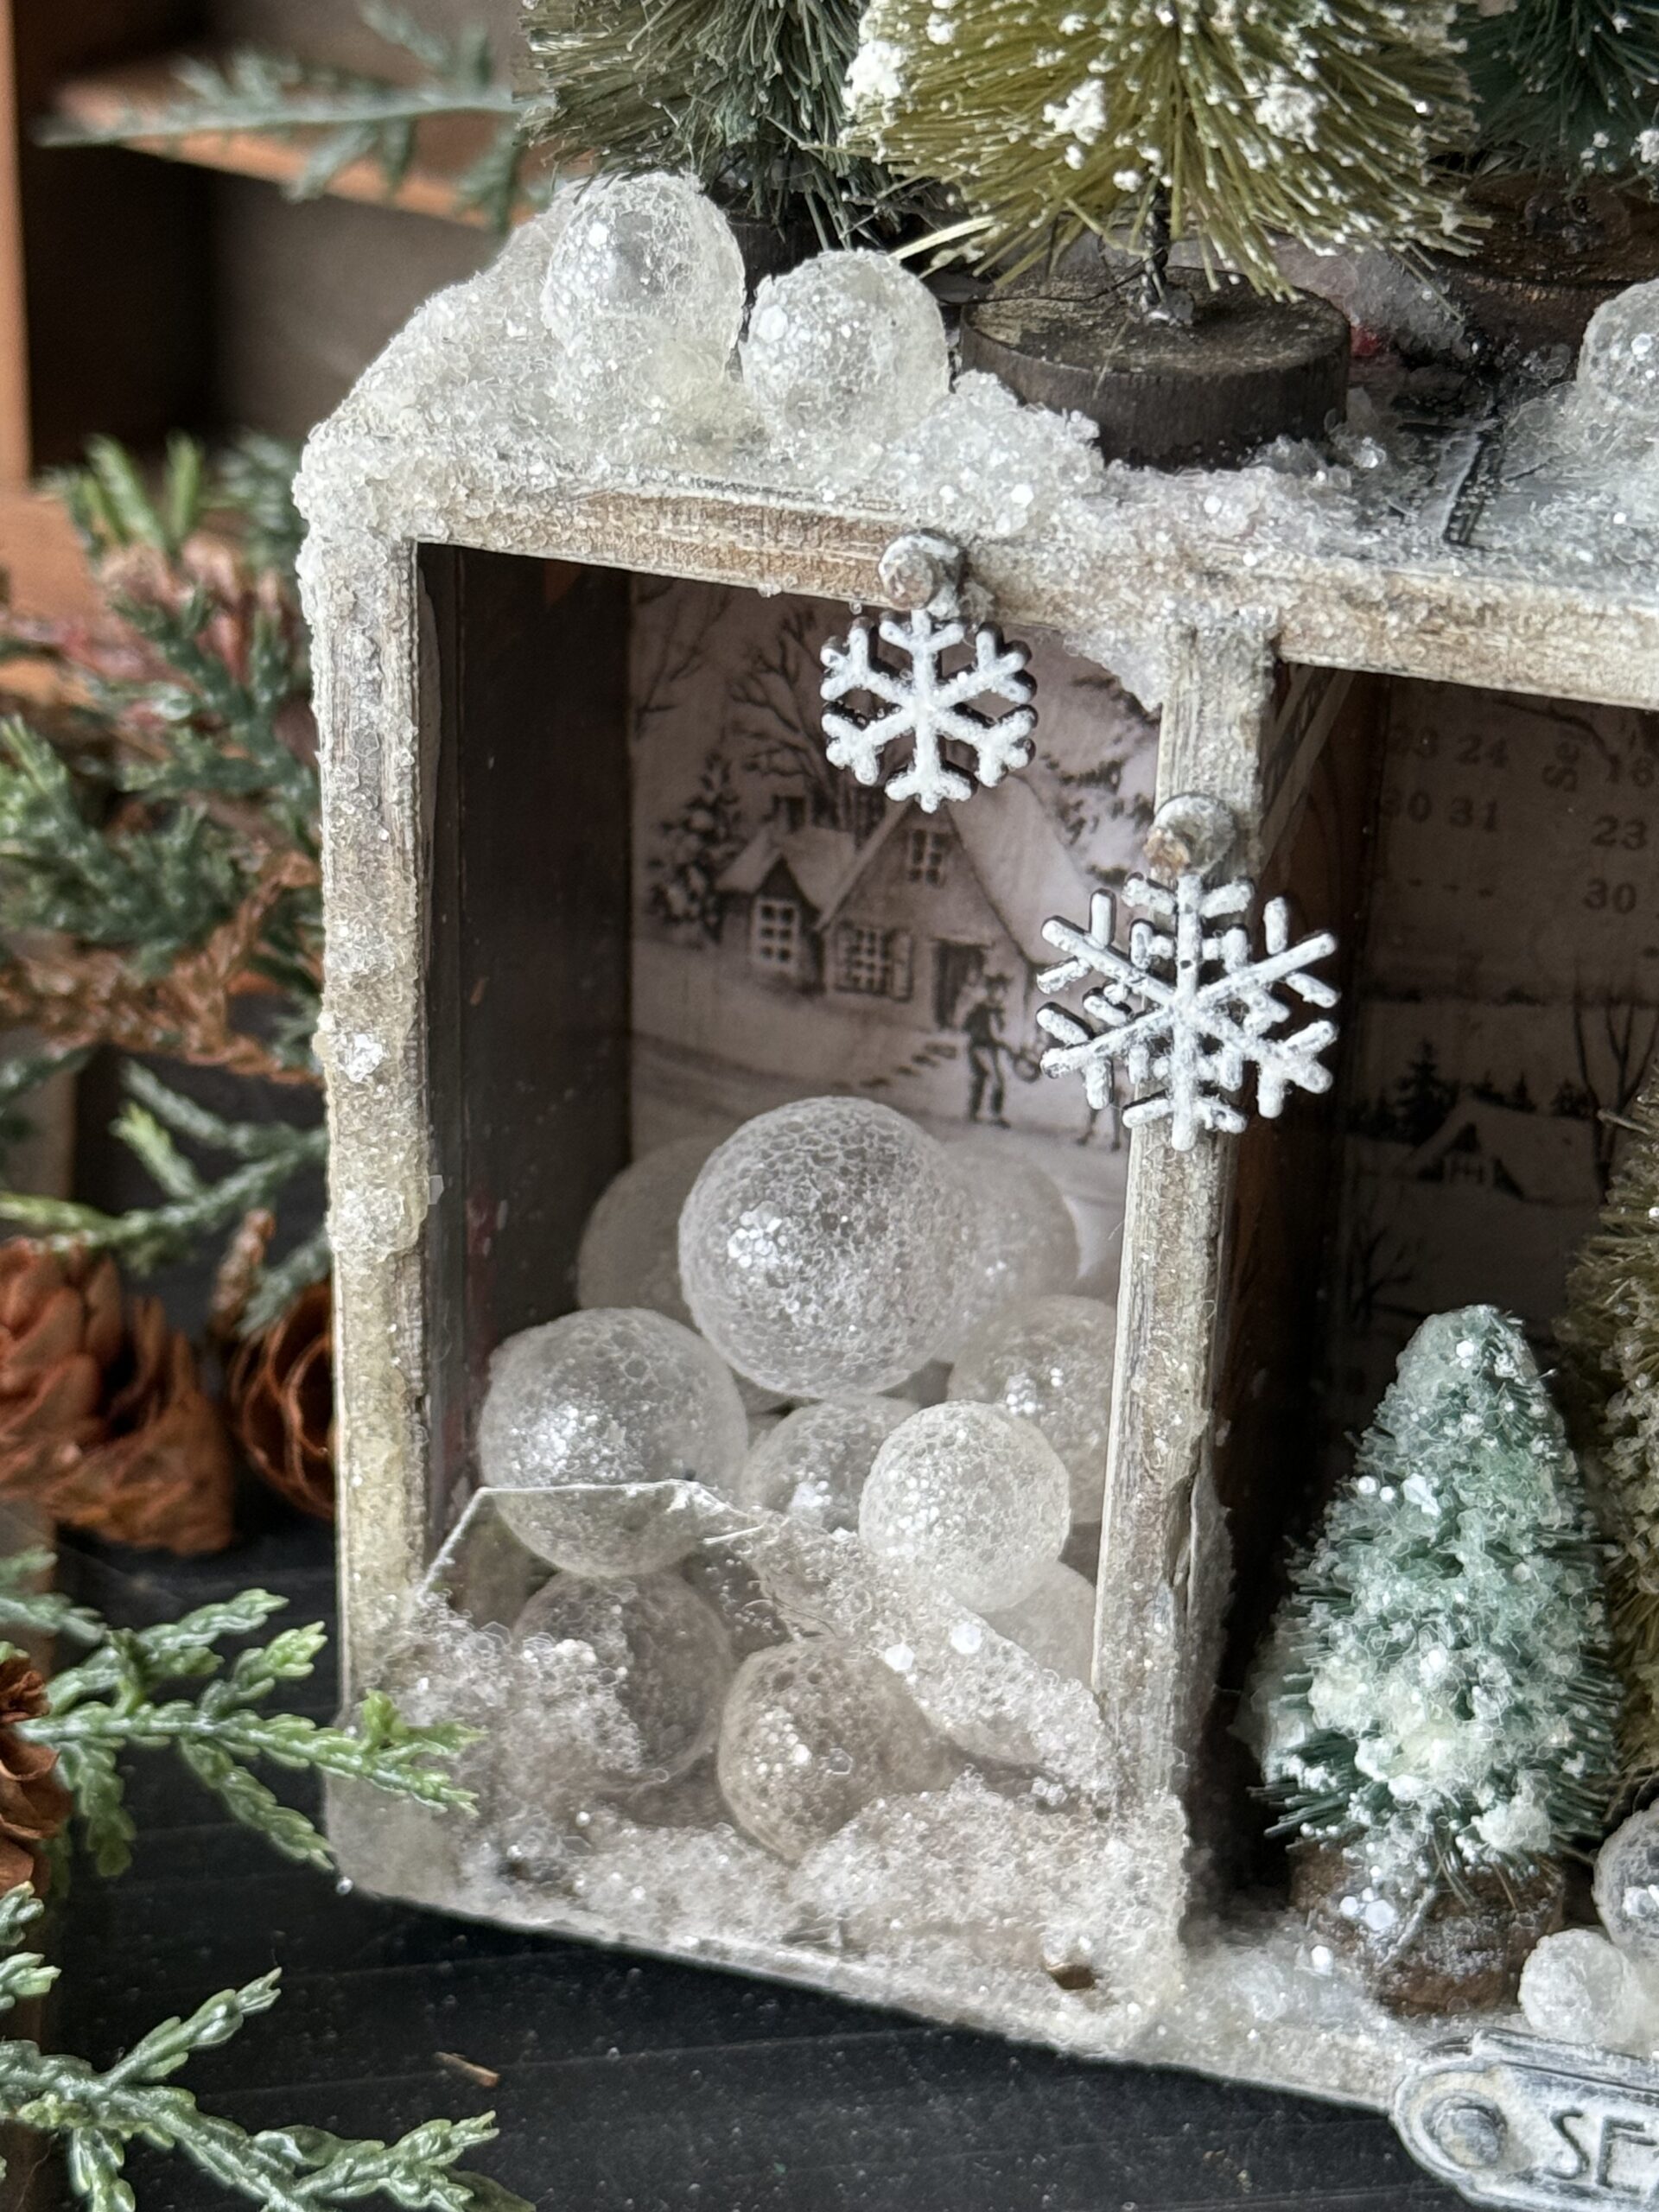
I decided the placement of the trees and the snowman and began adding Grit Paste Snowfall inside the vignette using a palette knife, then I adhered the trees and the snowman in place, and set it aside to dry for a couple hours or overnight. I feel overnight is best as the snowfall and glossy accents become hardened thoroughly.
As the Snowfall Grit Paste dries, the glitter and magic frosty parts appear, creating a perfectly frosty look, it is then enhanced if you rub the area with some glossy accents and sprinkle with that perfect combination of the Clear Rock Candy Glitters both regular and chunky.
Oh my goodness…it really looks like it was just taken out of a deep freeze, don’t you think?

While I was waiting for the grit-paste, trees and snowman to dry in place, I began working on my collection of snowballs. The snowballs were created using idea-ology Bubbles from the Tim Holtz idea-ology Halloween release. They were rubbed with Glossy Accents, then tossed into a bowl with the Clear Rock Candy Glitter combo, then tossed around in the glitter to get the bubbles covered…Viola! Snowballs!!! I made one package of bubbles into snowballs to use for this project and to have for future makes…they are just so much fun to make!

Now, one of my ideas for this project was to create a gathering spot for the snowballs…I mean, I think Frosty would definitely have a supply on hand, don’t ya think?
So, with that in mind, that little spot on the left side of the vignette became that area. I decided to use a little piece of Mica Tile as the “holder” and make a “snowball storage”. I also decided to leave my snowballs loose so that if I wanted to, down the way, add a little balloon light into the snowball mix, it would light up at night for a cute look, and, if I wanted to add or subtract from my snowball supply for other projects, I could.
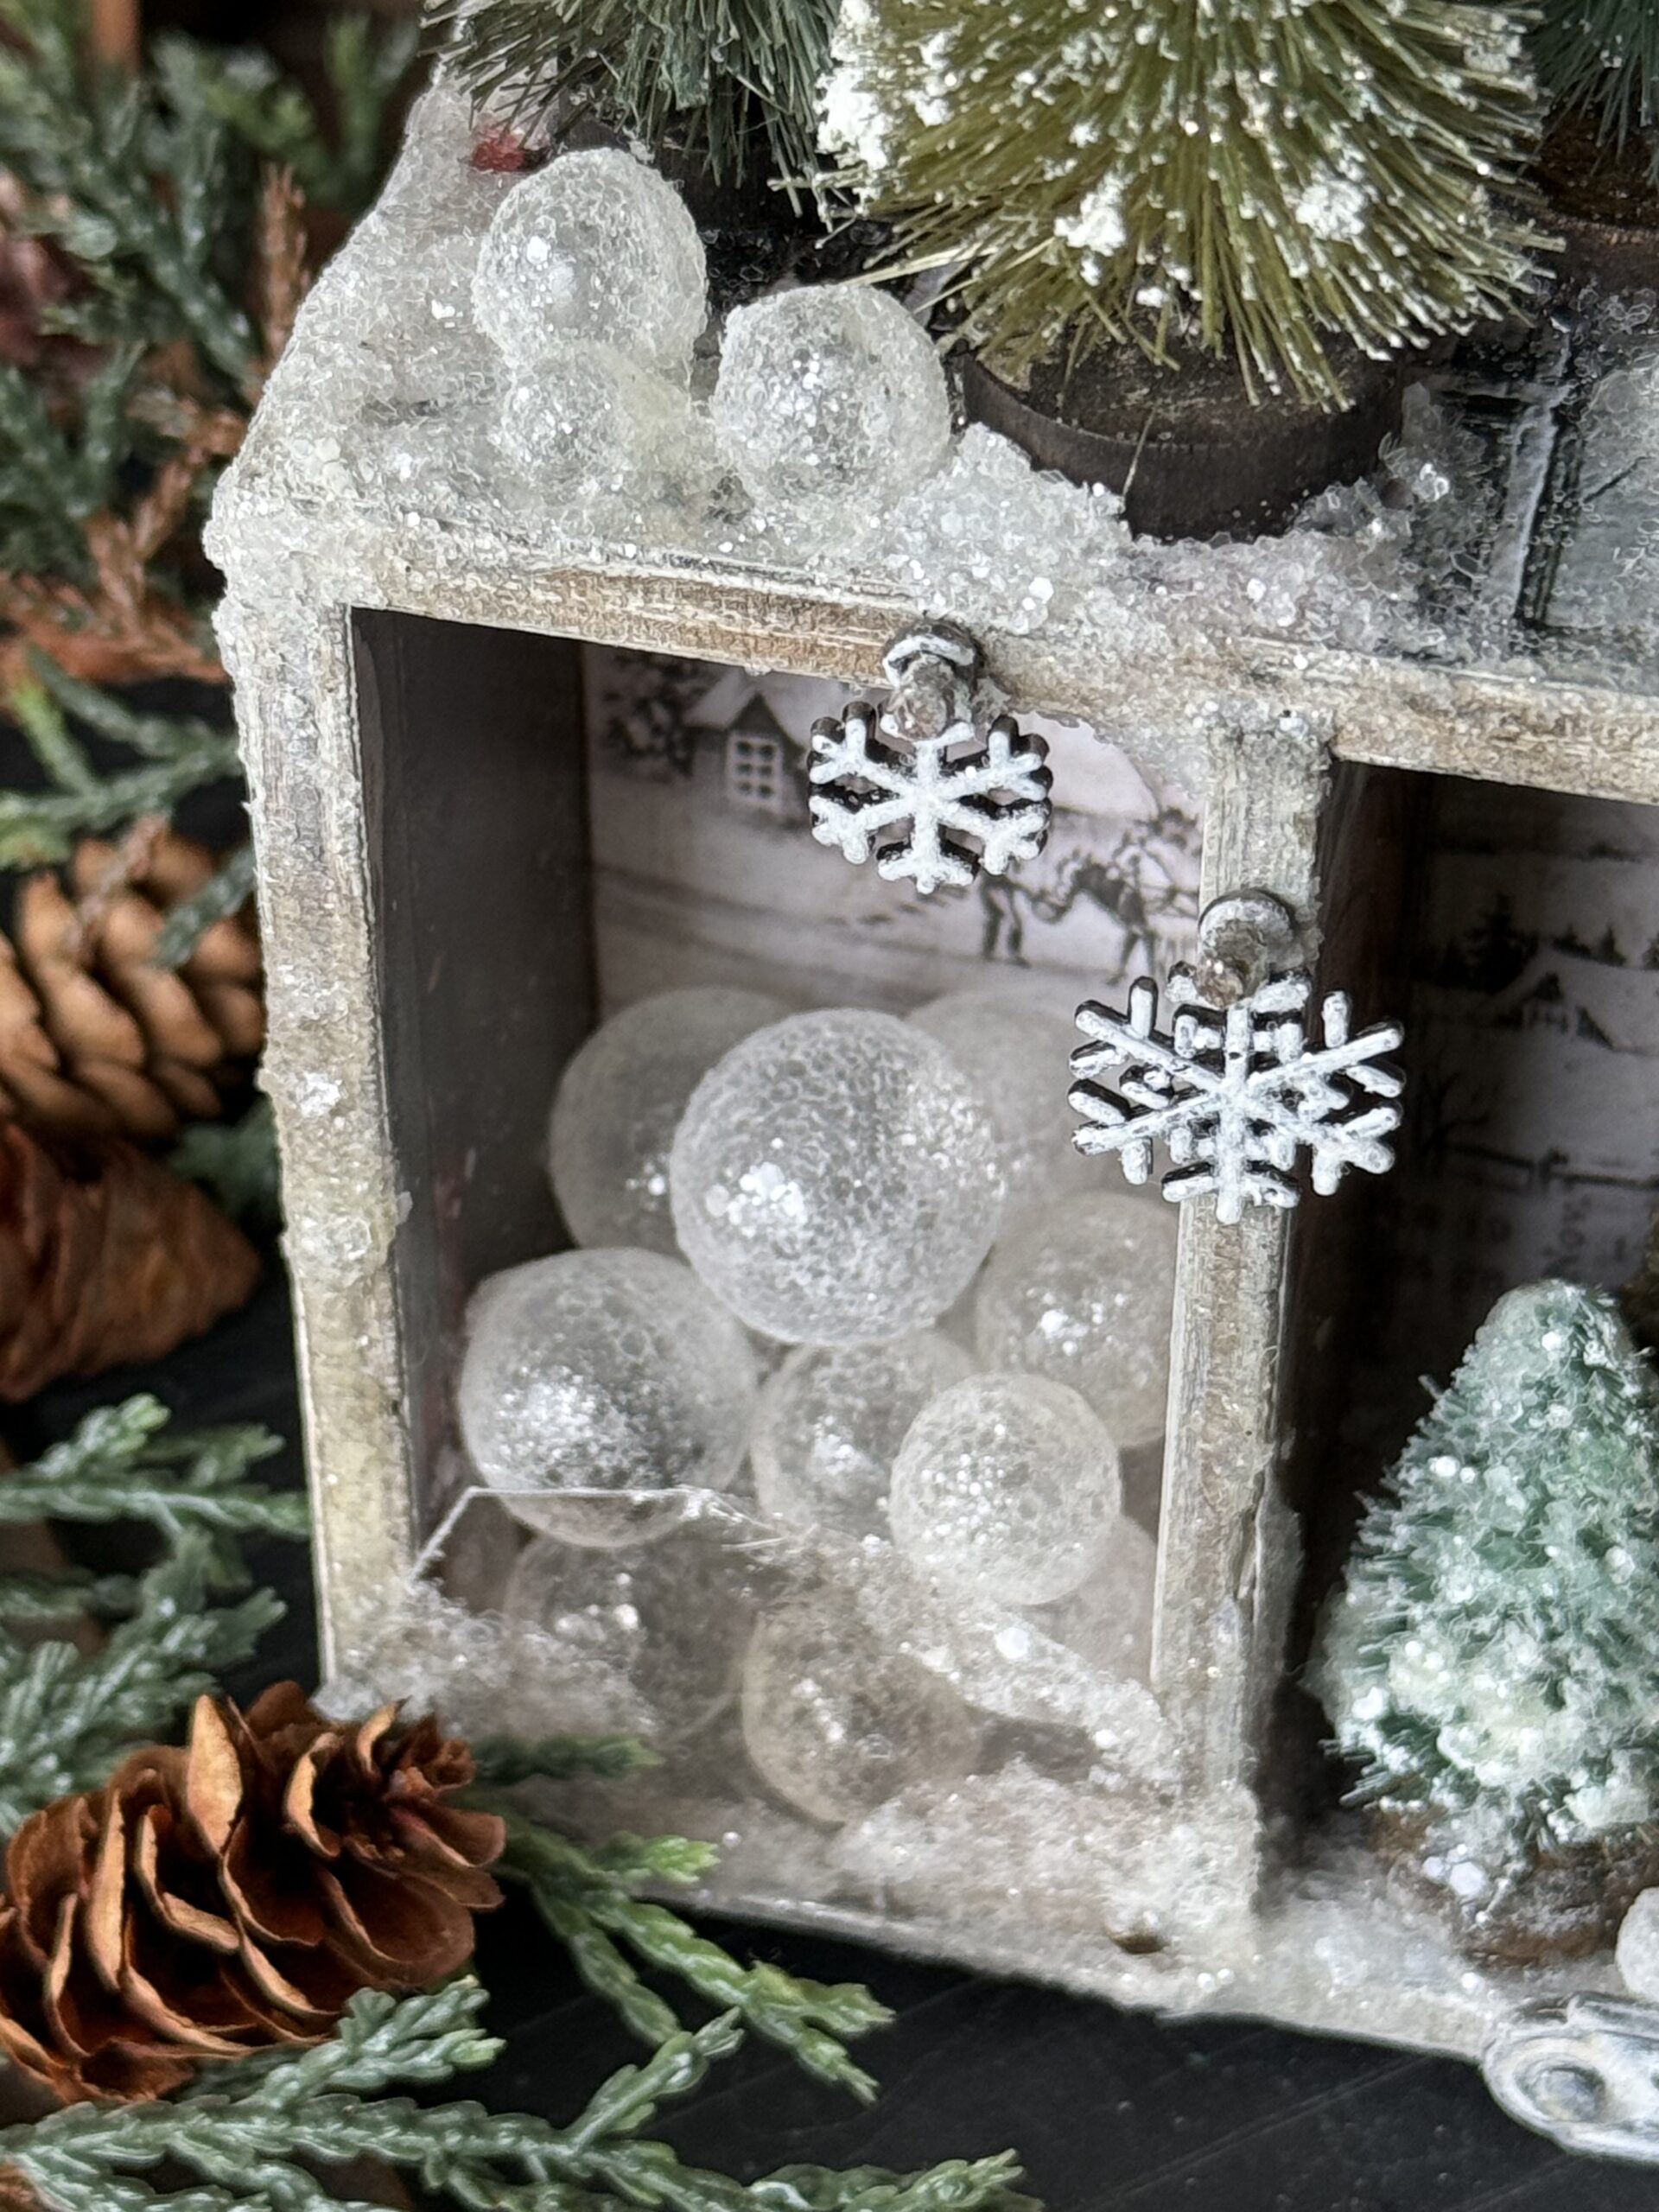
Here is a look at the mica tile that I used for the snowball section… it worked perfectly as you can see right through it to see the collection!
The Mica Tiles was rubbed with Glossy Accents, then sprinkled with glitter and placed onto the vignette using vintage shoe tacks that I hammered into place. (Remember, this was done after the snowman, trees and Snowfall Grit Paste were completely dry.)
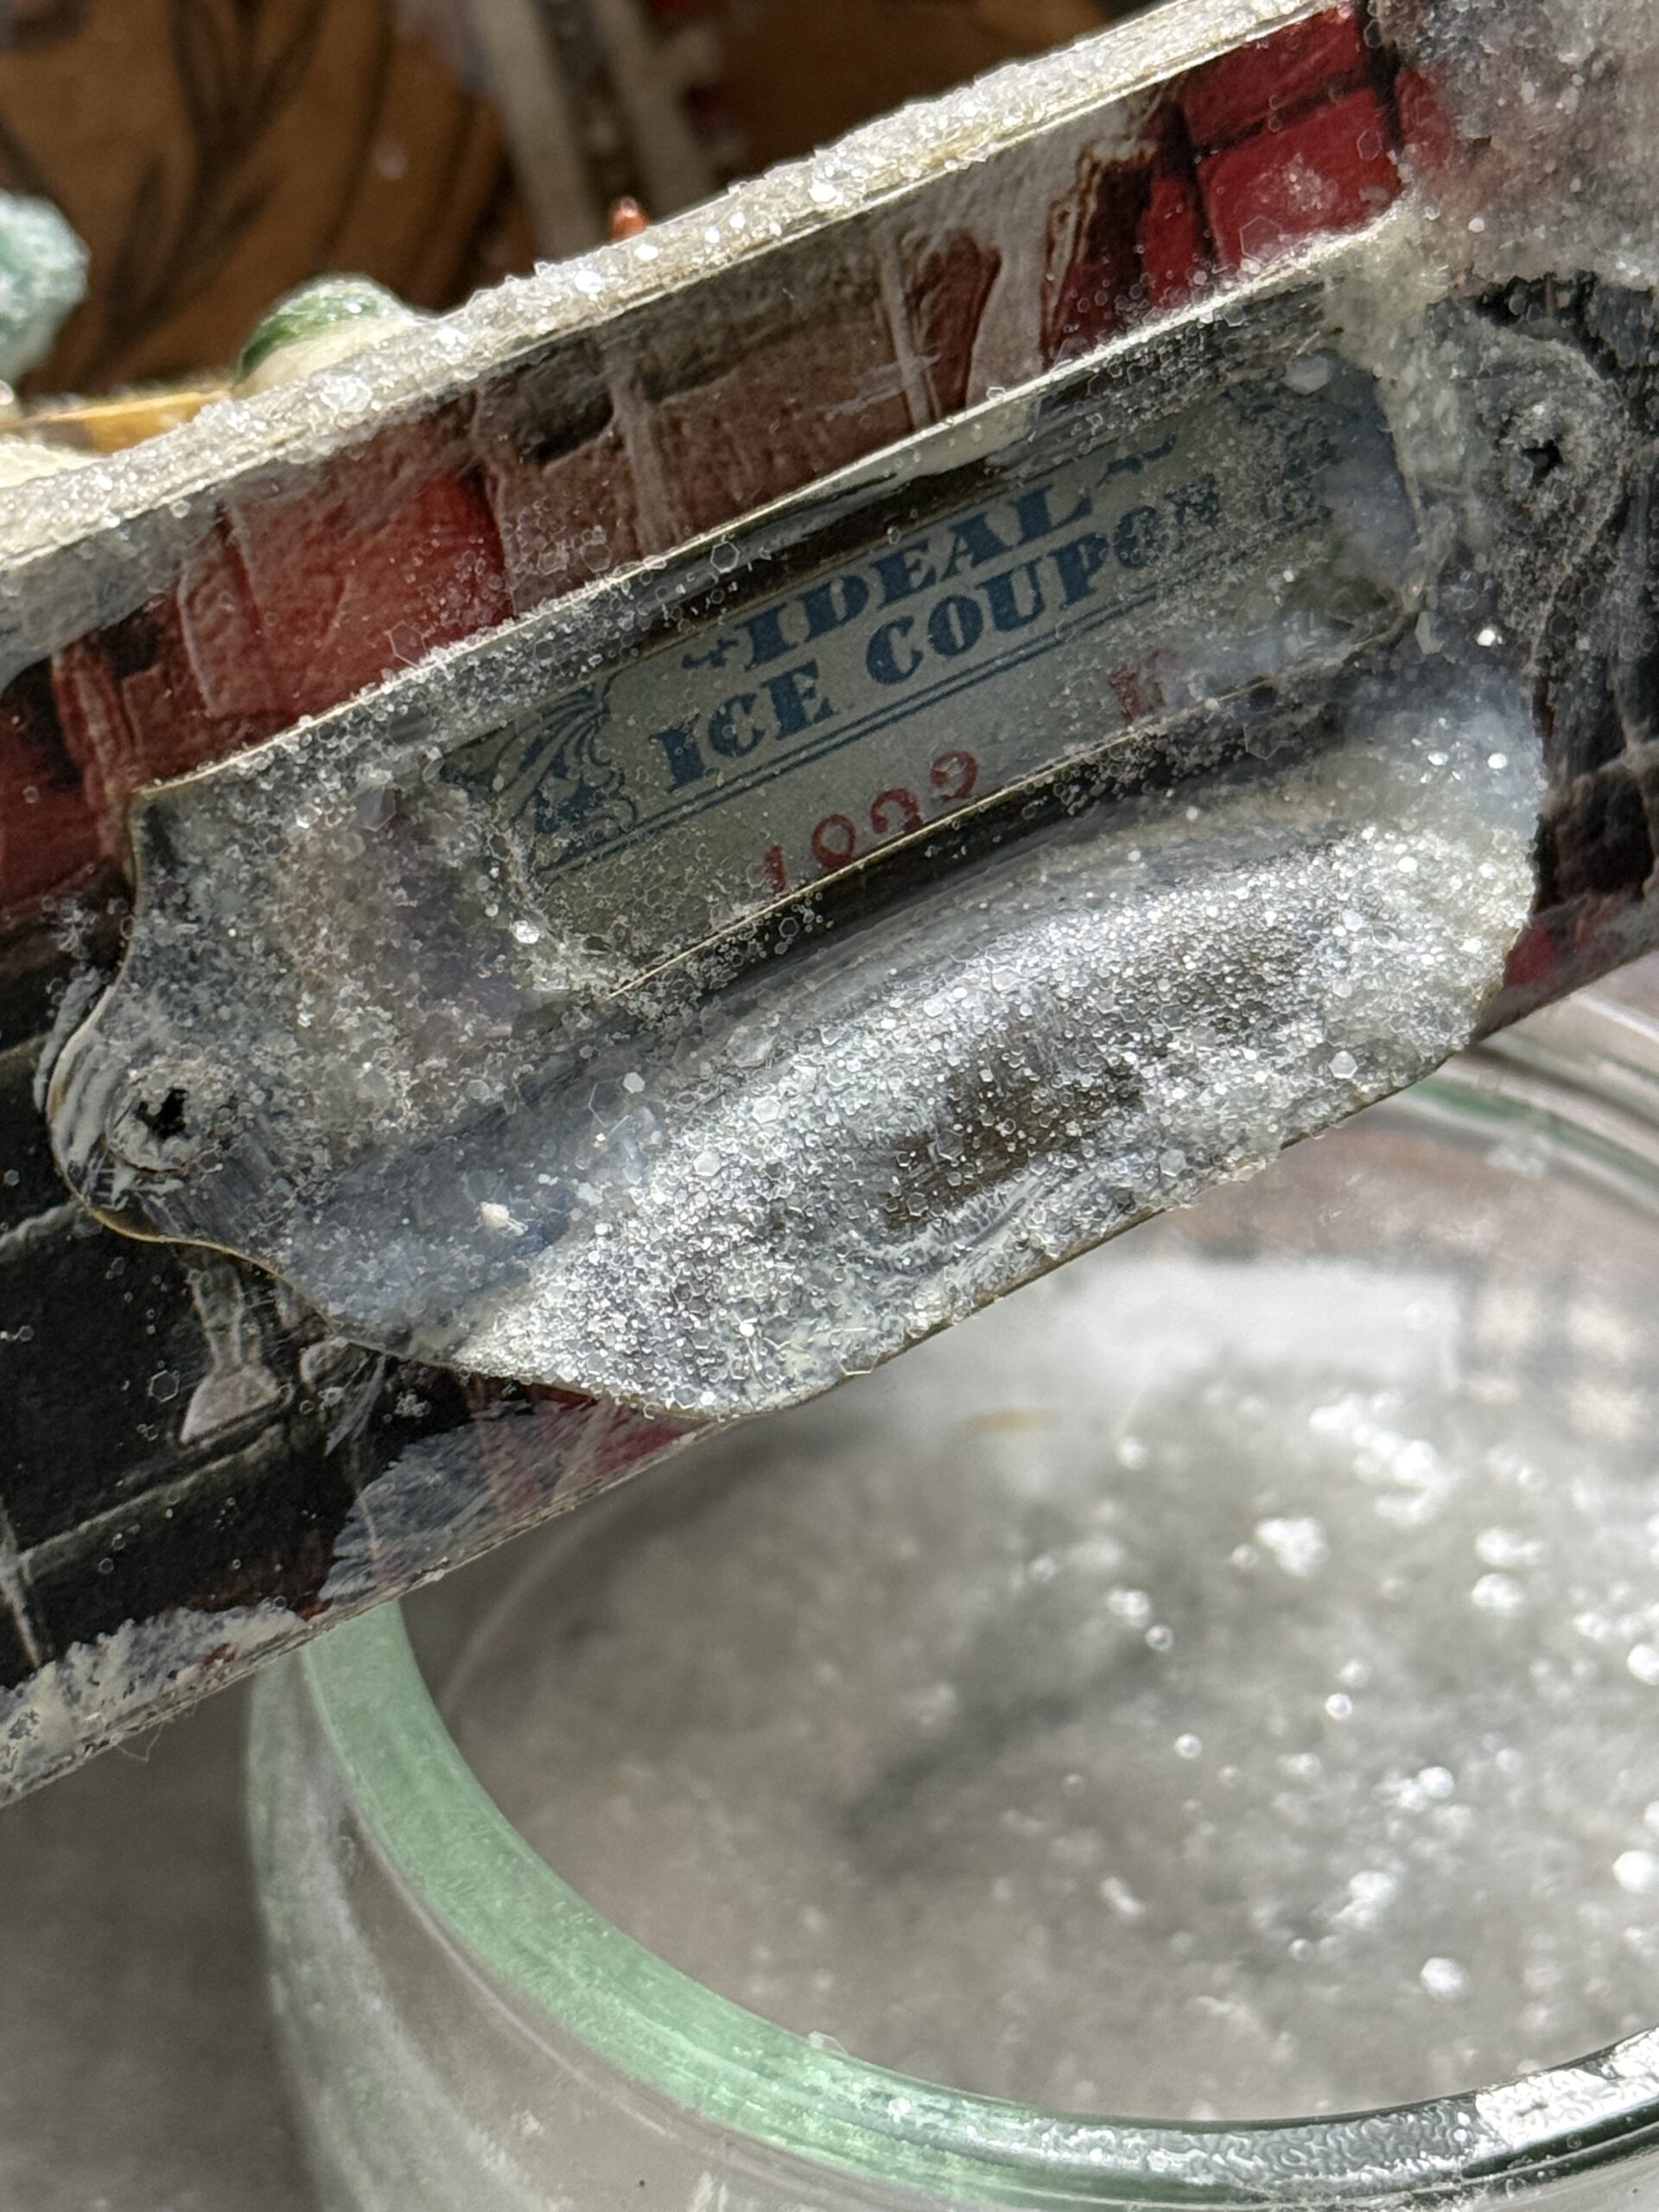
After the Mica Tile was placed, I added an idea-ology Word Band that had been rubbed with a Picket Fence Distress Crayon. This was then added the the bottom of the vignette box using some more vintage tack nails.
I added the file tab drawer pull back to the vignette box, then found a small ephemera piece in the Christmas pack, it fit perfectly with my theme, so I added in into the tab, and rubbed the pull with some Old Paper Distress Paint, Glossy Accents and sprinkled it with glitter.
At this point, I added more of the Snowfall Grit Paste around the vignette, along with some glossy accents rubbed in places, then sprinkled it all with the Clear Rock Candy Glitter. Some of the Snowballs were adhered in place next to the snowman, and up at the top near the trees.
Again, I set the project aside and let it dry for awhile before moving on to the final step, which was adding the little snowflakes to the front of the piece.

I painted a couple snowflakes using Picket Fence Distress Paint, then let them dry. After they were dry, I rubbed them with some Glossy Accents and sprinkled them with some glitter.
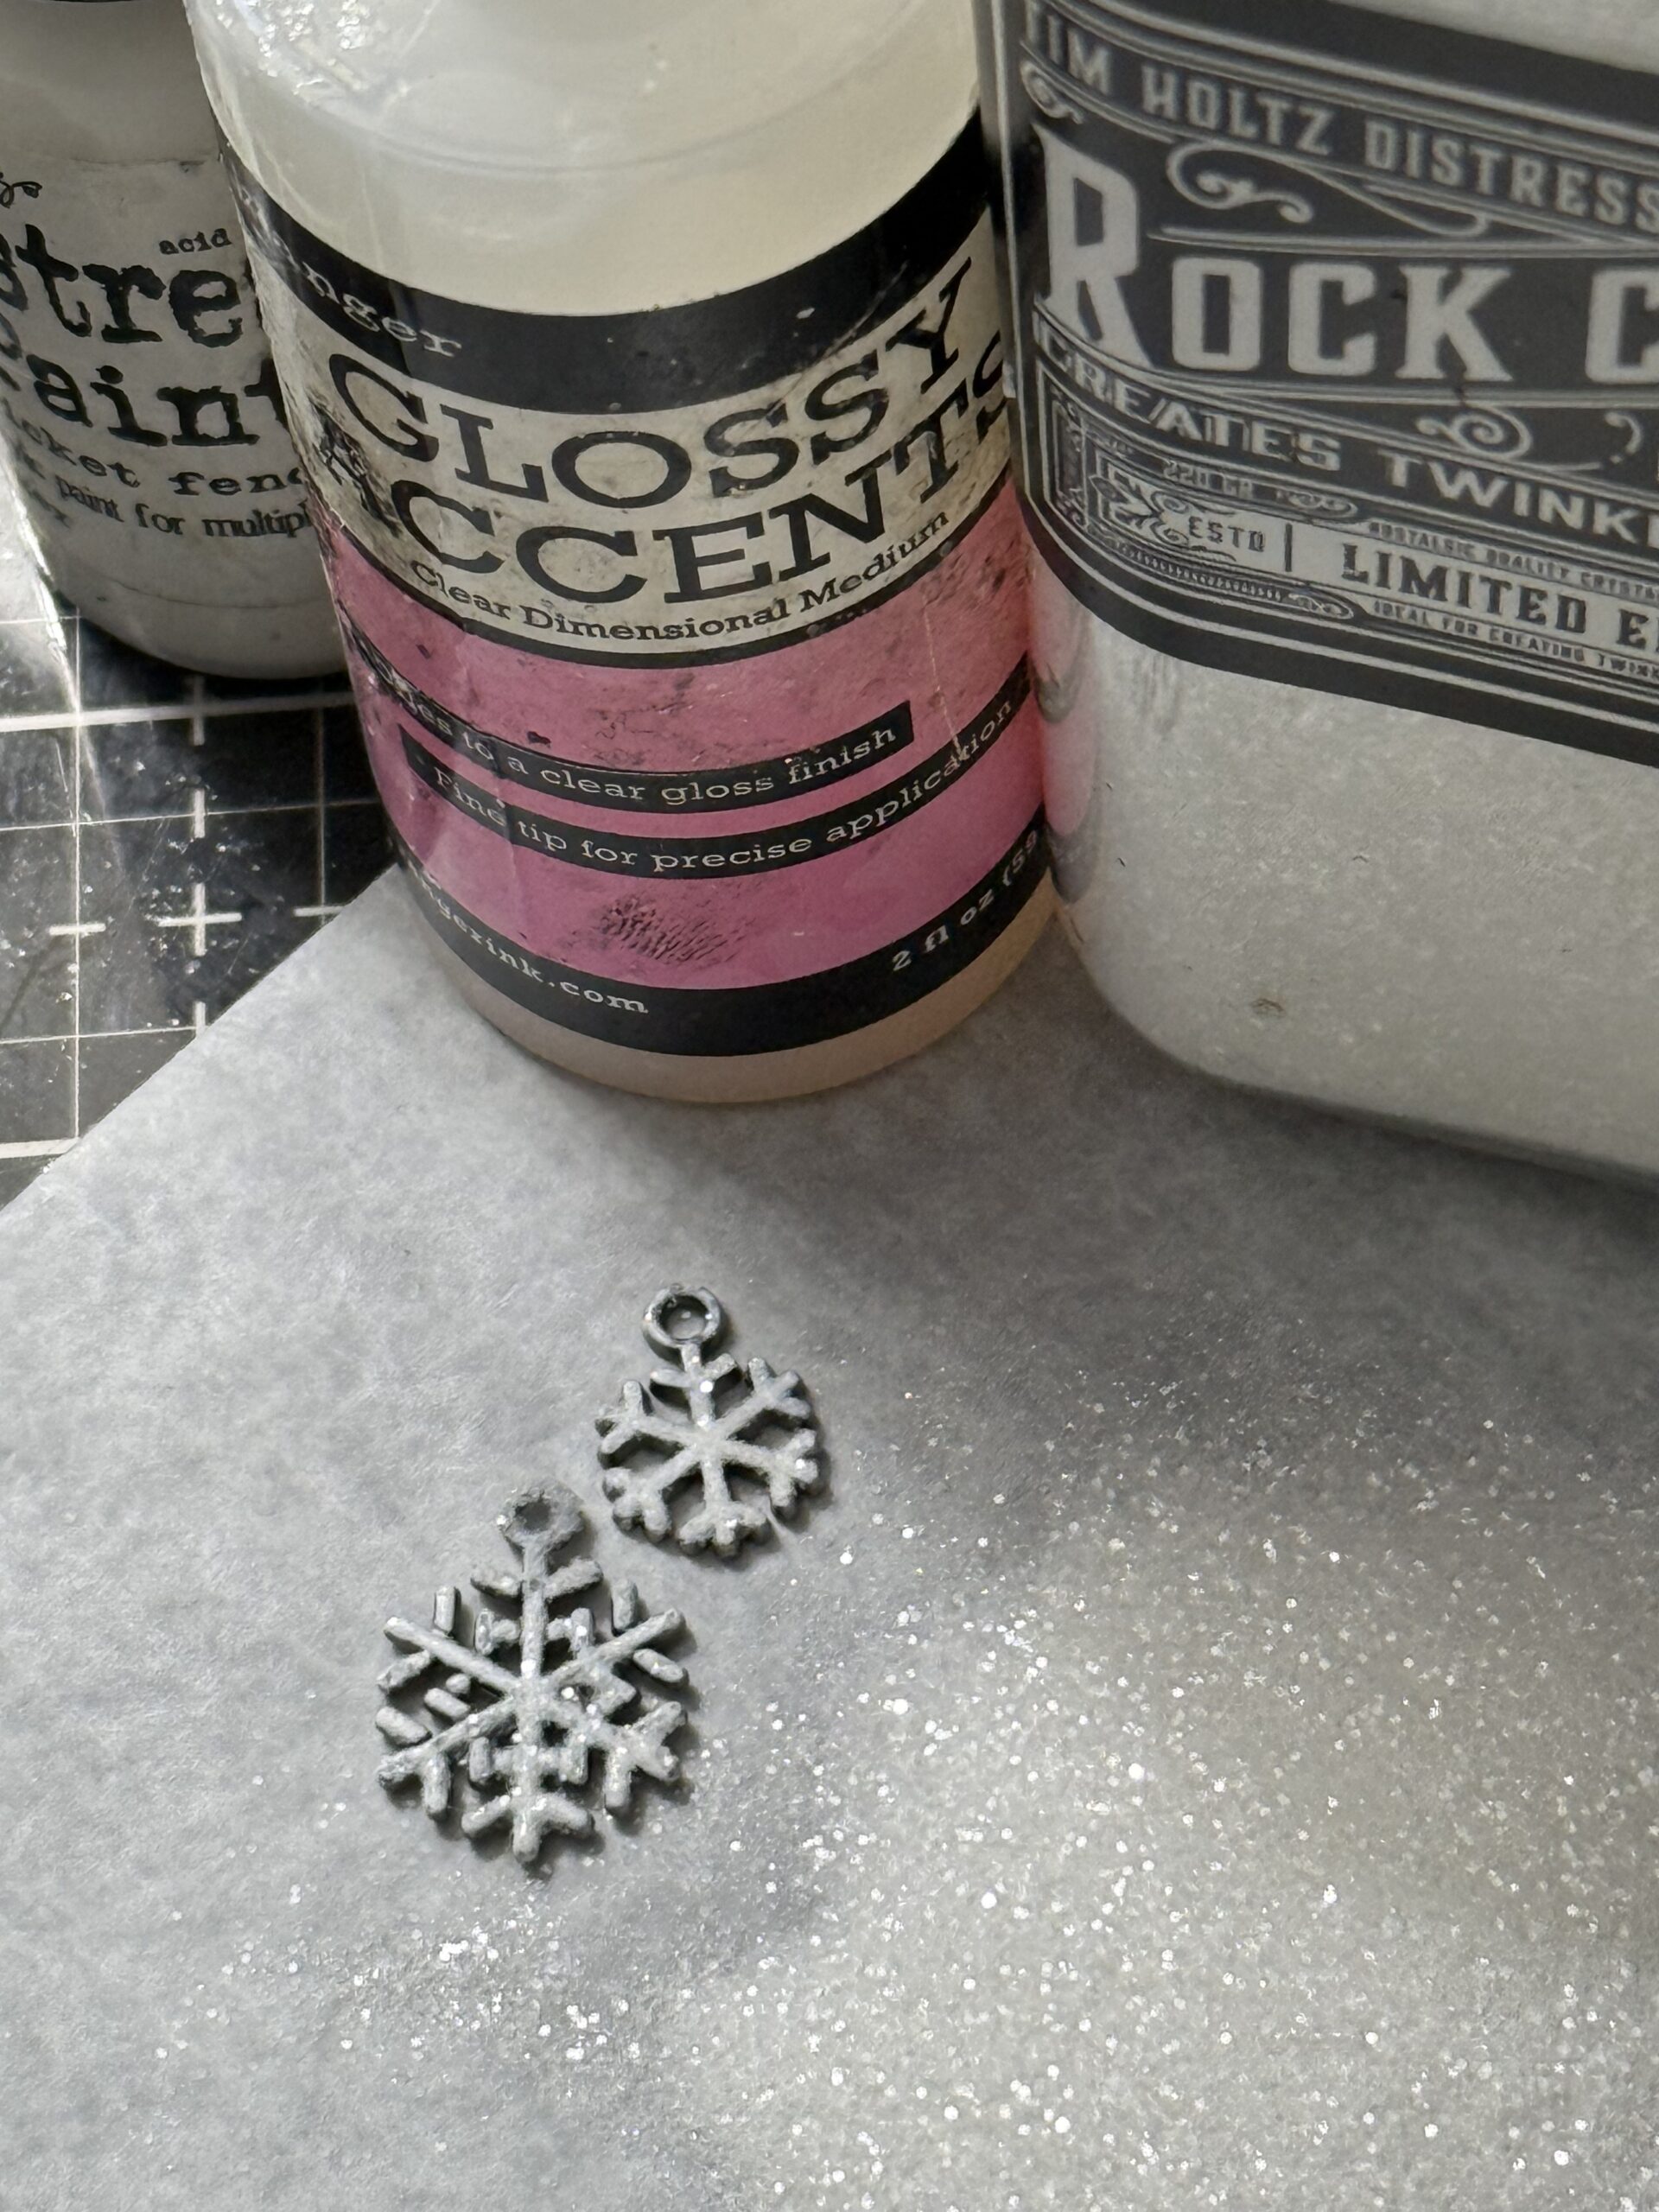
The snowflakes were then nailed to the front of the vignette using nails and a hammer.
I finished the piece off by adding some Glossy Accents here and there, and sprinkling with a final dusting of glitter. With that, my project was complete.
To shop at SIMON SAYS STAMP click HERE.
Products used to create this project are included in the links below. Each time you are inspired and shop through those links, you are supporting me and my blog. I appreciate it SO MUCH as it helps me to provide you with tutorials and to cover the blog fees. THANK YOU!
What is an affiliate program, and why should I click on the link and buy through you?
When you shop via the affiliate link on this blog, I receive a small commission from the affiliate provider (Simon Says Stamp) at no extra cost to you, whatsoever. These commissions help me to cover the hosting fees and other costs to run my blog and be able to provide you with FREE inspiration. If you shop the links, THANK YOU! I truly appreciate being able to share my love of creating with you.


I love your vignette box Frosty scene. It looks amazing and all the frost, snow and sparkle actually gives me a chilly feeling. Thanks for the wonderful tutorial and inspiration.
Another winner from you. I love the snowman’s polka dot scarf and vintage look. And those tree ornaments that look like mercury glass……be still my heart. Thanks for your detailed descriptions of the process too.
Hi Stacy, it is a really beautiful make! I love it very much! Hello from Belgium!
I love this project! One question I have is where would I find the Mica Tile product? I hadn’t heard of this before.
Thanks in advance.
Marilyn
hi, Marilyn! Yes, Mica Tiles can be found online at Art Supply retailers. If you type into a google search, Mica Tiles for Crafting, I’m sure you’ll find some..I even think Walmart and Amazon have them online. 🙂 Hope that helps! Thanks so much for stopping by!-Stacy