Simon Says Stamp Monday Challenge:
Take Note Hello and Welcome back!

It’s my second week participating in the Simon Says Stamp Designer Spotlight and this weeks theme is “Take Note” so with that theme in mind I decided to go in a written word direction.

I created a card using the new Tim Holtz Stampers Anonymous Entomology Stamp Set CMS328 and the new Tim Holtz Stampers Anonymous Theories Stamp Set. To say that I am obsessed with handwritten and text stamps is a total understatement and these stamp sets do NOT disappoint.
In the Entomology Stamp set there is a very delicate and finely written background stamp that stamps beautifully! The bugs are AWESOME as well! They would be perfect for many projects including cards, notebooks, or planners and they scream guy, Halloween and grunge!
In the Theories Stamp set, there are several inspirational greetings that are useful for all different occasions. They are a worn typewriter text font, that I love! The phrase that I chose to use on my card worked well with this weeks theme. Be sure to check both sets out!

As always, Simon Says Stamp will be giving away a $50 gift certificate to use in their shop! Good luck and lets get to making! Let’s get started!
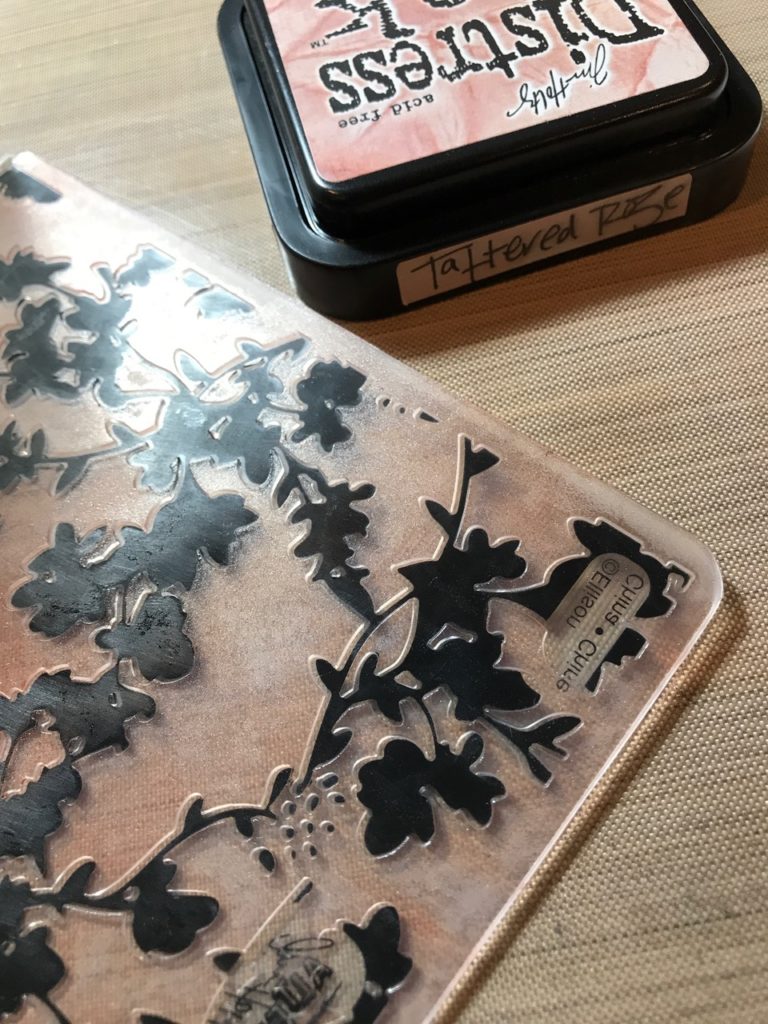
The first step in this card was to make the background…
I inked the inside of my Tim Holtz Sizzix Texture Fades – Floral, with Tattered Rose Distress Ink, the side with the background is the best way to do it, in the newer style fades, it is the side that has the pattern in black.
Then I inserted a piece of watercolor card stock and then ran it through my Vagabond.
After it is embossed it will look like this…
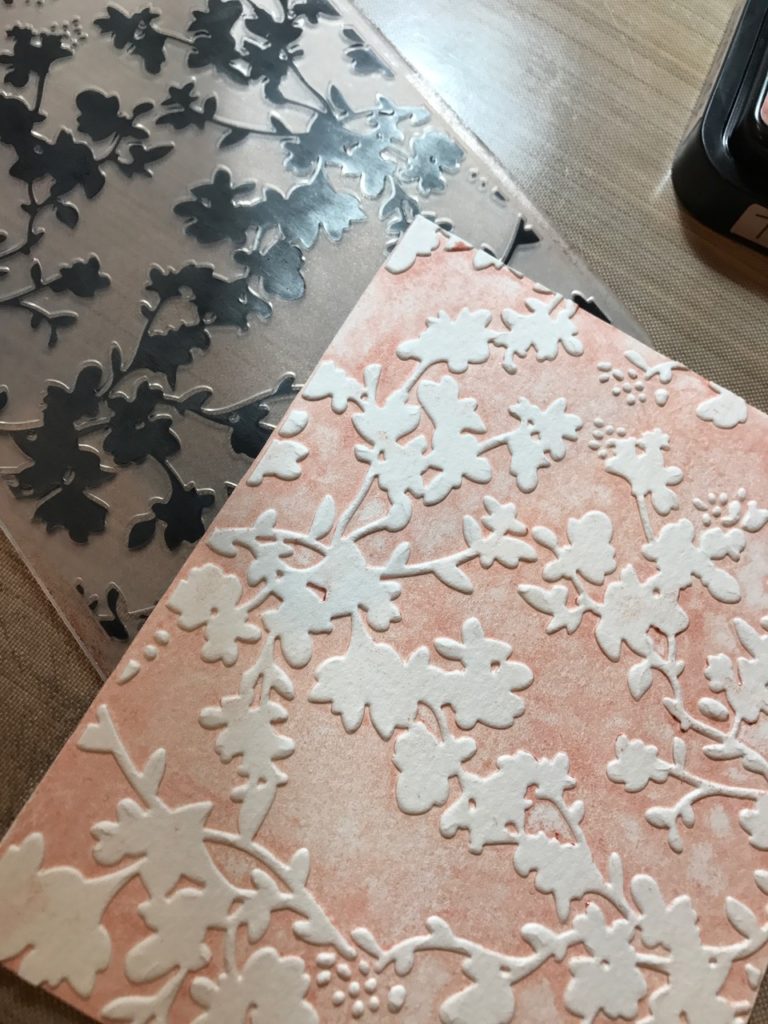
I absolutely LOVE what the ink and texture fades together do to paper! So AWESOME!
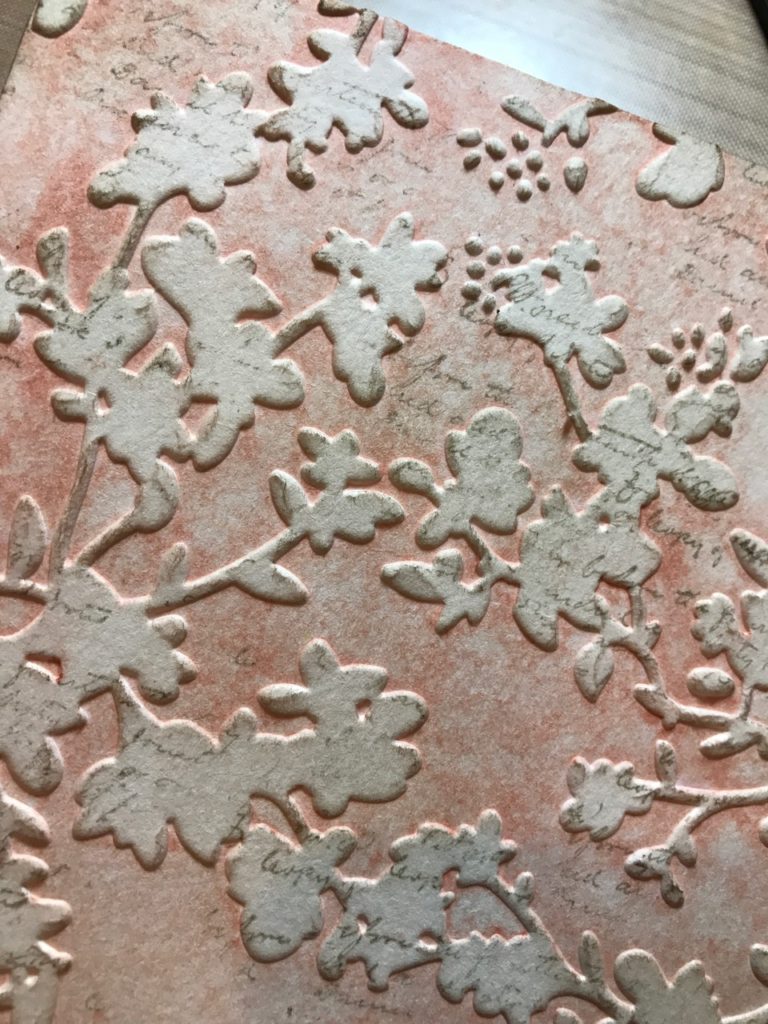
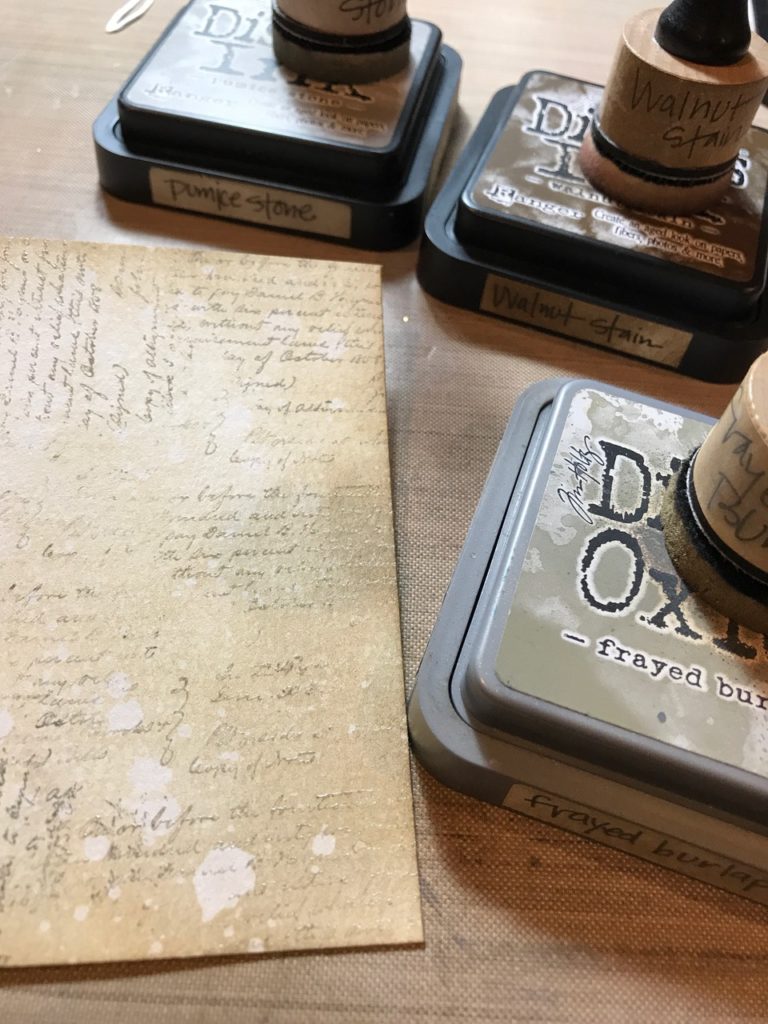
I then sprayed it with my Distress Sprayer, and then dried it with my heat tool. Then I blended a bit of the Tattered Rose Distress Ink over the embossed flowers and stamped the handwritten text stamp with Pumice Stone Distress Ink and blended a bit of pumice stone onto the flowers as well.
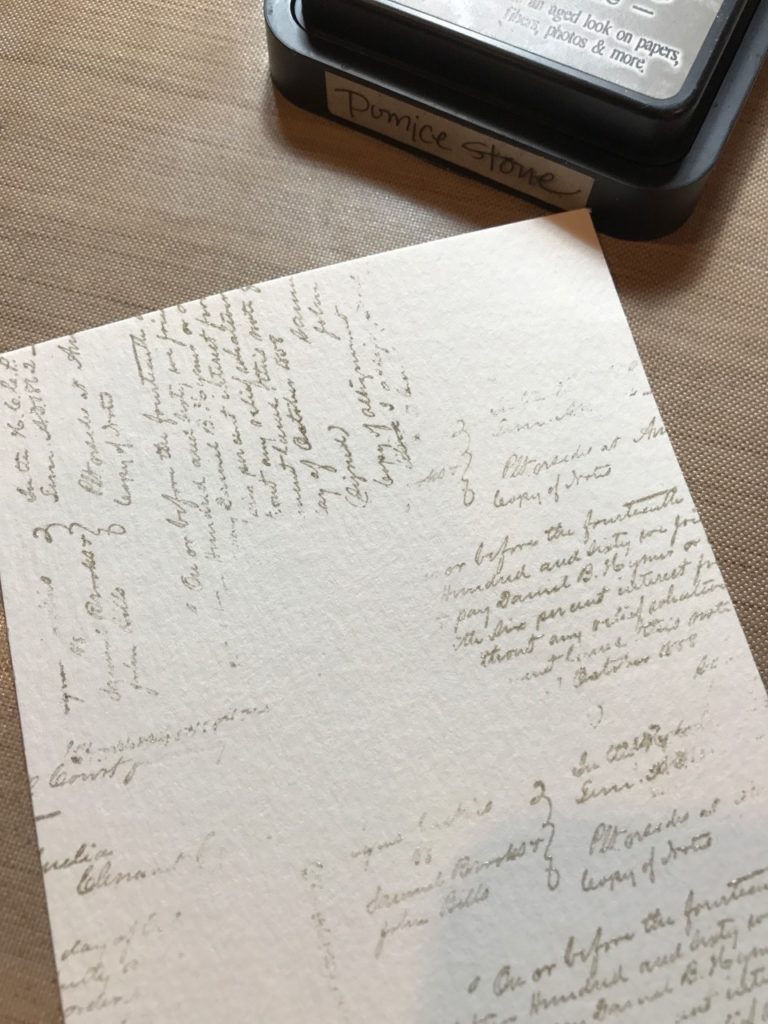
Then I set that aside and started working on the front portion of the card. I cut a piece of water color card stock down to fit the front of my card and with the handwritten text stamp and Pumice Stone Distress Ink, stamped around on the paper and then sprinkled it with clear embossing powder and heat embossed the images.
Then I blended a bit of Frayed Burlap Distress Oxide, Pumice Stone Distress Ink and Walnut Stain Distress Ink plus a bit of water from the Distress Sprayer, dabbed it with a towel and dried it with my heat tool to look like this…
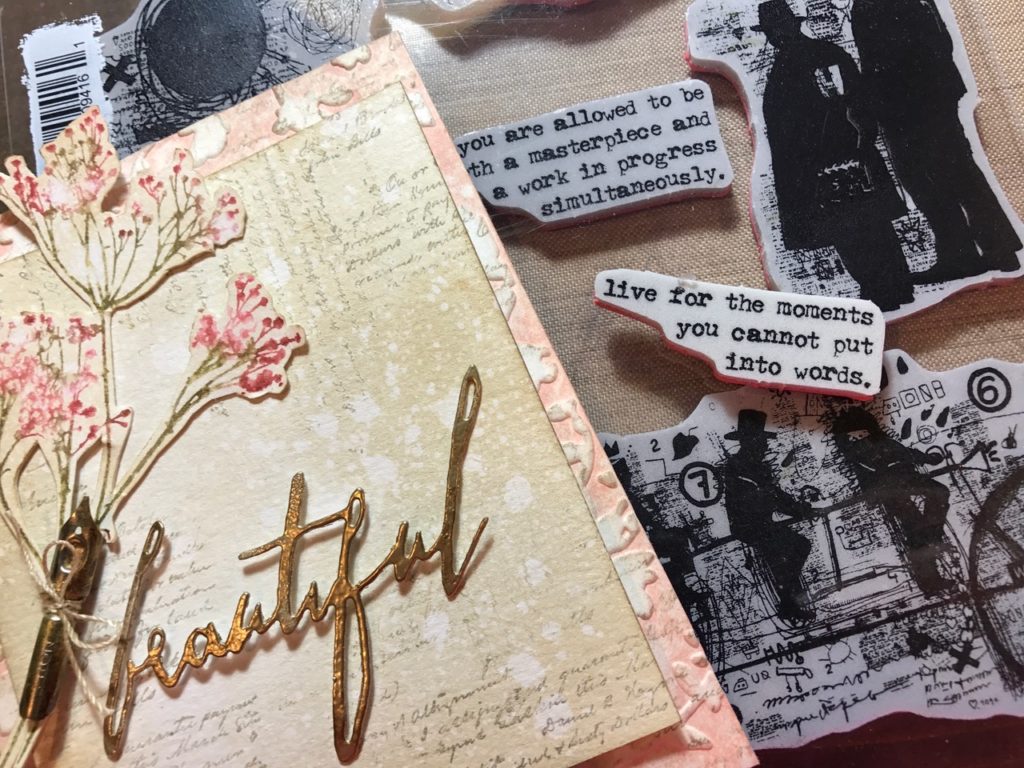
After that I cut the word “beautiful” with the Tim Holtz Sizzix Handwritten Love Die Set from a scrap piece of watercolor paper with my Vagabond. Inked it with Distress Clear Embossing Ink and sprinkled it with Ranger Liquid Platinum Embossing Powder and heated it with my heat tool.

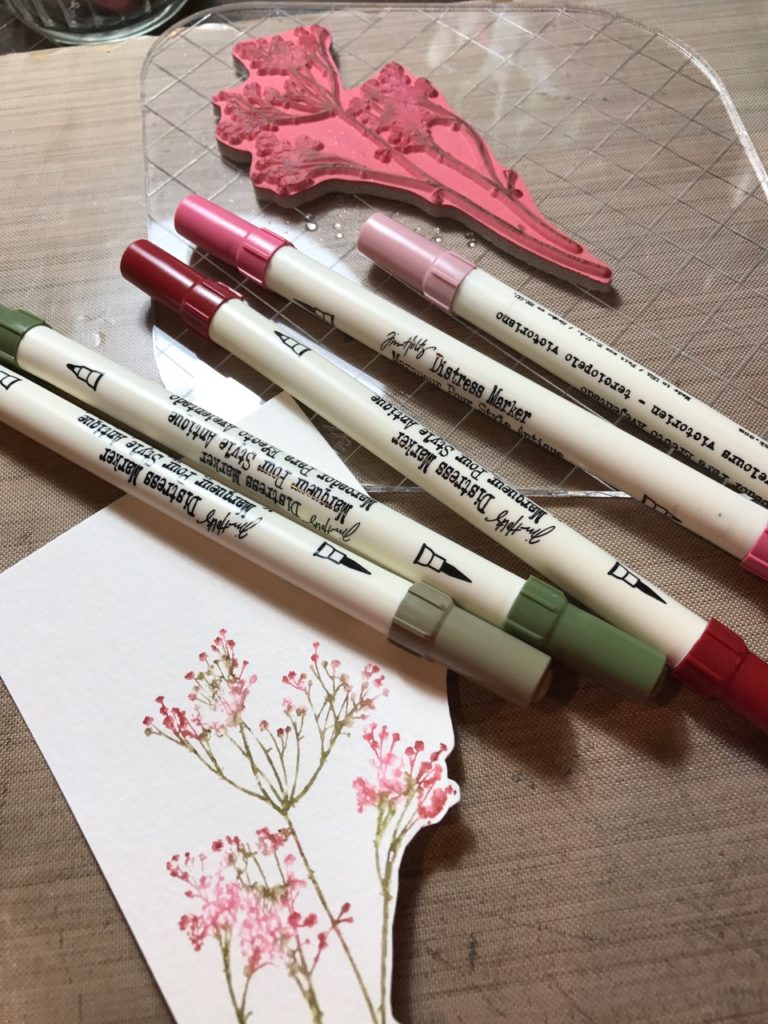
Then on another piece of scrap watercolor paper I stamped the flower image from the Tim Holtz Stampers Anonymous Nature’s Moments (CMS001). I colored directly onto the stamp with a selection of Distress Markers, the colors I used were…Victorian Velvet, Worn Lipstick, Fired Brick, Frayed Burlap and Forest Moss. I then lightly sprayed the stamp with my Distress Sprayer and stamped the flower onto the paper and dried it with my heat tool. I then fussy cut around the flower.
After the flowers was cut out I inked one of the Tim Holtz Pen Nibs with Gold Mixative Alcohol Ink and a bit of Mushroom Alcohol Ink ..then I tied it to the flower stems with a piece of string. I decided the layout of the card and stamped the phrase from the Theories Stamp Set (CMS329)
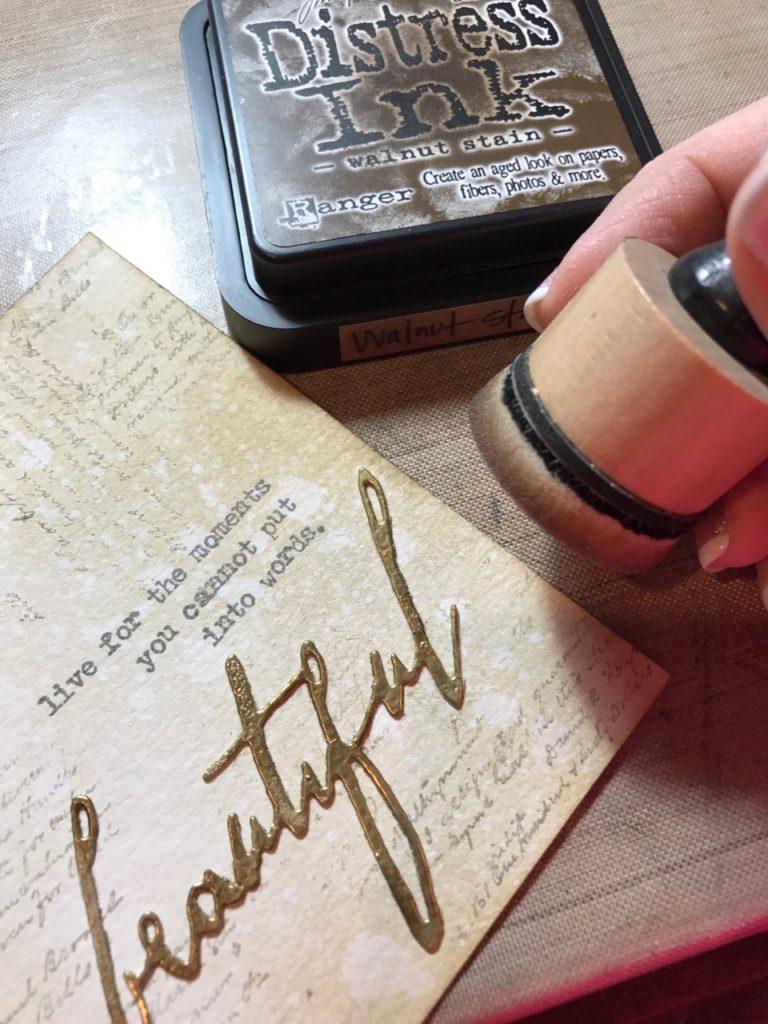
The phrase was stamped with Ranger Watering Can Archival Ink. After the ink was dry I blended a bit of Walnut Stain Distress Ink along the edges. Matted the background paper onto a light pink card stock from the Tim Holtz Paper Stash with pop dots and adhered the rest of the card together.

Thank you so much for stopping by today..I can’t wait to see your projects and what you create! Be sure to visit Simon Says Stamp Monday Challenge next week to see what the next challenge will be!
Creatively Yours,
Stacy
Gather Your Supplies:
Tim Holtz/Stampers Anonymous: Entomology (CMS328), Theories (CMS329), Nature’s Moments (CMS001)
Tim Holtz/Sizzix: Vagabond 2, Texture Fades Floral, Handwritten Love Thinlit
Tim Holtz/Ideaology: Pen Nibs, Paper Stash Classic Kraft
Tim Holtz/Ranger Ink:
Distress Ink- Pumice Stone, Tattered Rose, Walnut Stain
Distress Oxide Ink- Frayed Burlap
Watering Can Archival Ink, Clear Embossing Powder, Clear Embossing Ink,
Heat It Heat Tool, Distress Spray Bottle
Distress Markers- Victorian Velvet, Worn Lipstick, Fired Brick, Frayed Burlap, Forest Moss
Alcohol Ink: Gold Mixative, Mushroom
Other: Canson Watercolor Paper


This is a truly beautiful card Stacy! So happy to see you create your magic and inspire us all through this designer spotlight! I love the colors and what a great way to use the texture fades with ink. Thanks for sharing!
Thank you again for all your lovely comments, Ann! They really mean the world to me! ❤️ I’m so blessed to call you friend! Take care! Hugs!
~Stacy ❤️
This is gorgeous. Your step outs are always lovely.
Thank you so much, Jess!! I’m so happy that you like it…thank you for being so supportive of my creations and blog! ❤️
~Stacy ❤️
Stacy, this card is stunning! Thank you for the step-by-step instructions. I love the addition of the nib (beautiful touch).
Thank you so much, Susie! I’m so glad that you have found the blog and enjoyed this card! ❤️
~Stacy ❤️
In the mornings when I look at my emails, it’s such a JOY to find a notice from your site that you have posted a new project!! Your work is always stunning and I love to sit back and read your clear directions. I hope to copy everything you do–but alas all I seem to get done is “hope”. Keep up the great work!! Thanks much!!!
Hi Sheila! That is so sweet of you to say…it totally made me smile when I read your comment. I am so happy that someone gets excited to see an email from me and that the posts and directions get read…but I hope that you are able to find time someday to give it a try. Thank you so much for the kind words! Take care!
~Stacy ❤️
Gosh, Stacy, this is beautiful! The color palette is gorgeous and it’s such a lovely design.
Cathie ♥
Thank you so much, Cathie!! I’m so happy that you like it. Thanks for stopping by!
~Stacy ❤️
beautiful card Stacy and a great tutorial – love all the step outs you shared here!
Thank you, Paula! ❤️ It makes me so happy that you stopped over to check it out!
~Stacy ❤️
This card is beautiful! I love it. Your instructions are very clear, thank you.
Hi Marci, thank you! I’m so happy that you stopped by to check it out!
~Stacy ❤️
I am so happy I found your blog a few weeks ago! Since then, I have studied every project you have shared. I absolutely adore your style, and your tutorials are so well written and easy to follow. Thank you for sharing your gift so freely:) Katie
Hi Katie! I’m so happy that you found me as well!! That is so sweet of you to say! It is so nice to meet people through the blog that get happy about the same things that you do! It means so much to me!! Take care!!
~Stacy ❤️
Gorgeous card!!!
Thank you so much, Wanda!!! ❤️
~Stacy ❤️
Stunning work, Stacy! I love the pen nib holding the bouquet together!
*mwah*
Steph
Simon Says Stamp!
Thank you so much, Stephanie!!! ❤️
Wow — I don’t know how you could stand to cover up that much of that beautiful background! So gorgeous!
Thank you, Denise! I know…it was hard!! LOL!! Have a great day!
~Stacy ❤️
WOW!! this is an absolutely stunning card Stacy! I love the embossed background, such a lot of detail on there and the flowers with the pen nib and subtle background is absolutely GORGEOUS!! I am going to have to CASE this 😉 so pretty 🙂
luv
Lols x x x
Thank you so much, Lols!! The embossed background with the ink is one of my favorite techniques…it always turns out amazing!
Can’t wait till next weeks challenge! Take care!
~Stacy ❤️
Such a lovely project!! The subtle colours are so pretty together and I both the embossed and the oxide backgrounds are wonderful. Beautiful flowers too and great idea with the pen nib!
Thank you, Anna-Karin! It’s always amazing to see the embossing with the Inks. Thank you so much for stopping by! I’m enjoying my time participating with you all in the challenges!
~Stacy ❤️
Gorgeous card, Stacy! Love the dusty rose color and brilliant touch with the pen nib! Happy Valentine’s Day! Maura
Thank you so much, Maura!! I loved that color as well…and happy Valentine’s Day to you as well!! ❤️
~Stacy ❤️
This is such a beautiful card. I love the soft colors you matched. Amazing harmony. The soft rose looks so romantic with delicate beige and light browns. I love both backgrounds but the floral one is just breathtaking. Hugs, Marzena
Thank you, Macarena! The color combo got me as well, and I agree, that floral background was one of those that you get excited about! ❤️ thank you so much for stopping by. Hugs!!
~Stacy ❤️
Everything you do is lovely but this is just beautiful.
What a nice thing to say and I’m so glad you like it, Betsy! Thank you for stopping by!
~Stacy ❤️
I keep coming back to this amazing and beautiful card! I am a fan of soft and vintagy. I am appreciative of you including the instructions and materials. Going over to subscribe now and certainly look forward to your upcoming posts! Thanks for sharing!
Thank you, Jill! You are so welcome..I’m happy you found me! Vintage is my favorite! 😊 thank you for subscribing!
~Stacy ❤️
This is such a lovely and elegant piece! I am amazed at how you brought your background to life and I love how it frames out your central imagery. And how clever to incorporate the pen nib the way you did! You are SooOoooO full of clever ideas and this was a real treat to see!
Thank you so much, Andrea! I’m so happy that you liked it. I love making backgrounds and embellishing with Tim goodies is FUN! Thanks for stopping by!
~Stacy ❤️
stunning notebook Stacy, love that gorgeous background and those flowers are dreamy, hugs kath xxx
Thank you so much, Kath! I’m so glad you stopped by to have a peek! Hugs right back!
~Stacy ❤️
Love your gorgeous creation, Stacy. The embossed background and the colors you created are amazing. Great inspiration! 🙂
Thank you so much, Meihsia! It was fun to make, I’m so glad you like it!
~Stacy ❤️
This is another gorgeous piece of art, Stacy! The colours are so pretty and so feminine and I love how you’ve interpreted the challenge, it’s just all come together perfectly! <3
Thank you so much, Emma, my sweet friend! ❤️
This card is so pretty! I love it!
Thank you, Zoey!
~Stacy ❤️
BEAUTIFUL indeed! I’ve never seen the Wildflower looking finer, and I love that you’ve added the pen nib! Squeal! Your backgrounds are amazing! thank you for the wonderful tutorial. I think I may have to CASE this card for my Mom’s Mother’s Day card! Off to the Closet to see what I have! Happy Sunday!
That’s wonderful! I’m sure yours will be fabulous…you are an amazing artist! Thank you for all the kind comments and for popping over! Hugs! ~Stacy ♥️
I just found this lovely business on Pinterest. Beautiful work. I know the techniques but the artistry is putting it all together and you certainly did that expertly. I have subscribed to this site, I hope to learn from you as time goes by. Thank you so much for sharing.