Hello there, friends!
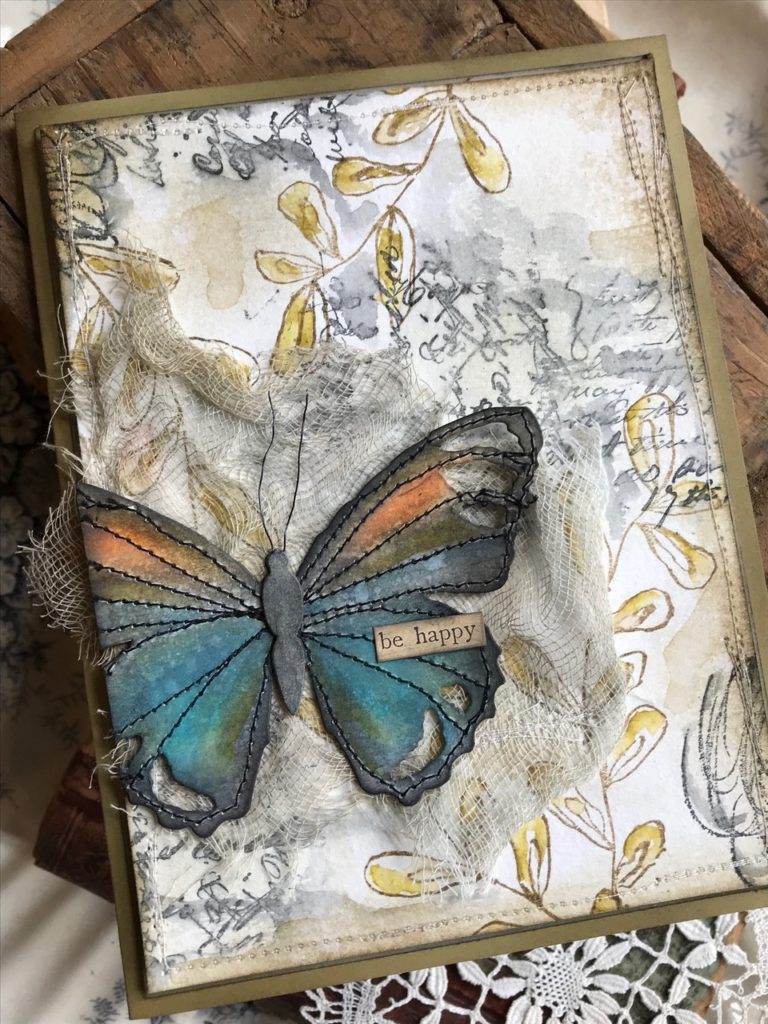
I hope you are all well! I’m back today with a new tutorial for you…. this one features the new Tattered Butterfly Bigz die combined with the lovely new Stampers Anonymous Media Marks 2 (CMS363) Stamp Set. (These have become some of my favorites from the new releases!)
I LOVE combining Sizzix dies with stamps. They harmonize so perfectly together!
I started out by creating the background paper… then cut the large butterfly out of a piece of watercolor paper, and stitched the edges with my sewing machine and black thread. I watercolored the butterfly with Distress Markers and a Water brush…and, Lickety split, it turned out to be the perfect accent on my card!
Let’s begin!
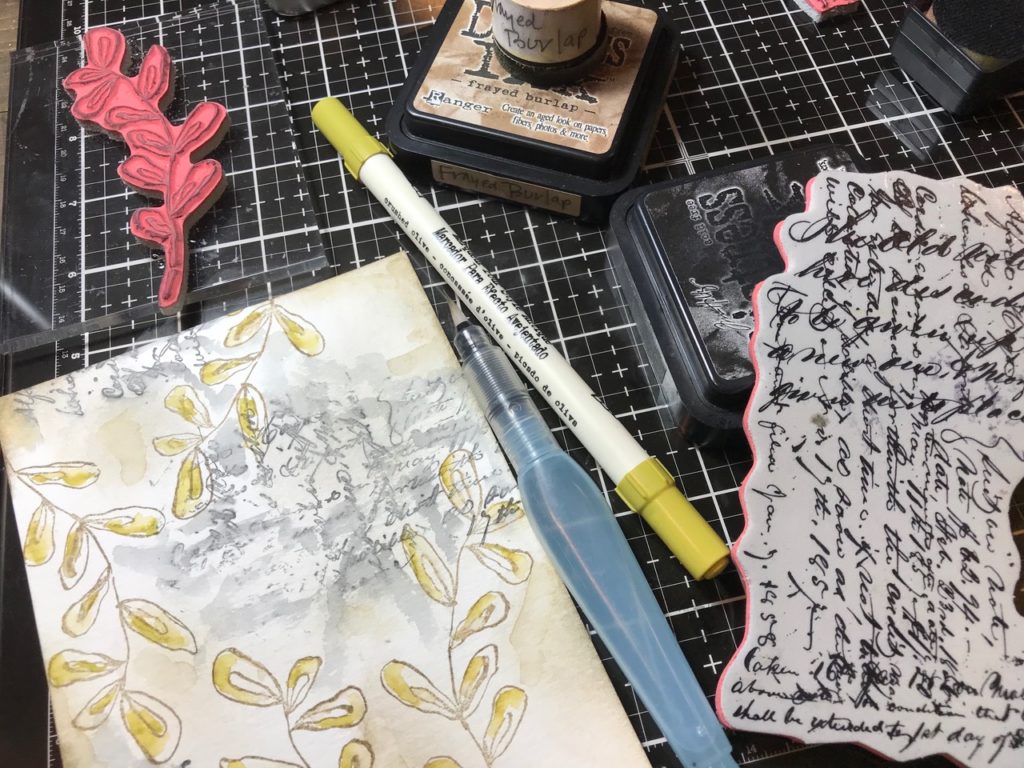
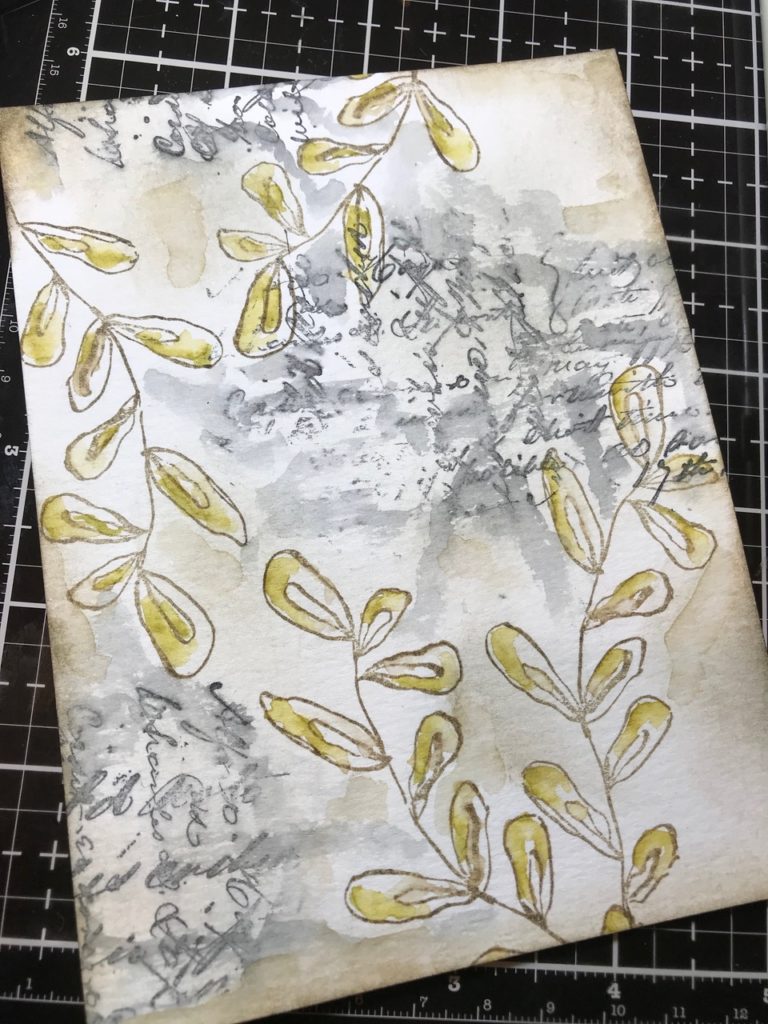
I first began by stamping the leaf onto a piece of Distress Watercolor Paper using Frayed Burlap Distress Ink, then colored it with Crushed Olive Distress Marker and blended the ink with a Detail Water Brush and dried it with my heat tool.
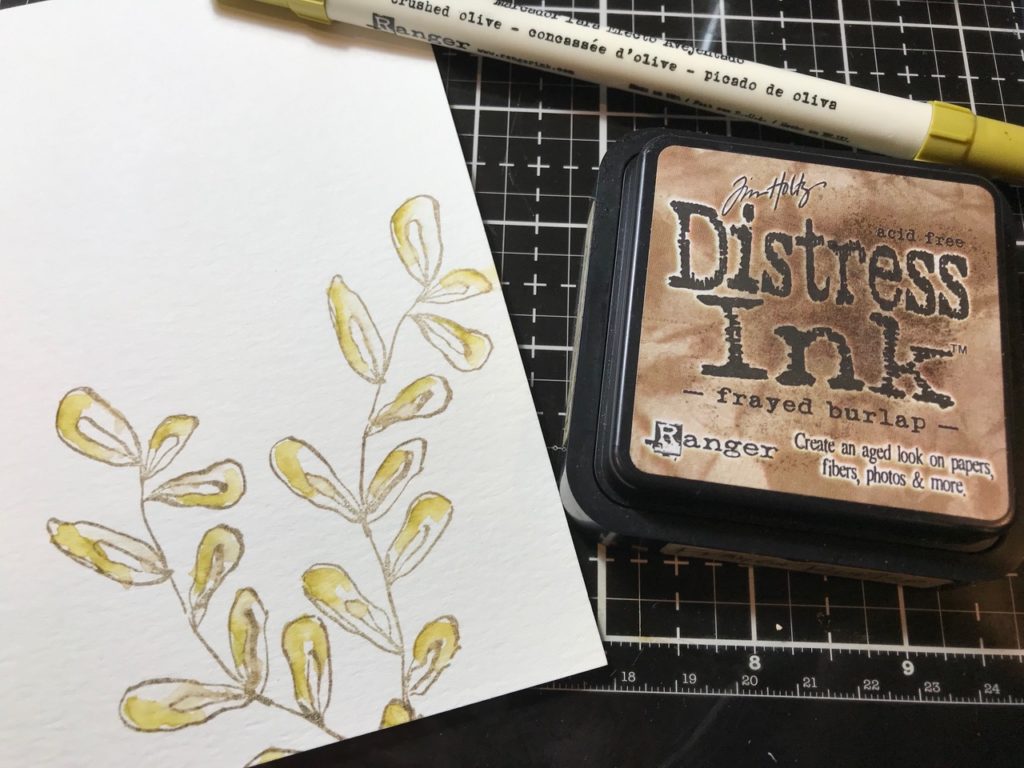
I then added a few more leaves, colored them and stamped some handwritten script (Ledger Script CMS241) using Black Soot Distress Ink.
I lightly blended some areas with the Frayed Burlap Distress Ink then blended the area with the Water Brush and dried it with my Heat Tool. I watercolored both the Black Soot and Frayed Burlap water-downed inks randomly around the outside of the leaves to give the background a more watercolored look. Then dried it with my heat tool.
After the background was dry, I blended the edge of the card lightly with Frayed Burlap Distress Ink.
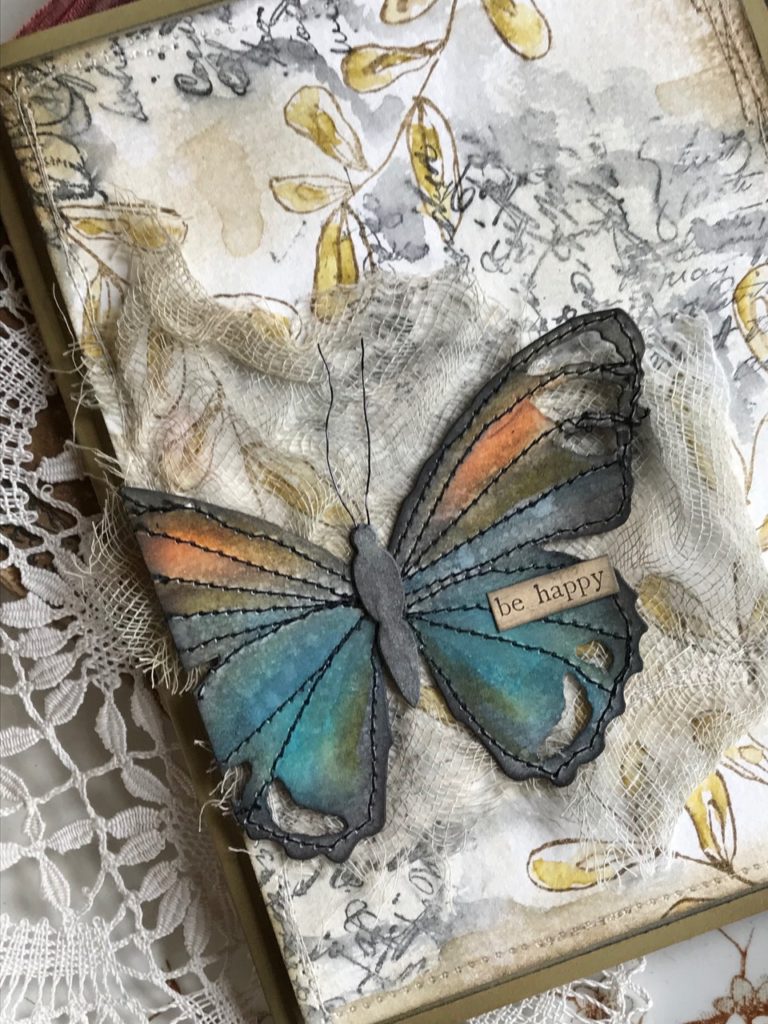
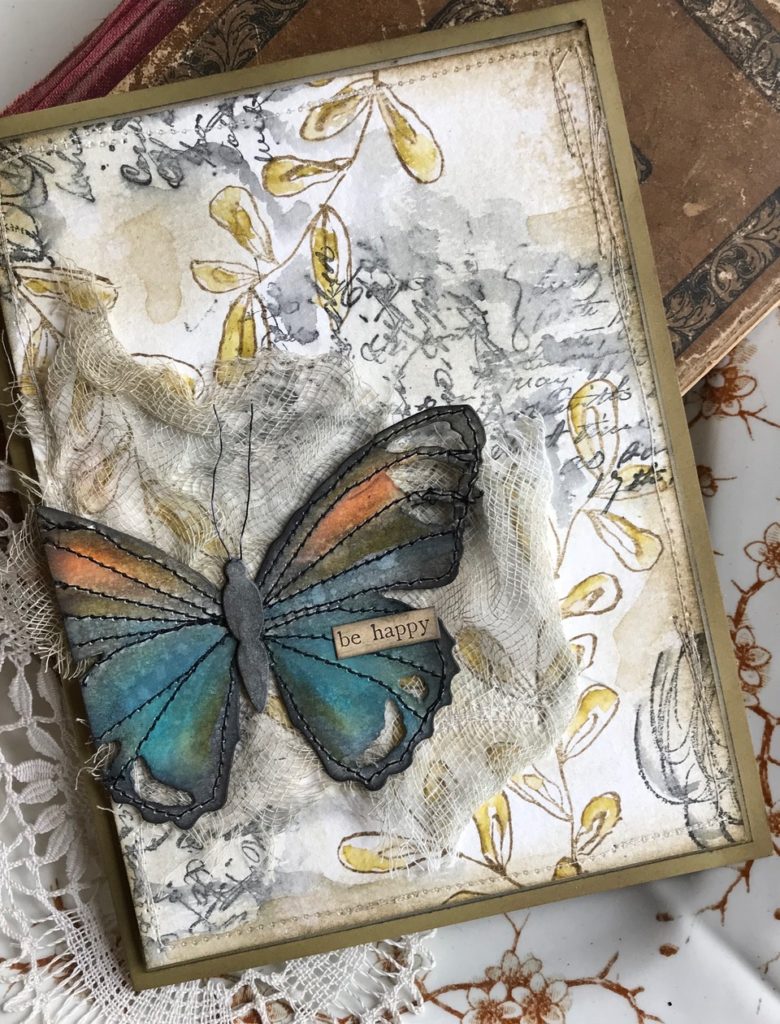
adding the cheesecloth…
After the background was complete, I messy stitched around the outside edge of the card with my sewing machine and cream thread. I cut a piece of cheese cloth and dyed it with Frayed Burlap Distress Ink and water, and dried it with my heat tool. I stitched the cheesecloth to the background paper.

the butterfly…
I cut the butterfly from a piece of watercolor paper and with my sewing machine and black thread, carefully stitched onto the butterfly to create a wing pattern. The secret to stitching the detailed areas around the wings is to go very slow!
Although…you’ll notice the left side of my butterfly is missing a portion of its wing, that was because while stitching, the paper ripped. I decided to “wing it”! HA! 😉 (sorry, I couldn’t resist)
I just chopped off that portion of the butterfly and added it to the edge of my card!
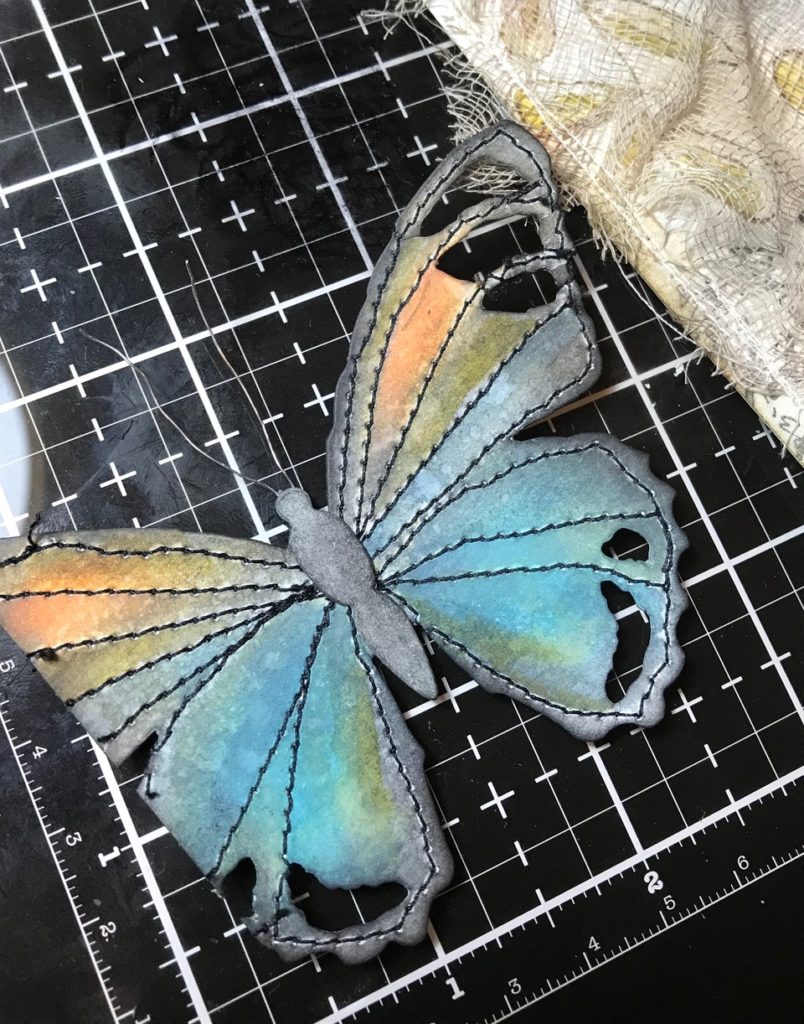
I watercolored the butterfly with a variety of Distress Markers and some Oxide Inks. Then blended the outside edge of the butterfly with Black Soot Distress Ink. I embellished the butterfly with some thin wire to create antenna, and added the butterfly body.
The phrase “be happy” came from the Idea-ology Sticker Clippings. I lightly blended the outside edge of the sticker with Black Soot Distress Ink.
The butterfly and phrase were both adhered to the front of the card and with that, the card was complete!
Thank you so much for stopping by… have a wonderful day!
Creatively yours,
Stacy
What is an affiliate program, and why should I click on the link and buy through you?..
When you shop via the affiliate link on this blog, I receive a small commission, from the affiliate provider (Simon Says Stamp), at no extra cost to you whatsoever. These commissions help me to cover hosting fees and other costs to run my blog and be able to provide you with FREE inspiration. If you shop the links, THANK YOU! I truly appreciate being able to share my love of creating with you.
Gather Your Supplies-
Tim Holtz/Sizzix- Tattered Butterfly, Vagabond 2
Tim Holtz/Stampers Anonymous- Media Marks 2 (CMS363), Ledger Script (CMS241)
Tim Holtz/ Idea-ology- Sticker Clippings
Tim Holtz/Tonic- Tonic Guillotine Paper Trimmer, Tonic Shears
Tim Holtz/Ranger-
Distress Ink- Frayed Burlap, Black Soot
Distress Oxide- A Variety of Colors
Distress Markers- Crushed Olive
Distress Tools/Mediums- Distress Sprayer, Media Mat, Heat it Heat Tool, Blending Tools, Distress Collage Matte Medium, Distress Watercolor Paper, Detail Water brush, Wire Trimmers
Other- Thin Gauge Wire, Black Sharpie Marker, Cheese Cloth, Sewing Machine, Black Thread, Cream Thread


Again, you can throw anything together and it is beautiful vintage whimsy.
thanks so much, Amy!
Such charm and goodness….
thanks again, Amy! 🙂
beautful, Stacy!!! love it!!!!
thank you, Marty!
Ha, Ha, Ha! “wing it”, too funny…love all the watercolor effect you achieved. I finally received my Tattered Butterfly die this past weekend, but have not felt well enough to play, yet. It is taking me longer to collect my supplies for my project…but, I will get there…LOL.
thanks so much, Sherry! I hope you’re feeling better soon! I’m so happy you got the tattered butterfly, you’re going to love it!
Another absolutely gorgeous project! Keep them coming!
aww, thanks so much, Cyndi! I will do my best! 🙂
this is gorgeous Stacy!
thank you so much, Lisa!
What a fabulous card! What kind of sewing machine do you have?? Asking because I am looking to buy one, and it needs to be one for craft and easy to use.. EASY!!
Hi Christel! I actually have 2 sewing machines…I keep one loaded with cream thread and one with black. One is an old Kenmore sewing machine that I inherited from my mom, and one is a newer Janome. Both work really well…they don’t have to be fancy to work on paper. The only thing is that your needles will dull quicker, so they’ll need to be changed more often. I hope that helps. Sewing on paper is seriously one of my favorite things to do, it’s fairly easy and always adds that little extra something to a project! If you have any other questions, let me know! Thanks for stopping by! – Stacy
I have one tip, always test on a scrap piece of the same paper you will be stitching on so that you can adjust the tension…I have had a real mess on some of my pieces when I did not test first….LOL…yes, it is fixable, but it is easier to test first.
Oh definitely, YES! I always test it first…I have also, unfortunately had some super knots and messes with the sewing machine…LOL! Thanks for the tip, Sherry! 🙂
Absolutely AMAZING, Stacy! Thanks for the steps.
aww, you’re sweet, Macarena! thanks so very much!
Beautiful! I absolutely love that butterfly!
me too, Stephanie!! they are so easy to embellish! Thank you!
Well, you had me at the water color background, but that stitched up butterfly is amazing! I read in your reply to a comment above that you keep two machines at the ready with different color threads. Smart! One of the things that prevents me from stitching on my projects more often is it’s so durn hard to thread (Old eyes!) You are truly an inspiration and I appreciate your wonderful tutorials. Hugs!
Thank you so much, Sara Emily! Having both of the sewing machines in my room is definitely a huge help. I’m glad that my little tips are helpful. Thank you, as always, for your kindness!
Very gorgeous design! Love how you stitched in black around that drop dead gorgeous butterfly!
The stitched wings definitely make me happy! LOVE every detail on this delight…you are amazing girl!
I love this card! The colors and that butterfly!! Your directions are fabulous, so easy to understand. Can’t wait to give something like this a try. G