Simon Says Stamp Monday Challenge

Hello Again and Welcome!
I’m so glad that you stopped by! This is my final week in the Designer Spotlight at Simon Says Stamp Monday Challenge. I just want to take a moment and thank Lols, the Monday Challenge Design Team, Simon Says Stamp and all of you for making my time participating a GREAT one! It was such a pleasure to play along and be welcomed so kindly. It has truly touched my heart to read all the wonderful comments…they mean so much to me! Thank you for that!
Now on to the challenge…


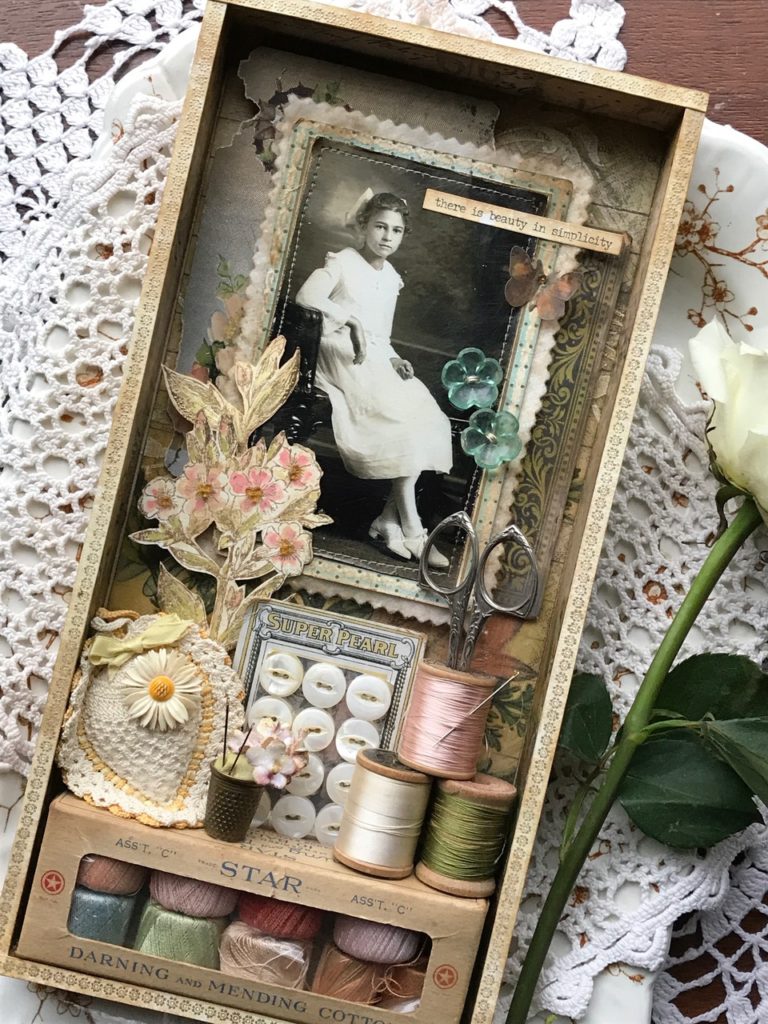
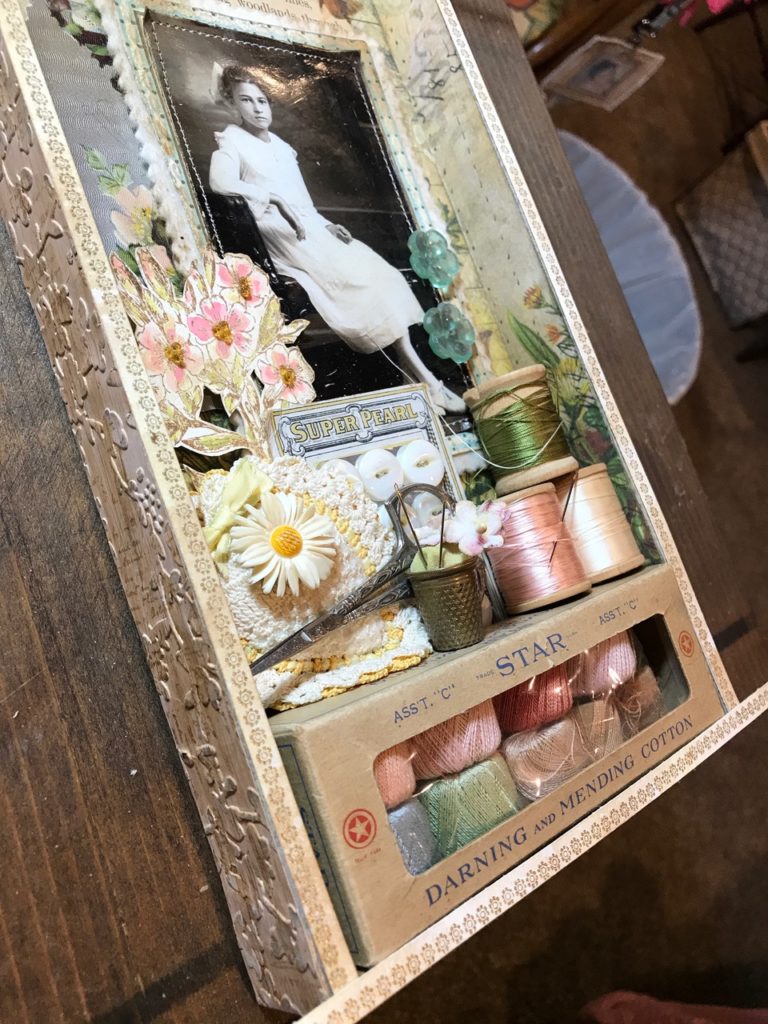
This weeks Challenge theme is “In My Garden”…as soon as I found out the challenge I knew that my grandma, Mabel, would be the perfect subject for a vignette. She had a true love for flowers, sewing and quilting. She was a avid gardener and spent countless hours keeping her gardens planned and pruned. Along with gardening she had a love for sewing, was a seamstress for many years, and quilted from the time that she could hold a needle. As a child, I remember sorting through her button tin which kept me busy while she sat quilting. I knew I wanted to combine all of her favorite things along with a photo of her. I hope that you enjoy my interpretation of the challenge.
Please be sure to join us in the challenge…as always, Simon Says Stamp will be giving away a $50 gift certificate to use in their shop! Good luck!
Lets get started!
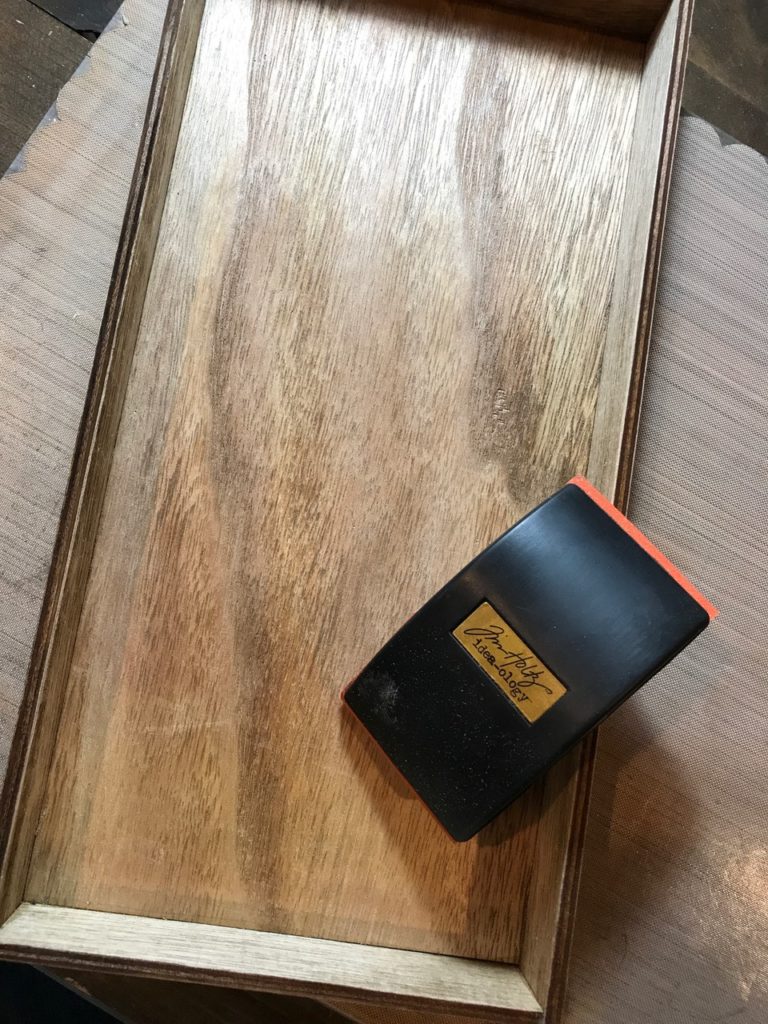
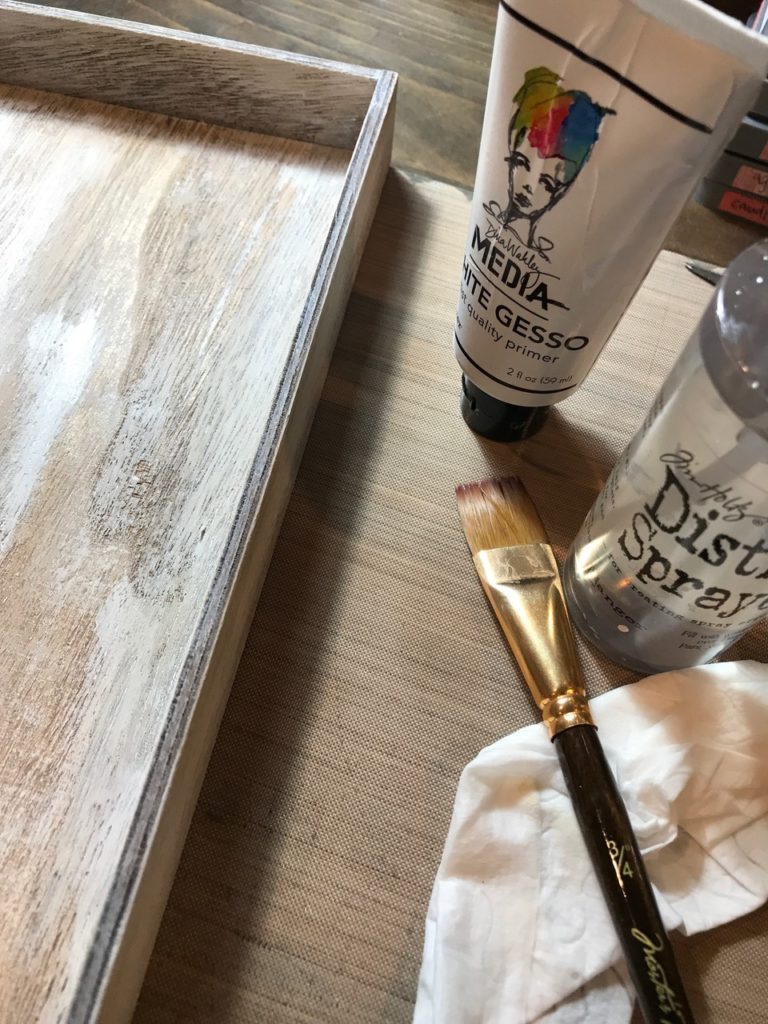
First, I began by prepping my vignette box.. I sanded all the edges a bit and then painted it with a wash of white gesso and water, just to give it a good tooth to adhere the background paper to. I used the large size vignette box that is approximately 5 1/2″x12″… this was the perfect size to add a photo at the top and then add embellishments below.
I then selected a paper from the Tim Holtz Wallflower Paper Stash to use for my background, cut it to size to fit on the back of the box, and added a bit of texture paste through the Tim Holtz Flourish Layering Stencil with some Crackle Texture Paste and a Palette Knife. I sprinkled a bit of Ranger Liquid Platinum Embossing Powder onto it and set it aside to dry…(this sometimes feels like it takes forever) ….when it was dry and crackled, I heat embossed the powder.

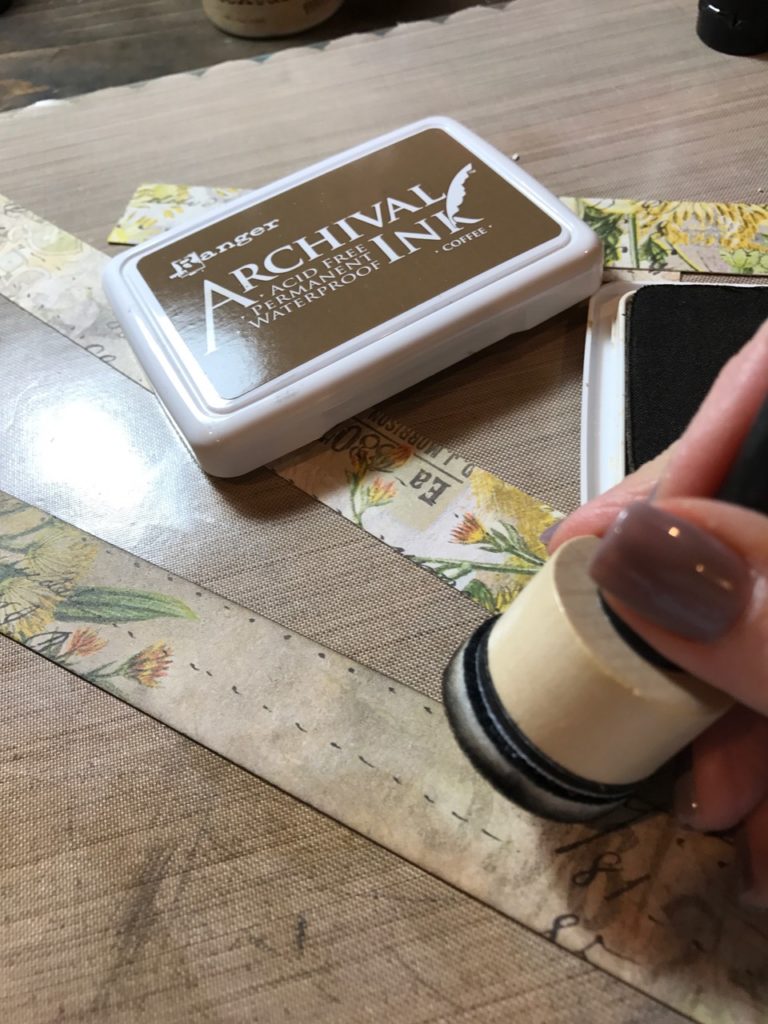
With a blending tool, I added a bit of Ranger Archival Coffee Ink to the edges and background of both the background and the side pieces. Just to give it a more grungy feel.
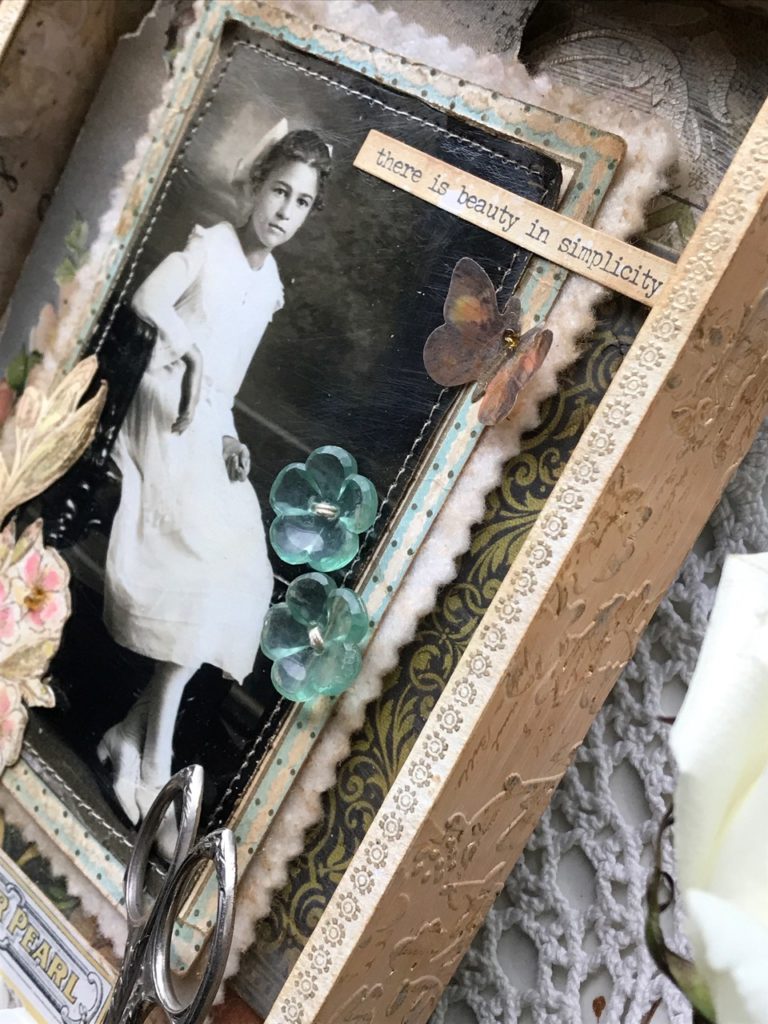
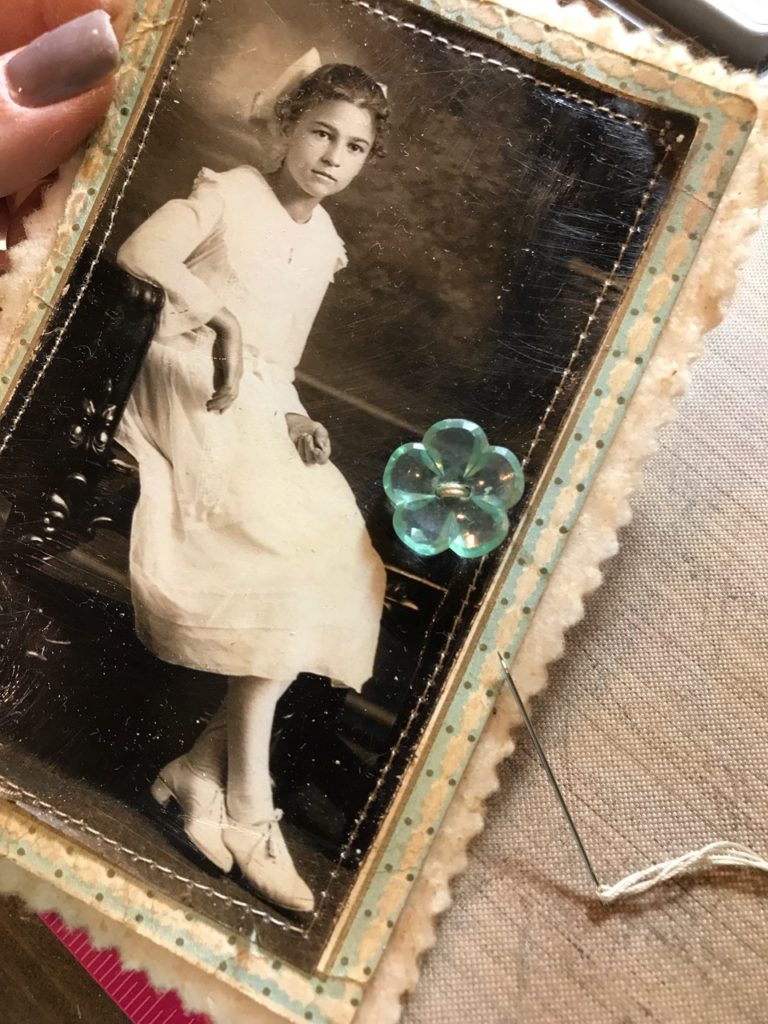
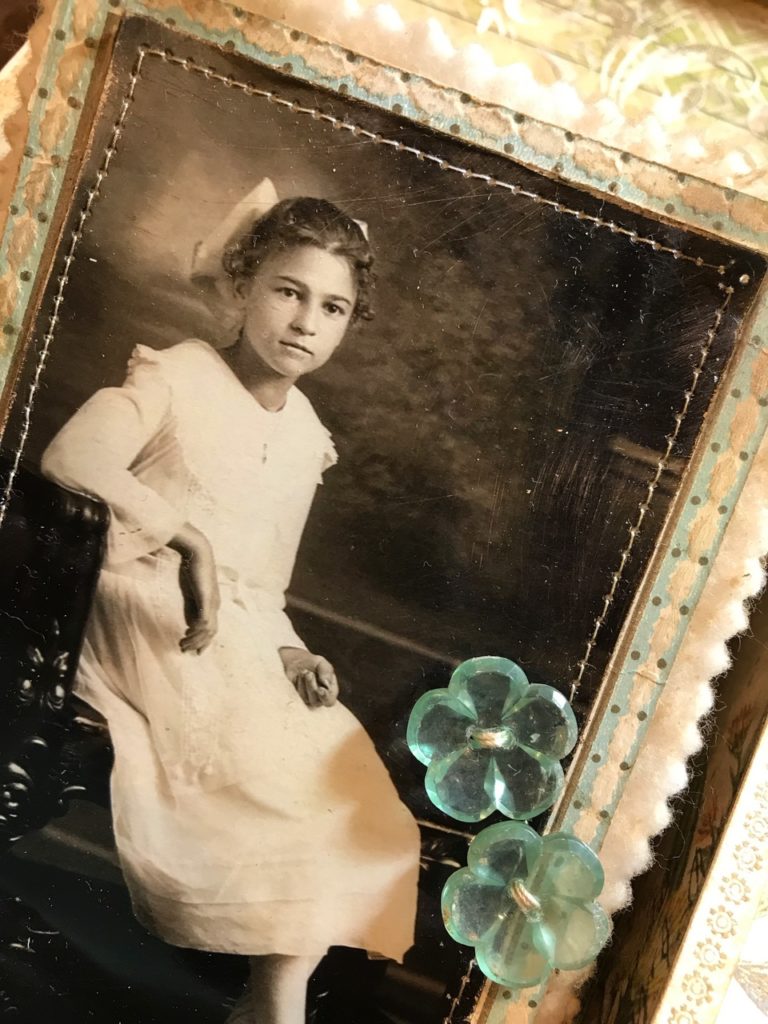
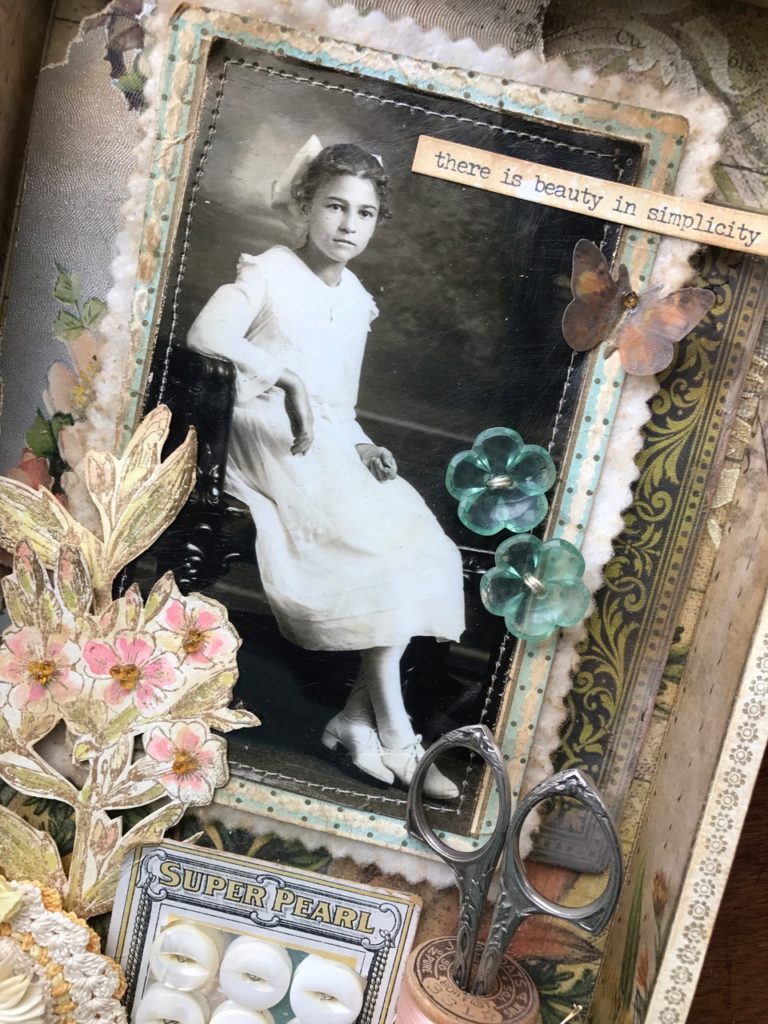
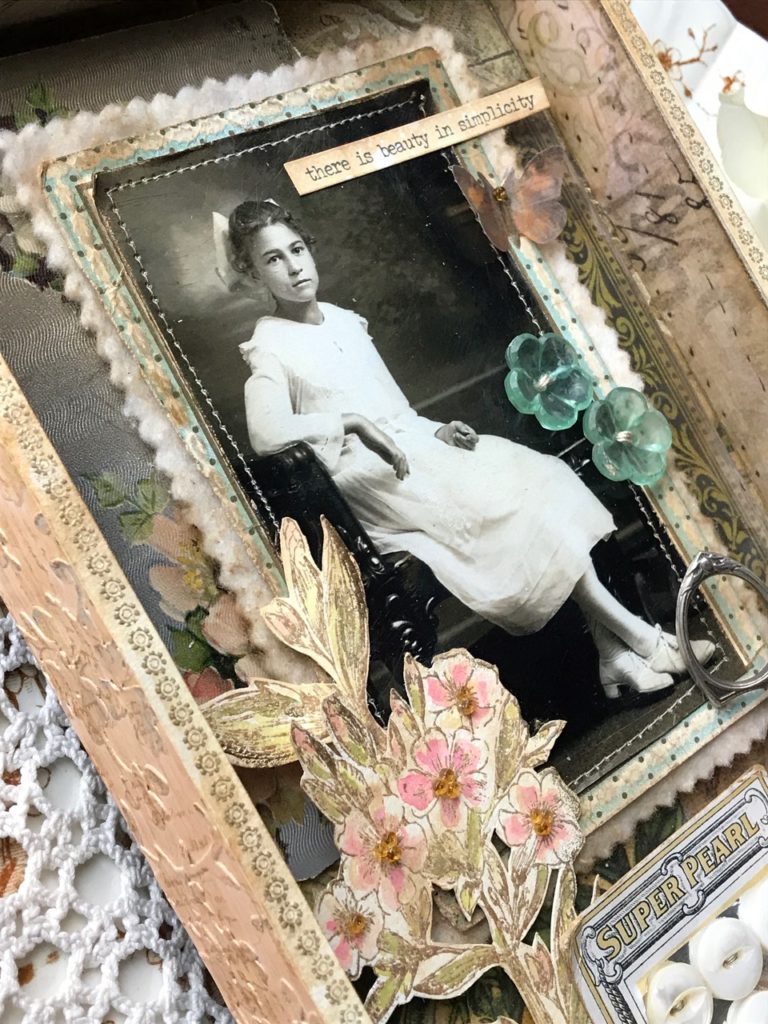
I then trimmed a photo of my Grandma that I had copied, sanded a bit around the edges to distress them as well. Then I blended a bit of the Coffee Archival ink to give it a tattered and aged look.
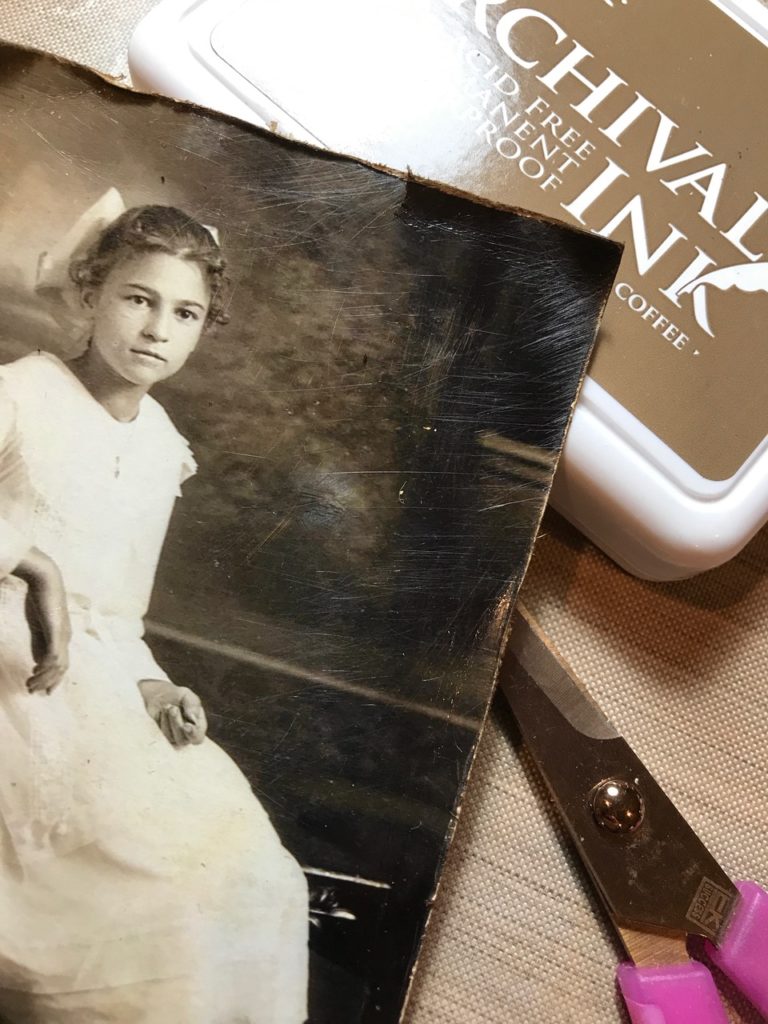
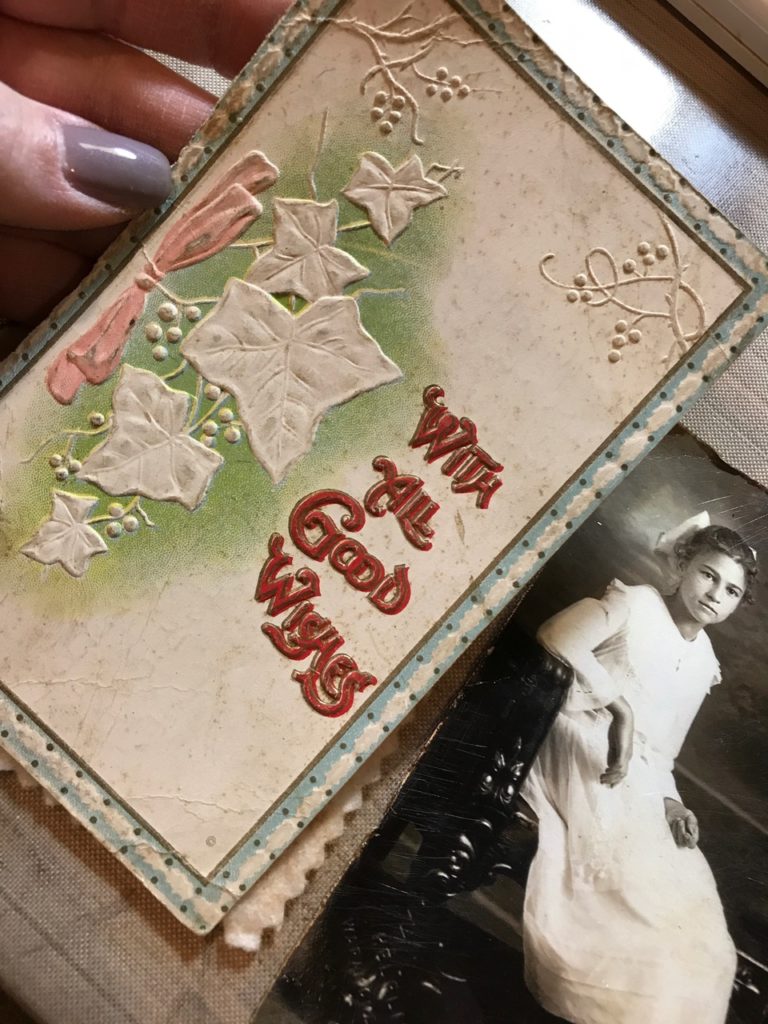
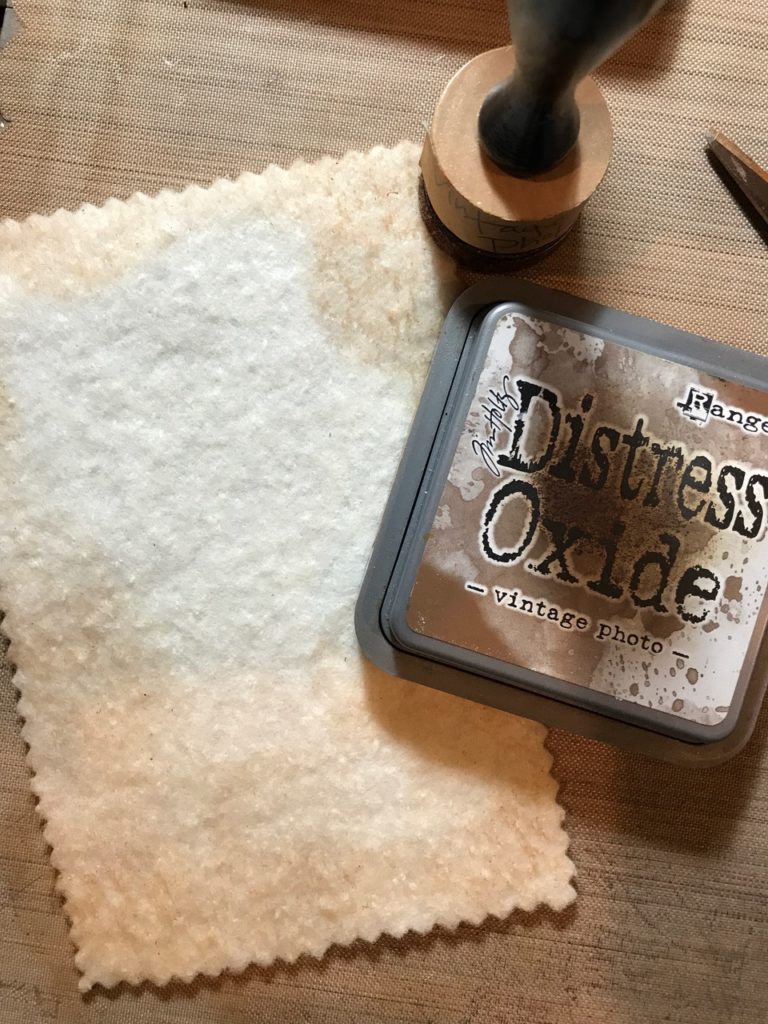
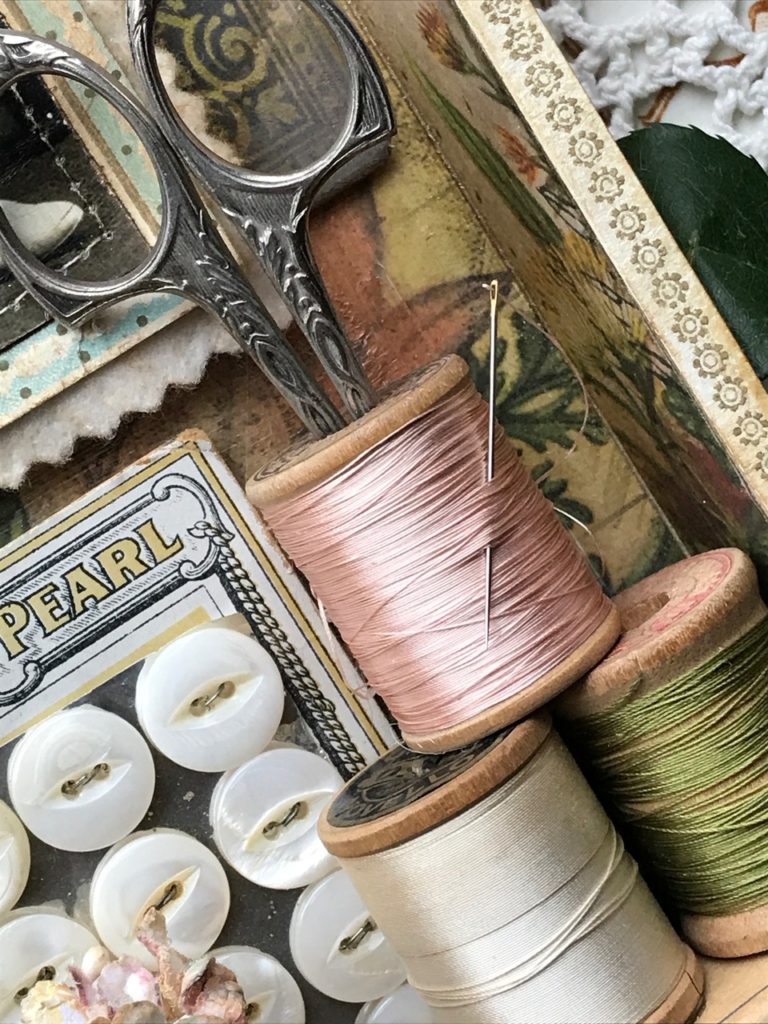
I matted my photo onto an old vintage postcard that had a really cute frame around its edges. (The actual postcard wasn’t that pretty, so I didn’t feel bad covering it up)…I trimmed a piece of cotton batting with a pair of pinking sheers, inked the edges with a bit of Vintage Photo Distress Oxide and then decided to sew the pieces together on my sewing machine with cream thread.
After my photo was sewn onto the background I sewed a couple of grungy vintage buttons on with some cream thread.
Next, it was time to finish the inside and outside of the vignette box…
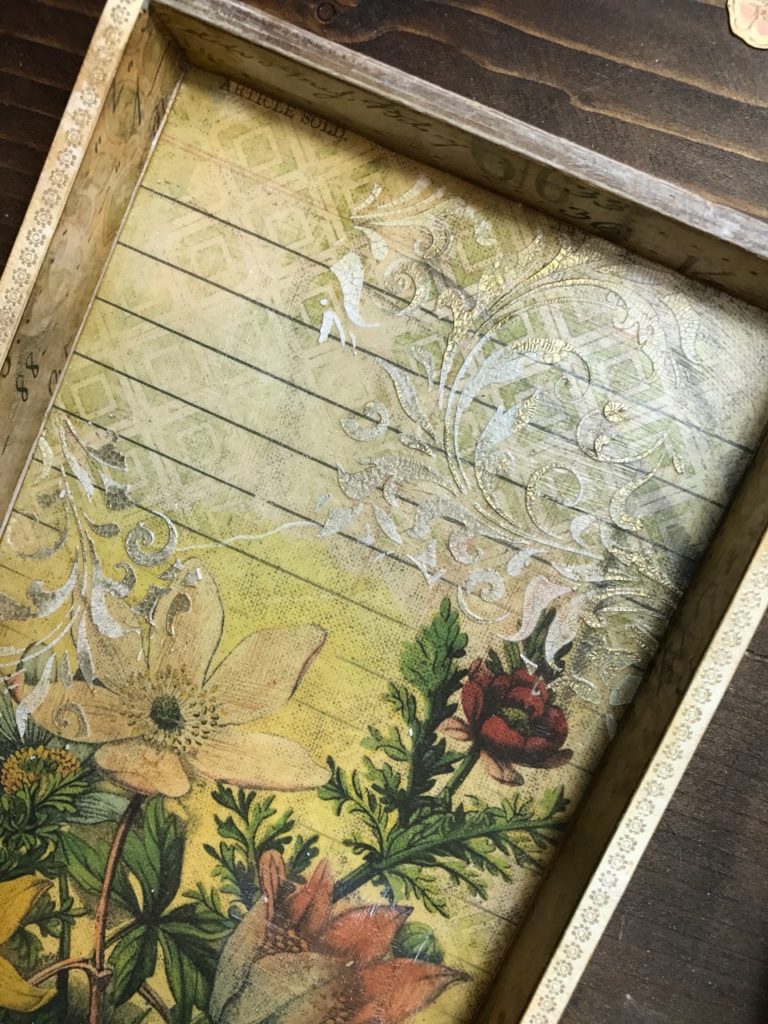
I adhered all my strips of Wallflower paper into the inside and inner sides of the tray with Distress Collage Matte Medium. The tops of all the strips of paper were finished with collage medium as well.
I decided that I wanted to make the outside of the box to look like that of an old vintage valentine candy box…kind of like this one.

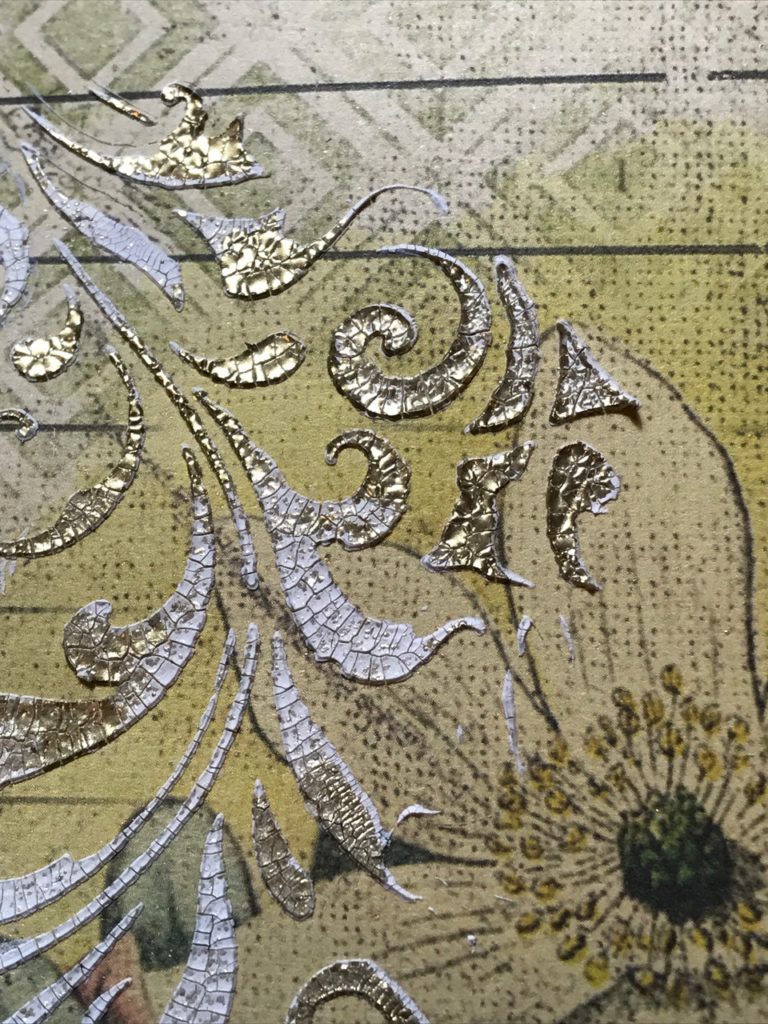
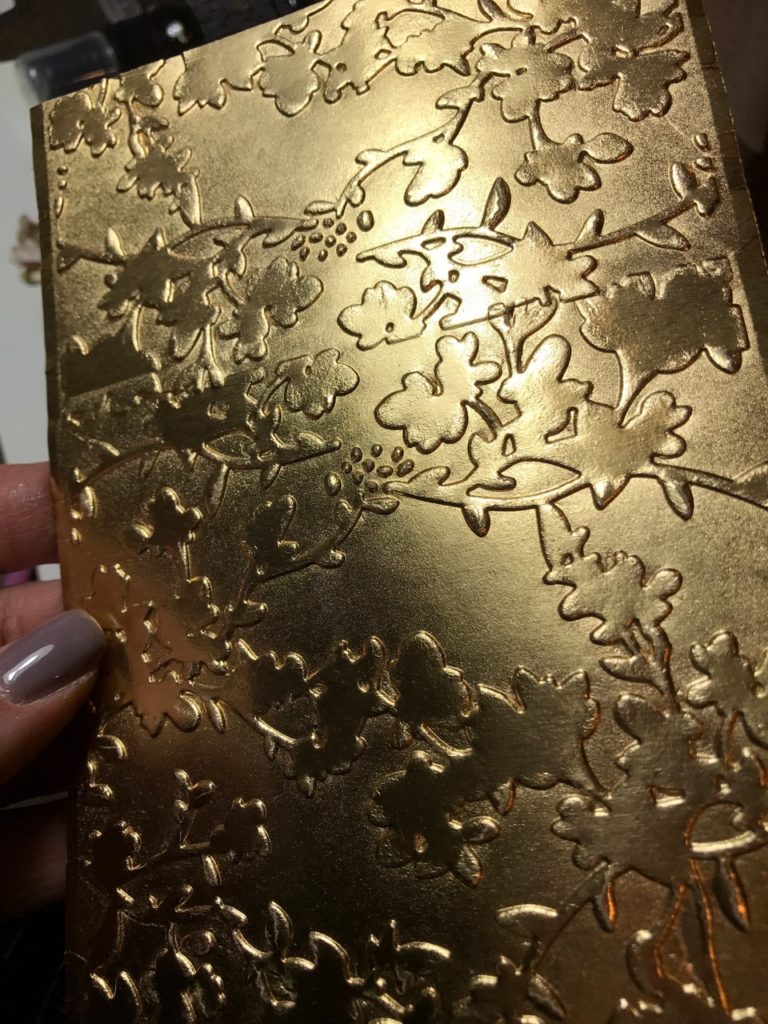
To do that…I embossed a piece of Gold 12×12 Kraft-Core Metallic Paper with the Tim Holtz Flourish Texture Fade. It took 3 passes through the Vagabond to get a whole strip embossed but it was so worth it. It turned out beautifully…I hope that you can see this in the photo, it’s so hard to photograph it with the reflection.
Then I cut the paper down into strips to fit on the outside sides of the tray. I painted each strip with a light touch of Picket Fence Distress Paint, sanded it a bit with my sanding block and inked it up with some Vintage Photo Distress Oxide ink.
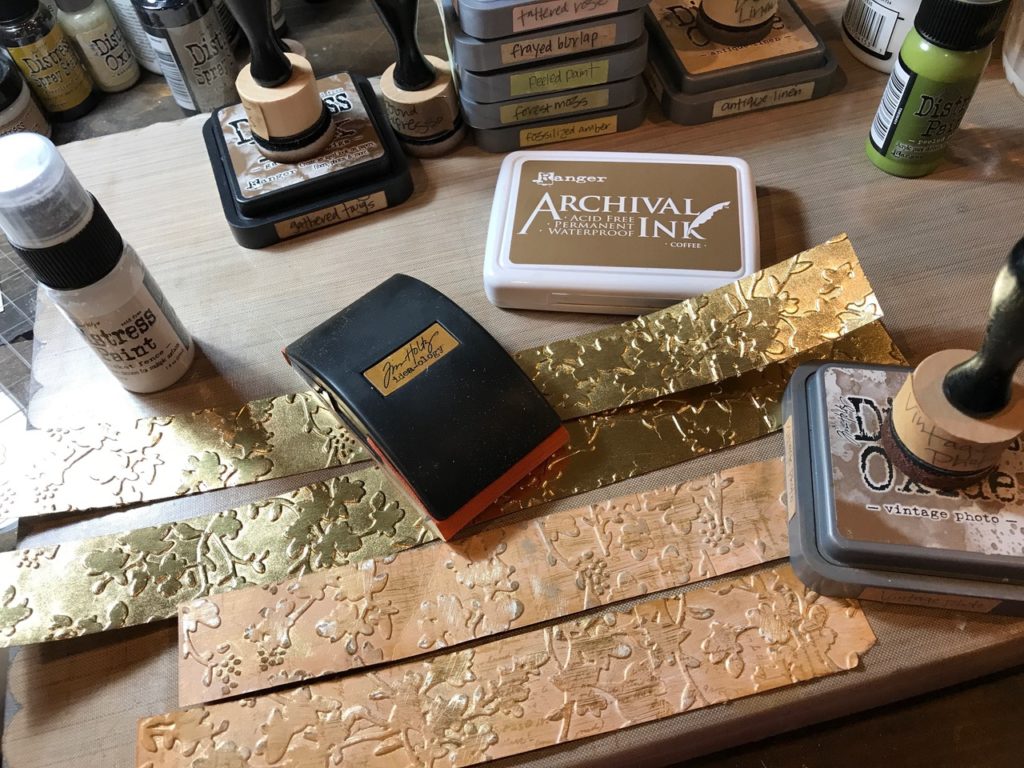
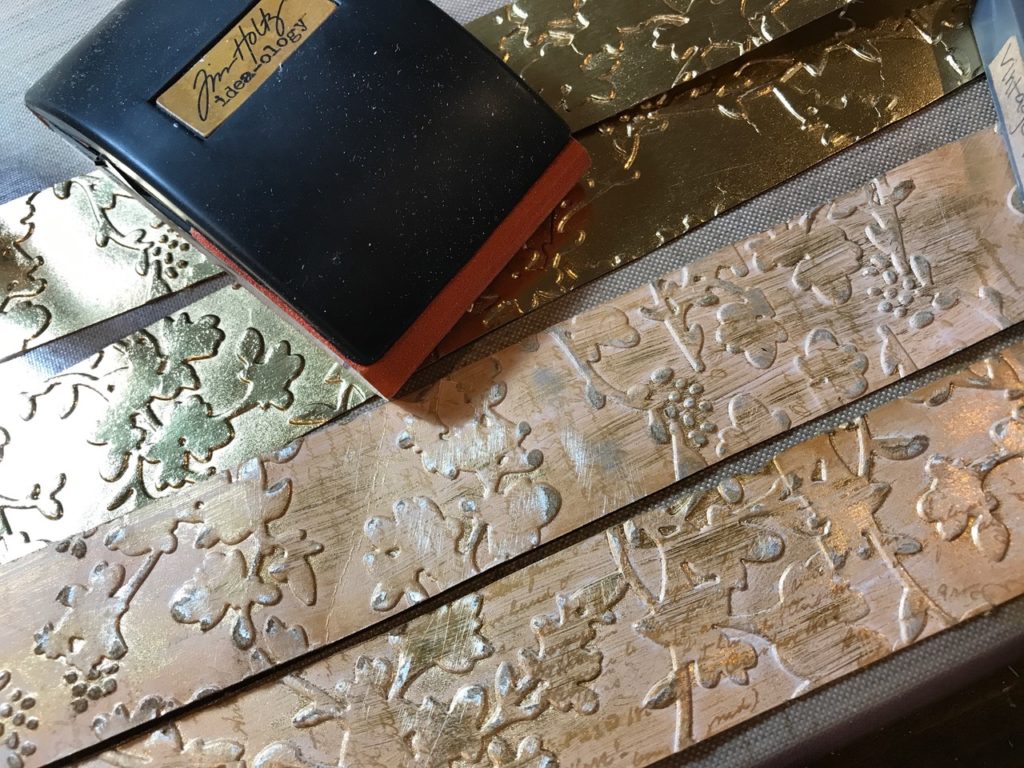

Then I decided to stamp the background font stamp from the Entomology Stamp set with some Coffee Archival Ink.
After they were complete, I adhered them again onto the tray with Collage Matte Medium and set it aside to dry.

Next, I stamped a couple strips of watercolor paper with a border from the Ornate Trims stamp set (CMS326) with Antique Linen Distress ink, embossed it with Liquid Platinum Embossing Powder, blended a bit of Vintage Photo Distress Oxide onto them and adhered the strips to the outside trim/edge of the tray.
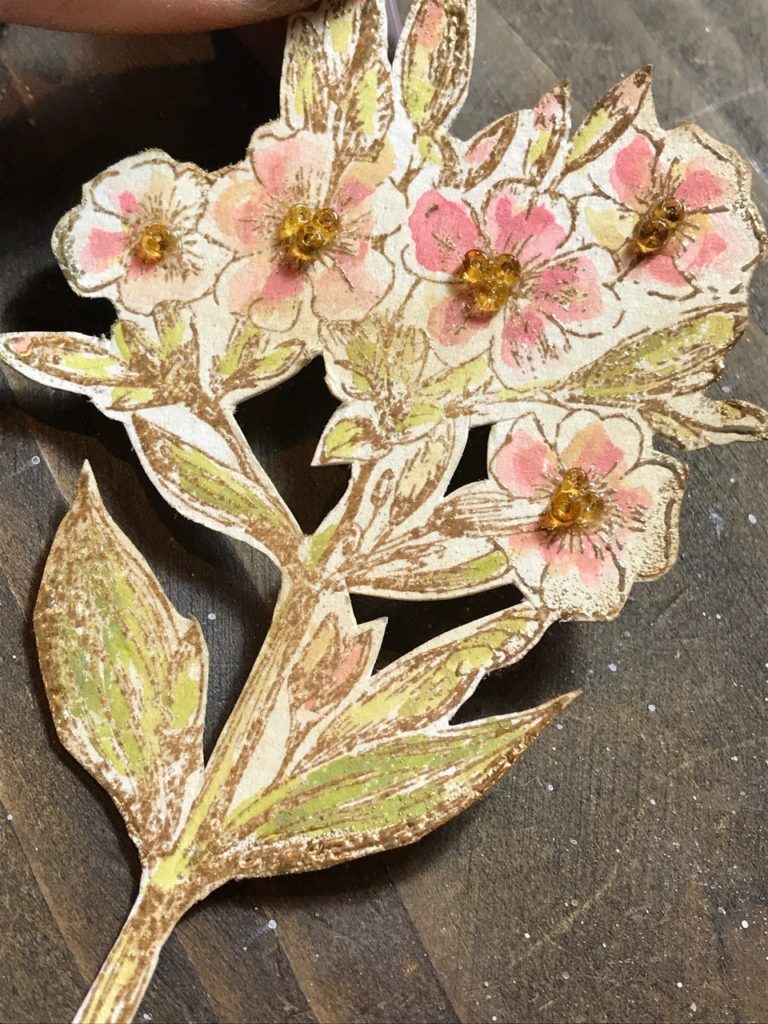
Next, I stamped a flower from the Illustrated Garden (CMS295) with Frayed Burlap Distress Oxide, embossed it with clear embossing powder and watercolor painted the flowers with a combination of oxide inks. (Worn Lipstick, Antique Linen, Peeled Paint and Forest Moss). I fussy cut around it and then added some old seed beads to the centers of the flowers with Glossy Accents. After the beads were dried and adhered I added a bit of Antique Linen Oxide with a blending tool to give the flower a more aged look.
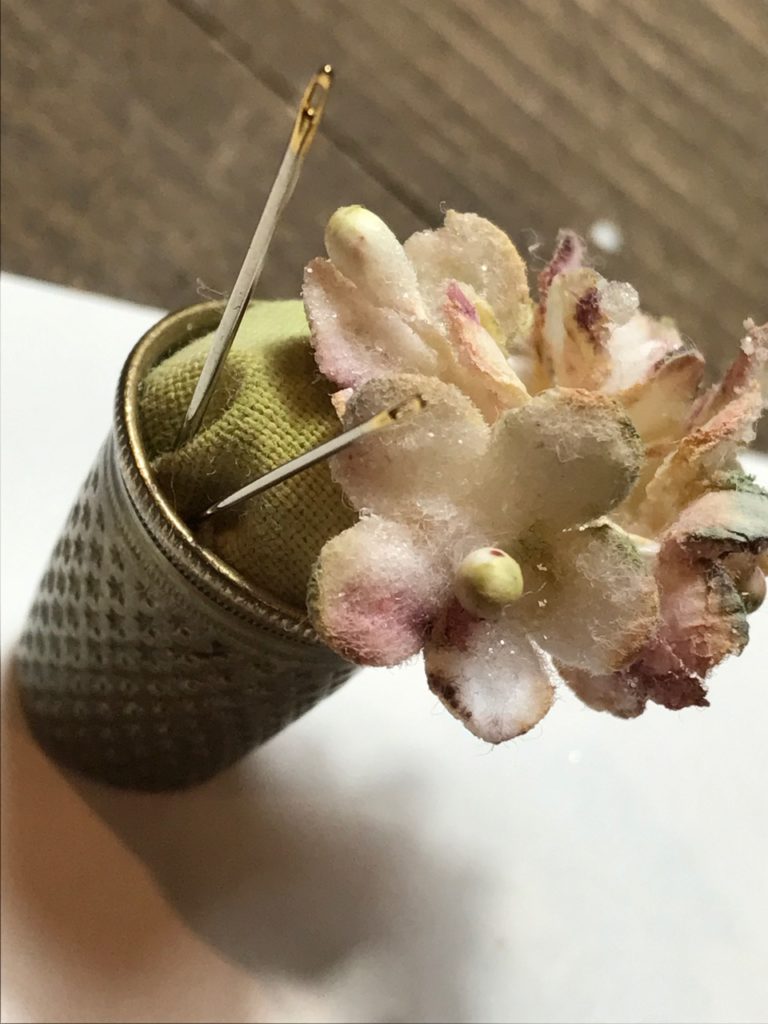
Then, I made a tiny “pin cushion” inside an old thimble and added some flowers from the Idea-ology Bouquet. The flowers were smooshed into some Antique Linen Distress Oxide and then I added some color with a couple Distress Markers. Then Glossy Accents was added to the tops of the flowers and they were dipped into Clear Rock Candy Dry Glitter. The “pin cushion” was a scrap of fabric that I inked with some Peeled Paint and Vintage Photo Distress Oxide and stuffed with a piece of cotton batting …then I squished it into the thimble and added a couple of old needles inside.
I gathered all my vintage knickknacks and began arranging them inside my tray. The photo I decided to back with an old distressed postcard and a Tim Holtz Ideaology Christmas Baseboard. The baseboard was distressed by sanding and then by blending with Vintage Photo Distress Oxide Ink. I also added a small butterfly from the Tim Holtz Vellum Thrift Shop Ephemera Pack. I emphasized the body of the butterfly with a Ranger Clear Embossing Marker and some Liquid Platinum Embossing Powder and a tiny seed bead was added for the head. A Small Talk sticker was inked with a bit of Vintage Photo and adhered to the top of the photo.
All of the vintage items were adhered with a hot glue gun and distress collage matte medium and placed within the tray.
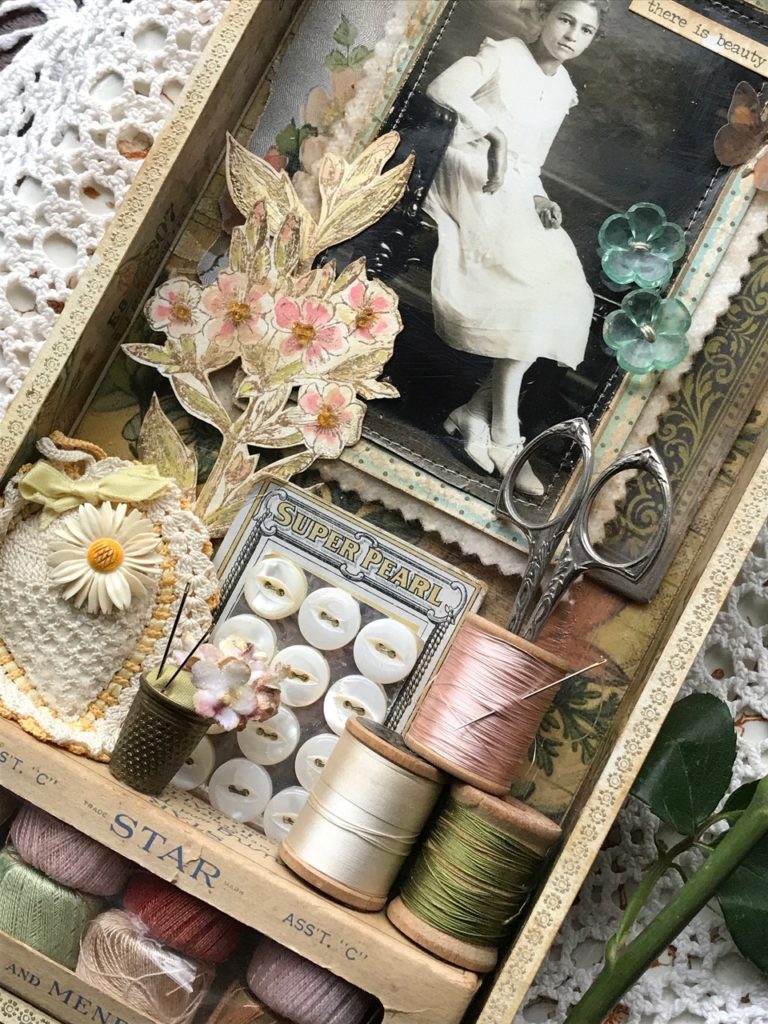

The vintage knickknacks I have been collecting over the years at various, estate sales, Goodwill stores, garage sales and the like. (My grandma was a “keeper of things” as well…hmm, I wonder where that love came from <3.)
Thank you so much for joining me today! I can’t wait to hang the vignettes that I’ve created this month…it’s the beginning of a family collage wall in my home.
I have had the best time creating things during my visit at Simon Says Stamp Monday Challenge and I hope that you’ve enjoyed your time with me as well.
Have a wonderful day and be sure to stop back again soon!
Creatively Yours,
Stacy
Gather Your Supplies:
Tim Holtz/Stampers Anonymous: Stamp Sets- Illustrated Garden (CMS295), Ornate Trims (CMS326), Entomology (CMS328) Layering Stencil- Flourish (THS032)
Tim Holtz/Sizzix – Floral Texture Fade
Tim Holtz/Idea-ology- Vignette Tray Structures, Bouquet, Christmas Baseboards, Small Talk, Kraft-core Metallic, Paper Stash- Wallflower, Vellum Ephemera Thrift Shop Pack,
Tim Holtz/Ranger- Wendy Vecchi Studio 490 Crackled Texture Paste, Clear Embossing Pen, Clear Rock Candy Dry Glitter, Liquid Platinum Embossing Powder, Multi Matte Medium, Sanding Grip, Dina Wakley White Gesso, Palette Knife, Clear Embossing Powder, Heat It Heat Tool,
Distress Ink- Forest Moss, Vintage Photo, Antique Linen
Distres Oxide Ink- Frayed Burlap, Vintage Photo, Worn Lipstick, Antique Linen, Peeled Paint, Forest Moss,
Archival Ink- Coffee
Distress Paint- Picket Fence
Distress Markers- Various Colors
Other: Canson Watercolor Paper, Sewing Machine, Thread, Glossy Accents
Vintage items: Postcards, Scissors, Thimble, Seed beads, Sewing Notions, scrap piece of fabric, button card, needles, cotton darning and mending cotton thread box, etc…(I’m a bit of a pack rat and have picked these items up at estate sales, garage sales and junk shops throughout the years.)


Oh Stacy what a perfect way to wrap up your time in the spotlight at SSS. This project is really beautiful and a wonderful tribute to your lovely grandmother. The items you have combined form an excellent foundation to highlight those gorgeous layers. Just fabulous, all of it. Congratulations to you, well deserved time in the spotlight! <3
Thank you so very much, Ann! It was a really fun project to do…being able to share with people my memories of my grandma and grandpa was kind of a healing process for me, I think. Thinking about them while I created about them is something that I’ve needed to do for awhile. Thank you again for being a huge supporter of mine. I can’t even tell you what it has meant to me. Thank you! Hugs!!!
Oh my goodness I have spent ages admiring this gorgeous creation! the photo of your Grandma is so pretty and I love that you made her the centre of attention and surrounded her with things that she loved. The whole design. of this is stunning and its fabulous that you added lots of real vintage items too, LOVE, LOVE LOVE it!! 🙂
It has been a great pleasure having you along with us Stacy and I hope its not too long before we get to work together again, you have been such a wonderful guest, THANK YOU XX
luv
Lols x x x
Thank you, thank you, thank you, Lols! This has been such a fun experience and I am so very grateful for being asked to contribute. I am so happy that you have liked all of my projects and I would be thrilled to pieces to come back to participate again… You and the design team have been so wonderful and gracious! Thank you! HUGS!! xxx
This is such a fabulous piece! (and I’m not just saying that because I’m a sucker for vintage sewing things 😉 )
Thank you, Lisa! You’re a sewing notions collector too??? Obviously, I am addicted as well! Thank you so much for stopping over to check it out. Hugs!
Stacy, your work is incredible! I have enjoyed each and every project you’ve made for our challenges. This piece is gorgeous and all the details are amazing. I look forward to continuing to see your beautiful work and it’s been so much fun having you with us on the challenge. Thank you for sharing your talent with us!
Cathie ♥
Thank you so much, Cathie! That is so sweet of you to say! It has been so much fun to play with you and the team! I look forward to seeing all of your amazing creations and participating in the challenges in the future! Thank you again for all of your kind words! Hugs!!
Such a beautiful vignette. I love the photo of your grandmother and the way you showcased it. I also love the vintage items you included. Just gorgeous!
Thank you so much, Marci! I am so glad that you stopped by to take a closer look! It was a really fun project to make, I had a wonderful subject. Hugs!!!
Gorgeous project, Stacy! I can see it is filled with memories and love for your grandmother! Love all the wonderful touches you’ve added, like the sewing, buttons, and the vintage threads. What a beautiful combination of gardening and sewing! It’s been wonderful having you with us this month!! hugs, Maura
Thank you, Maura! It has been a true pleasure to be with you all! I really am so happy that you like it. She was a beautiful person both inside and out and I’m so happy that you can see my love for her in the piece. That really means so much! Hugs!!!
This is AWESOME piece of art! I could be watching it for hours, it’s like movie with all those fabulous details and pieces. What a fantastic work! I love all the thousands of layers and distressings and embossings and flowers and buttons and everything! I am truly amazed! And your grandma was a beautiful girl. This picture is so pretty, misterious and classy. I love everything about this project and will kep observing all your further works following you on every social media! Thank you for having enriched our Mondays with your amazing arts! Hugs, Marzena
Thank you, Macarena! You are so sweet! Thank you so much for all your kind words! She was a very special lady and I’m so happy that my love for her came through in my piece. It was so much fun to create along side of you all! Thank you for making my time so special at SSS! HUGS!!
Just could not be more beautiful Stacy. Front he photos to the vintage pieces…you know this is right up my alley! You have been a tremendous asset to the SSS Monday group this month! Well done my friend!
I can not thank you enough, Paula! You are so sweet to say that, it has been a wonderful time and I am so grateful for all your wonderful comments and support that you have given to me. Thank you my friend! HUGS!!
This is absolutely breathtaking. I love it!
I’ve been inspired by each of your Monday creations. Thank you so very much for giving my creative side a swift kick in the backside.
LOL!! Too funny, Sara! I know exactly how you feel…I had a long break from creating things myself and I am so happy that my posts have been inching you closer to getting back to it! It really is therapy for me. Especially these last two projects! <3 Thank you for your kind words and looking forward to my emails and posts...that really means so much! HUGS!!
Such beauty. I was stunned whe I saw it on the SSS blog. It is a pure labour of love.
Thank you, Gio! I’m so happy that you stopped by and happy that you like it! Be sure to stop by again! ❤️
Your work is beyond beautiful but this project is truly a work of art. Thank you thank you for sharing your creativity.
You are so sweet! Thank you, Betsy! I’m happy that you came to take a look! Take care! ❤️
I love that you used a photo of your grandmother rather than a random person. This is so lovely and interesting and I bet the family collage wall will be fabulous! I got lots of ideas and inspiration from your process notes. Thank you for listing them out!
I’m so happy that you stopped by to check it out! Thank you, Heather!! I’m glad that you were inspired! ❤️
Absolutely gorgeous shadow box, Tracy! I love the way you’ve embellished it with so much gorgeous detail! Job well done!
*mwah*
Steph
Simon Says Stamp!
Thank you so much, Stephanie!
~ Stacy ❤️
This is exceptional! I can’t think of a better use for the vignette box and your grandmother would have loved this too, don’t you think?
Thank you so much, Cathie! Yes, I KNOW she would have loved it…it really means a lot that you like it, I love all of your creations!! Thank you for stopping by!
~ Stacy ❤️
Wow! You absolutely outdid yourself on this one! The finished product is remarkable and I love how it will be a family treasure that honors the past. My mom is so talented at handwork and sewing, so this piece struck a strong emotional note with me and I love when art makes me feel a true connection to a piece! You are ever-talented at connecting your heart and your hands and I’ve enjoyed seeing your entries with us so much! The details on this piece are extraordinary and I’m so glad you were able to be a Guest Designer for us!
Thank you so much, Andrea! I had the best time creating with you all this past month! You are all so very talented and sweet as well!! Hugs!
~Stacy ❤️
This is a masterpiece, love the soft tones, love the design, love all work you’ve done with the frame! Fantastic, you are super talented! It was an honor to be with you this month! Barbara
Thank you so much, Barbara! It was such a pleasure to participate with you all this past month! Thank you for all your kindness! Hugs!
~Stacy ❤️
Wow, Stacy, I don’t think I’ve ever seen such a beautiful assemblage before! Yours is filled with lovely vintage details and your creative hand has turned new into vintage as well! And the snapshot of your Grandmother is so precious! You are incredibly talented, and SSS has been blessed by having your as their Guest Designer this month. I’ve pinned this so I can come back over and over again! LOVE!
Thank you so much, Sara! That means so much to me! It was a great time participating with them this month and it got me to pull out all those old photos and create with them…bringing out cherished memories! ❤️ thank you so much for your many kind words!! Hugs!
~Stacy ❤️
You already know how much I love this project and that beautiful photo of your grandma ~ this tray is just stunning and everything about it really does appeal to me, especially that gorgeous embossing on the sides of the box ~ I love that. It’s been so good to have you join us at SSS, it’s been lovely to work alongside you my friend… <3
Thank you so much, Emma!!! All of your appreciation for my projects means really so much to me! It was such a pleasure to join you all this month at SSS and I really look forward to participating with you again! You are such a sweet heart! Thank you my friend! ❤️ Hugs!
this is such a beautiful project Stacy and you are going out with a bang, it’s have a real pleasure having you on the team, hugs kath xxx
Thank you so much, Kath! It has been so much fun to play along with you and the crew! I appreciate every one of your kind words, you are all so wonderful! I hope to work alongside of you again in future! Hugs!!
~Stacy ❤️
Wow…this is such a stunning creation, Stacy. Love all the fabulous details and the whole design. It’s so great to have you on the team with us. Thank you for the great inspiration! 🙂
Thank you so much, Meihsia! It was such a fun time and thank you for the kind words!
~Stacy ❤️
What a fabulous piece, Stacy! Love the embossed edges and love all the details you’ve added and see them come to live in your step by step tutorial! It was amazing to have you on our team! Hugs, Sandra
Thank you so much, Sandra! It was so fun to play along with you all…you are all so talented and have been the sweetest! Thank you for stopping by to check it out!
~Stacy ❤️