Hello all and welcome back!!
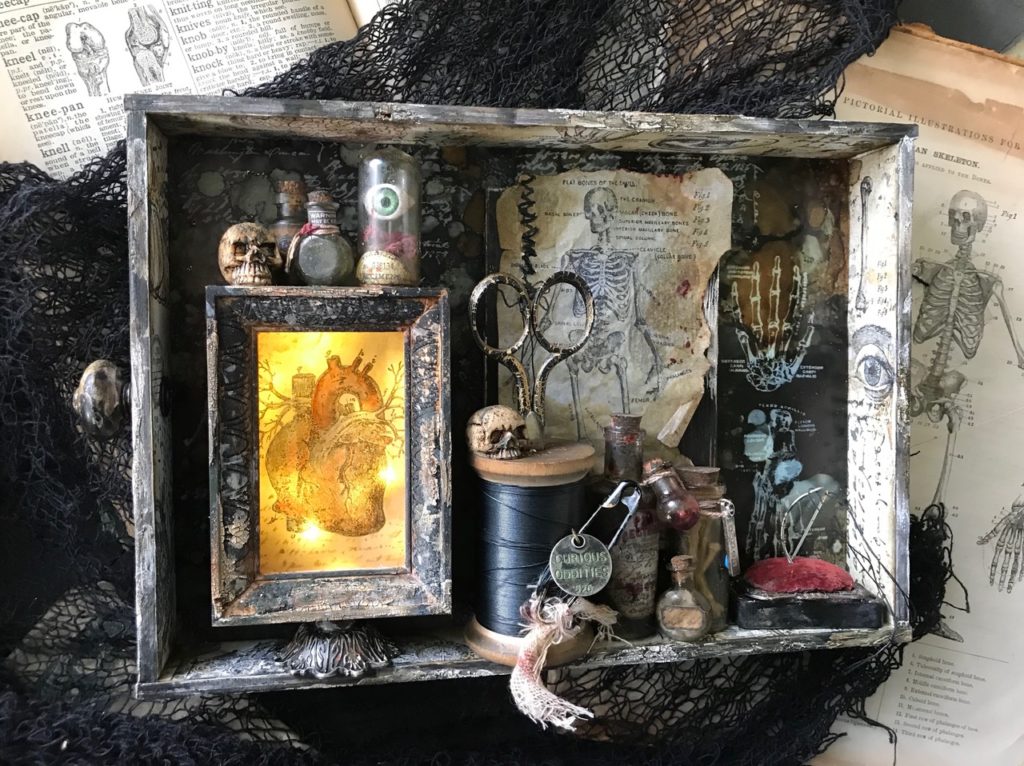
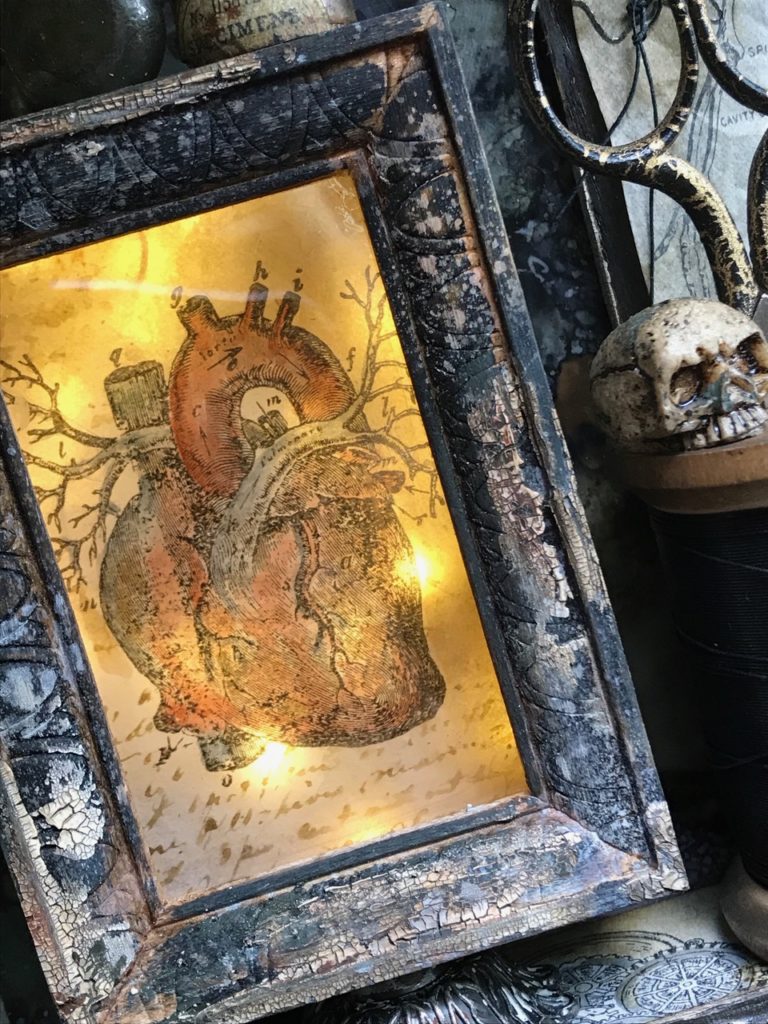
I’m here today with a peek at how I created a box of curious oddities that I made for the Stampers Anonymous Halloween Facebook Live. This project was created for the special guy that designed all of these awesome goodies. It features a framed heart image from the Cadaverous stamp set that lights up with the help of the new idea-ology tiny lights.
One of my favorite parts of the box were the papers created using several of the new Halloween Stamp Sets that included, Cadaverous, Weird Science and Tiny Toadstools.
This tutorial is going to highlight the papers, as the entire project uses many of the techniques that I have covered in other tutorials featured on my blog.
The background papers around the inside of the box were made by stamping, blending distress inks and watercoloring the images with Distress Markers.
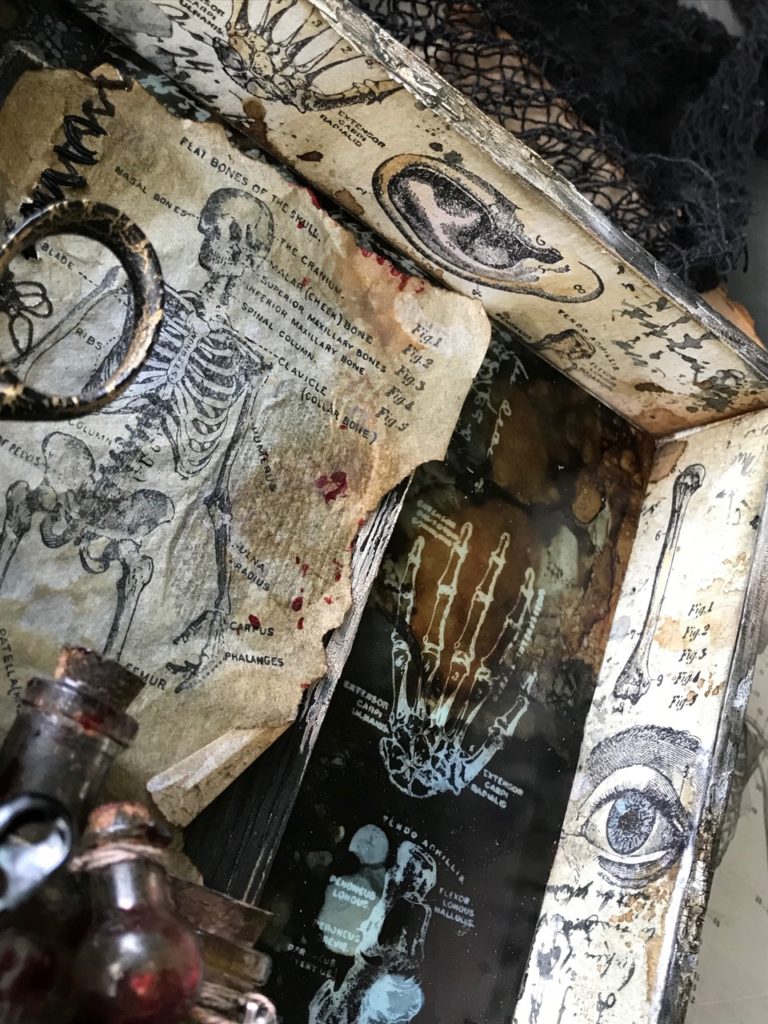
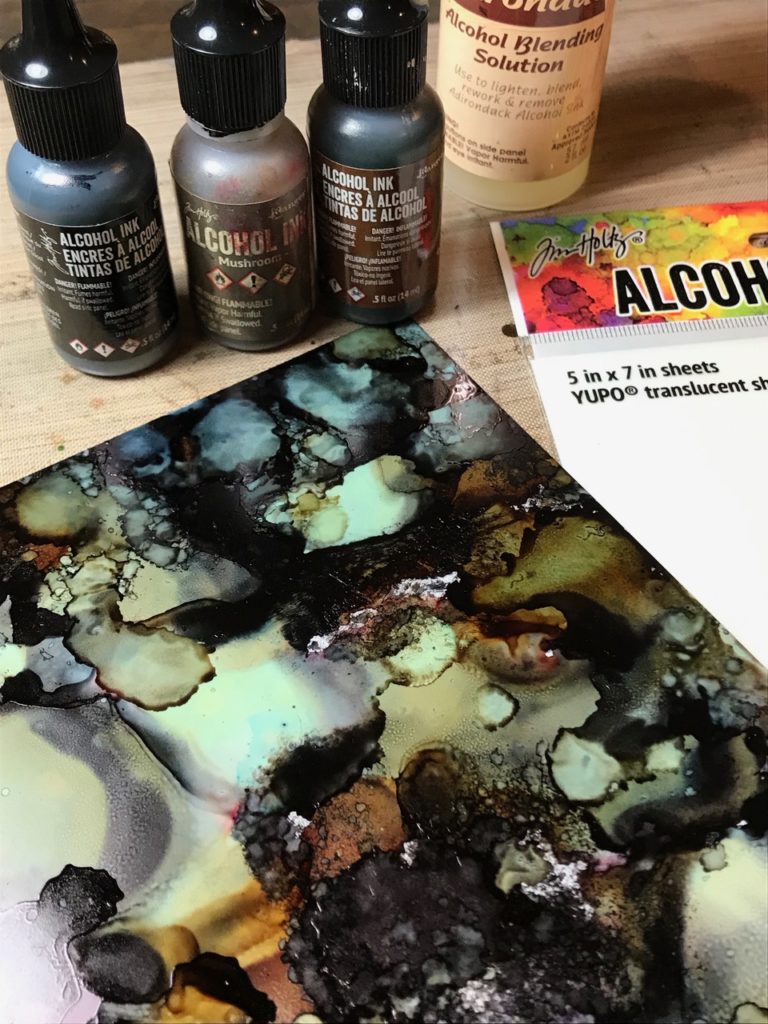
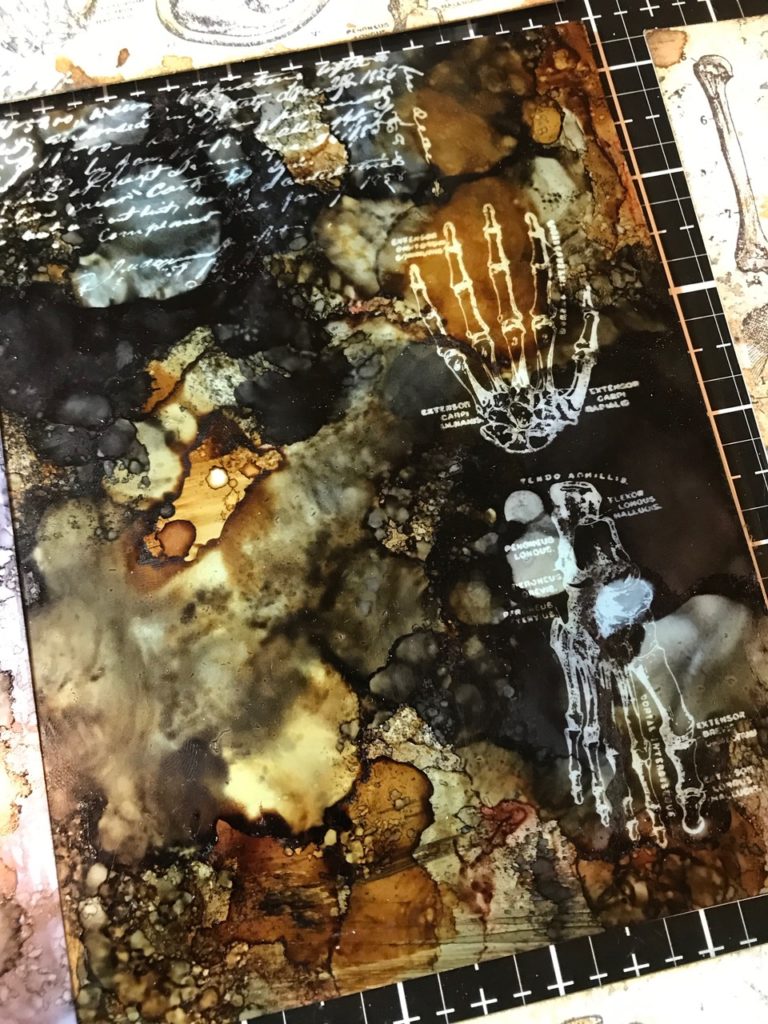
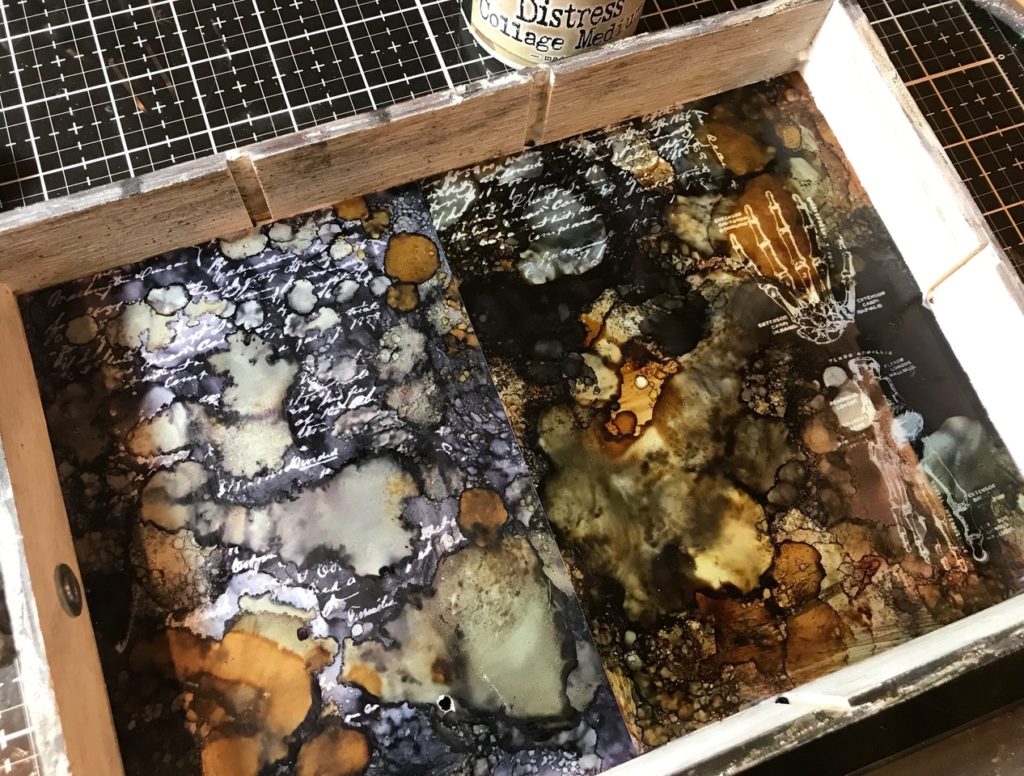
The background papers featured on the back of the vignette box were created by using Alcohol Inks on Translucent Yupo Paper and then by using Alcohol Lift Ink to create an x-ray effect.
Then I loaded the Vignette Divided Box with idea-ology pieces distressed by using all sorts of Distress products and then threw in a couple vintage goodies for good measure.
So let’s begin…
I started by blending and dropping drips of Pitch Black, Mushroom and Teakwood Alcohol Inks onto a couple pieces of Translucent Yupo Paper. This combo was perfect for adding creep. Mushroom Alcohol ink is one of my favorite colors, it added that gray blueish tint that you see below. It’s like MAGIC!!!
After I had added all the alcohol inks, I dripped on some Alcohol Blending solution, and blended it a little with felt and a blending tool then let it dry.
Then I spritzed some areas with 91% Isopropyl Alcohol that I had in a mini mister. YUM!!
After the backgrounds were created, I stamped the papers with images from the Ledger Script and Cadaverous stamp sets.
HERE is a hugely helpful video that Tim shared a year ago on the basics of Alcohol Ink and Alcohol Lift Ink techniques. It explains all the steps needed to create these type of backgrounds. If you haven’t played with these techniques you should definitely give them a try. It was a fantastic way to create the creepy x-ray background that brought this entire project together.
The background below was created by lifting the ink and then going back over the areas with some drips of the previously used alcohol inks. If you look closely you can see the shadows of the ledger stamps in the light grey areas, so COOL, right?
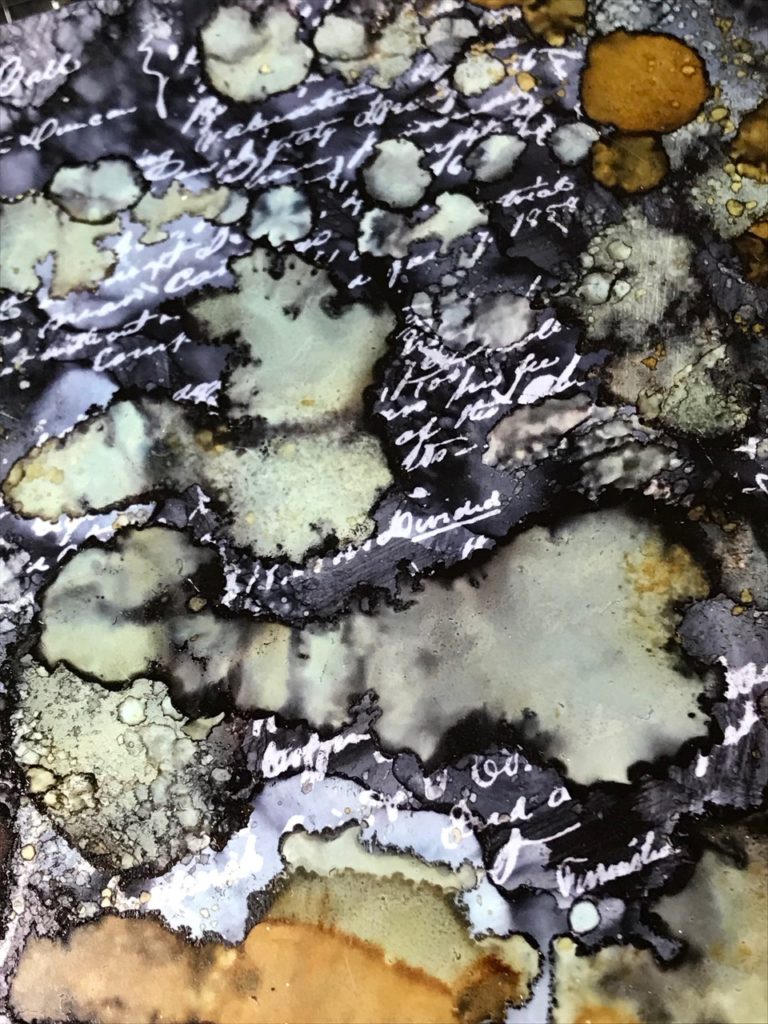
This background was stamped and lifted using the hand and foot from the Cadaverous set. I also stamped and lifted some areas with the Ledger Script stamp set.
The dividers were removed from the vignette box and the papers were adhered within the box with Distress Collage Matte Medium.

The vignette box side strips…
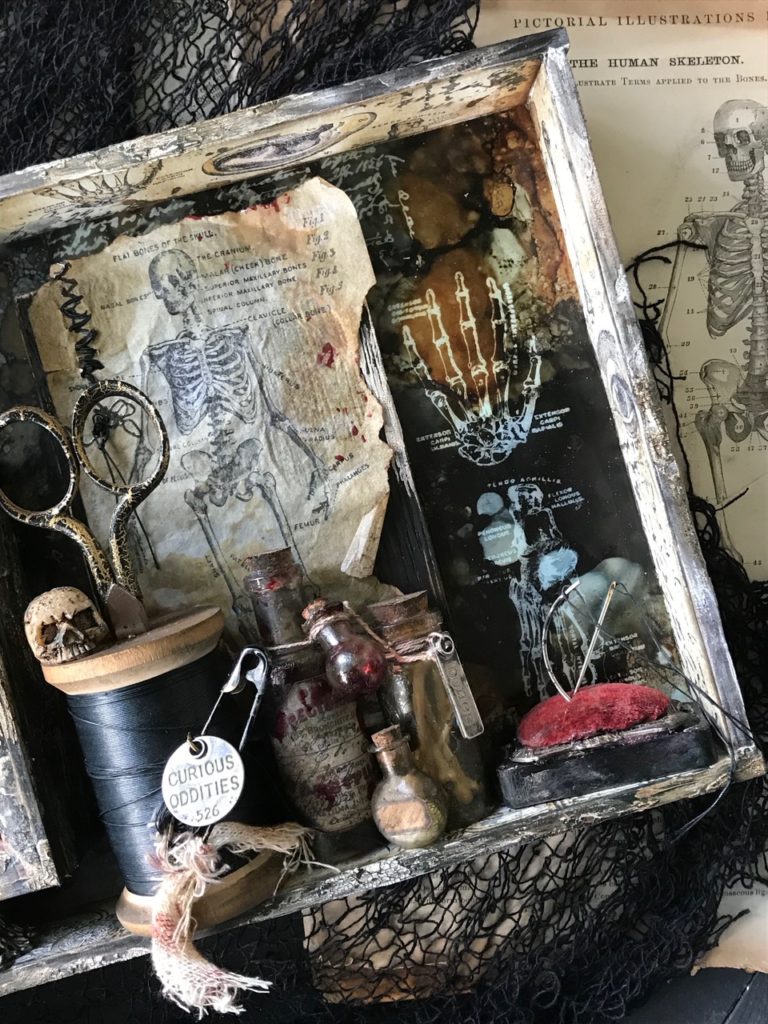
I blended some strips of Distress Watercolor Paper, that were cut to fit within the vignette box, with Pumice Stone and Walnut Stain Distress Inks. I spritzed the papers with water, dried and then blotted the drips with a towel. I stamped images using the Cadaverous, Weird Science and Tiny Toadstools stamp sets with Black Soot Archival Ink.
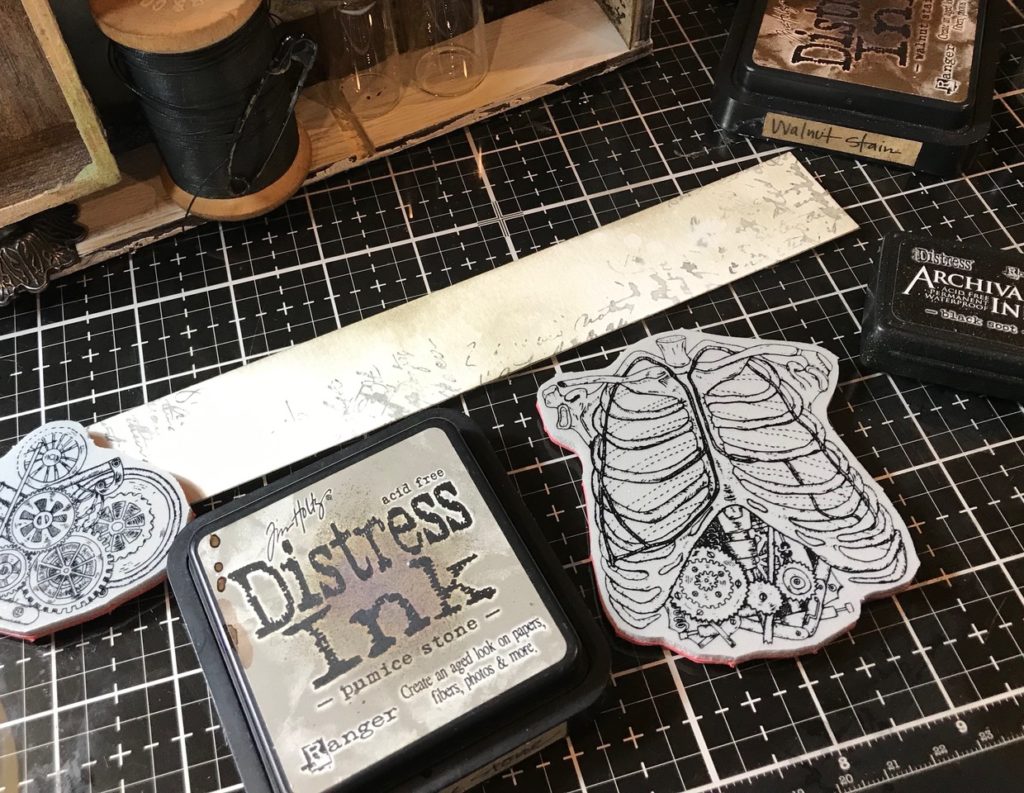
Then I colored the images with Distress Markers and a Water Brush.
I blended some more areas with Walnut Stain Distress Inks and dipped the strips into drips of ink that were left on the craft mat. Some areas of the strips were filled in by randomly stamping them with the Ledger Script and Tiny Toadstools stamps.
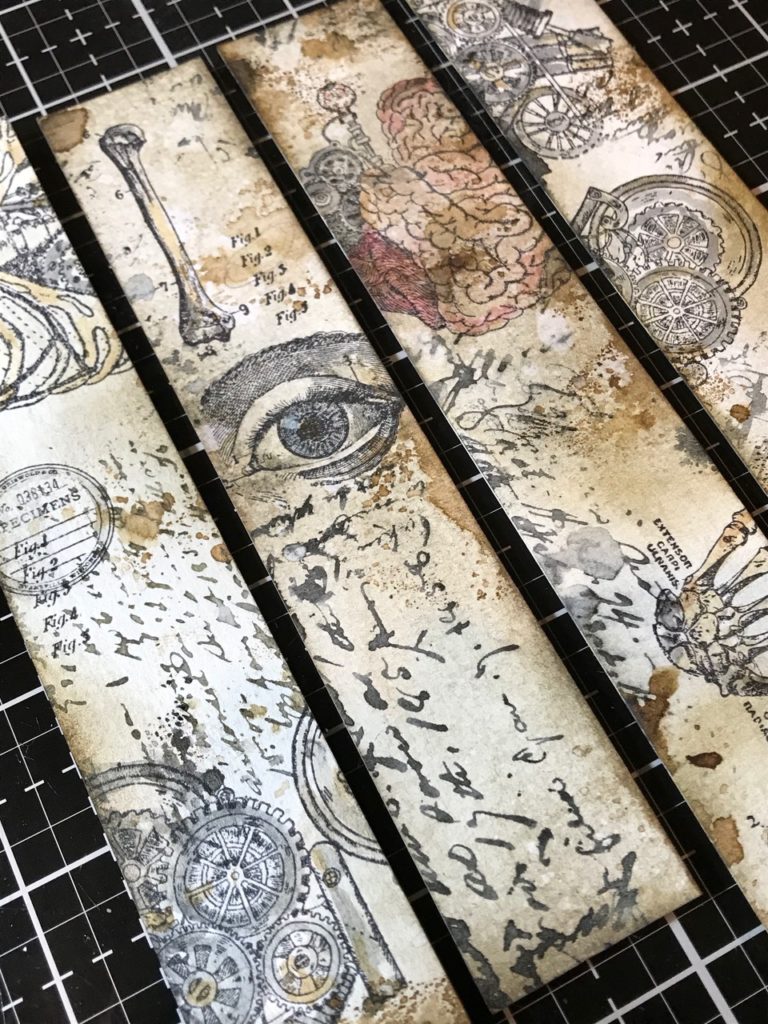
Then the strips were added to the box with Collage Medium.
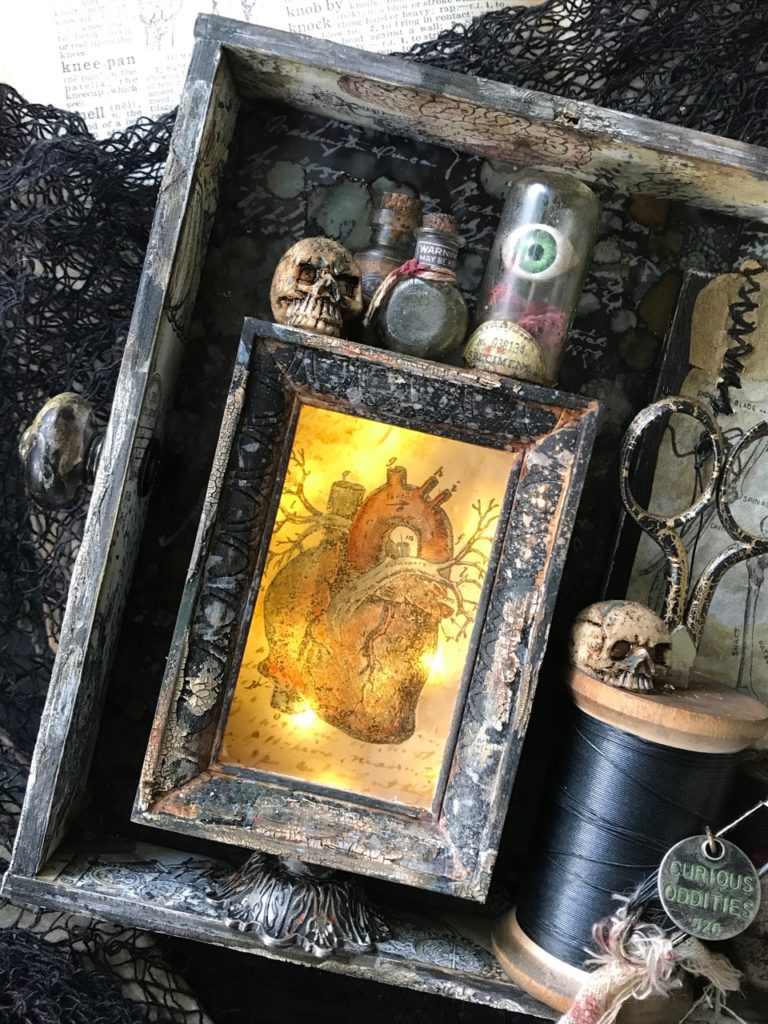
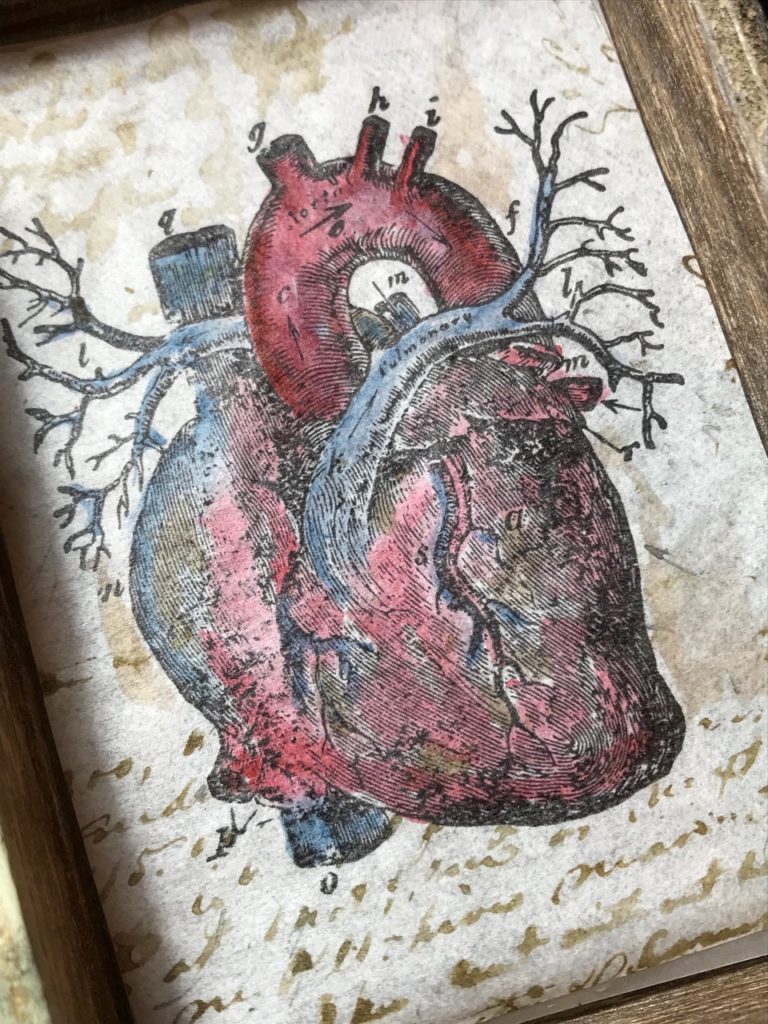
The heart was stamped with Black Soot Archival Ink onto a piece of vintage onion skin typing paper and colored in the same way with distress markers and a water brush. I randomly stamped some areas with the ledger background and blended it with some of the previously used distress inks.
Then I gathered all of the parts and pieces and began arranging the vignette.
I added a small vignette frame and a piece of Mica to cover the heart box and added a vignette base to the bottom and idea-ology tiny lights within it.
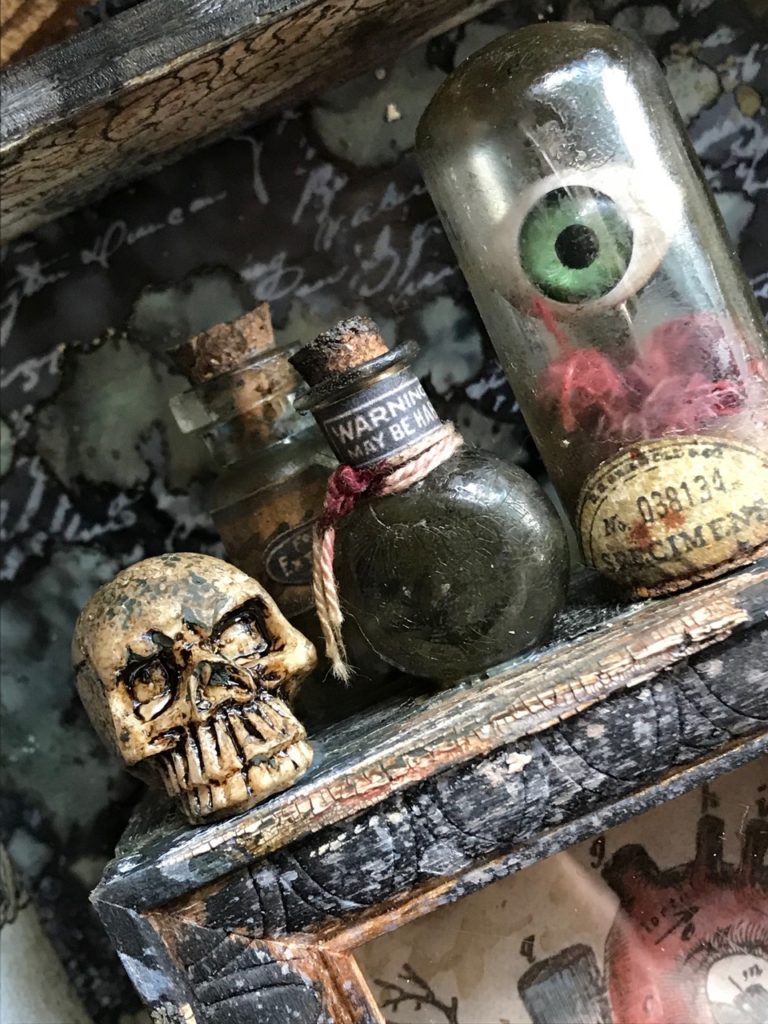
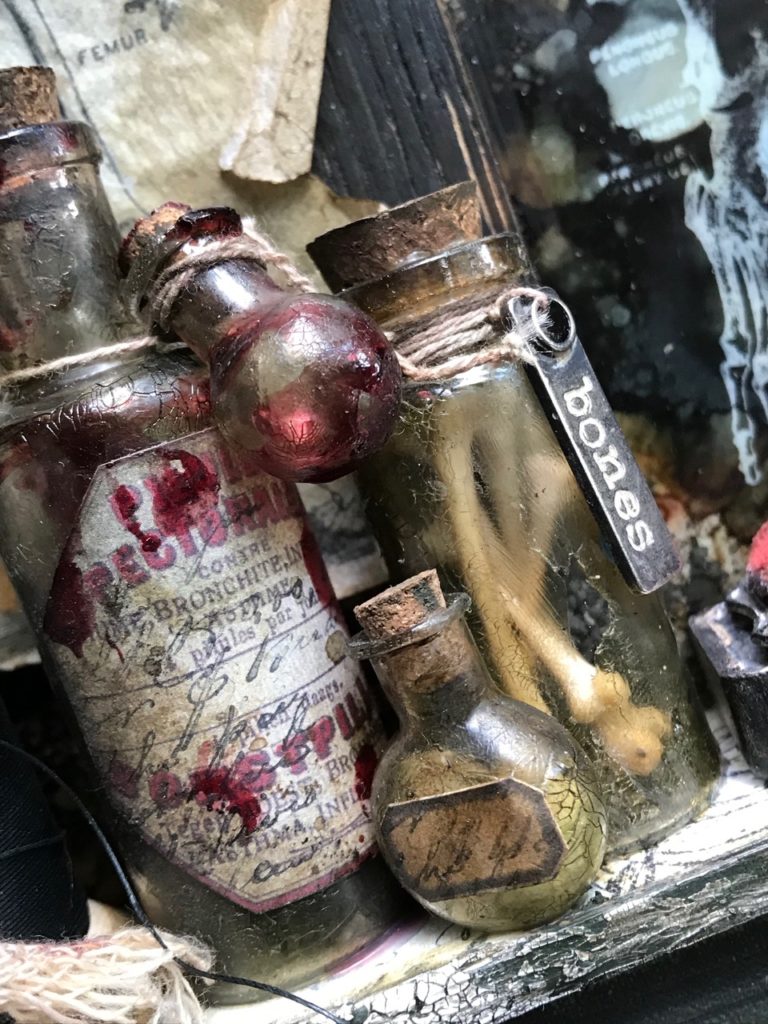
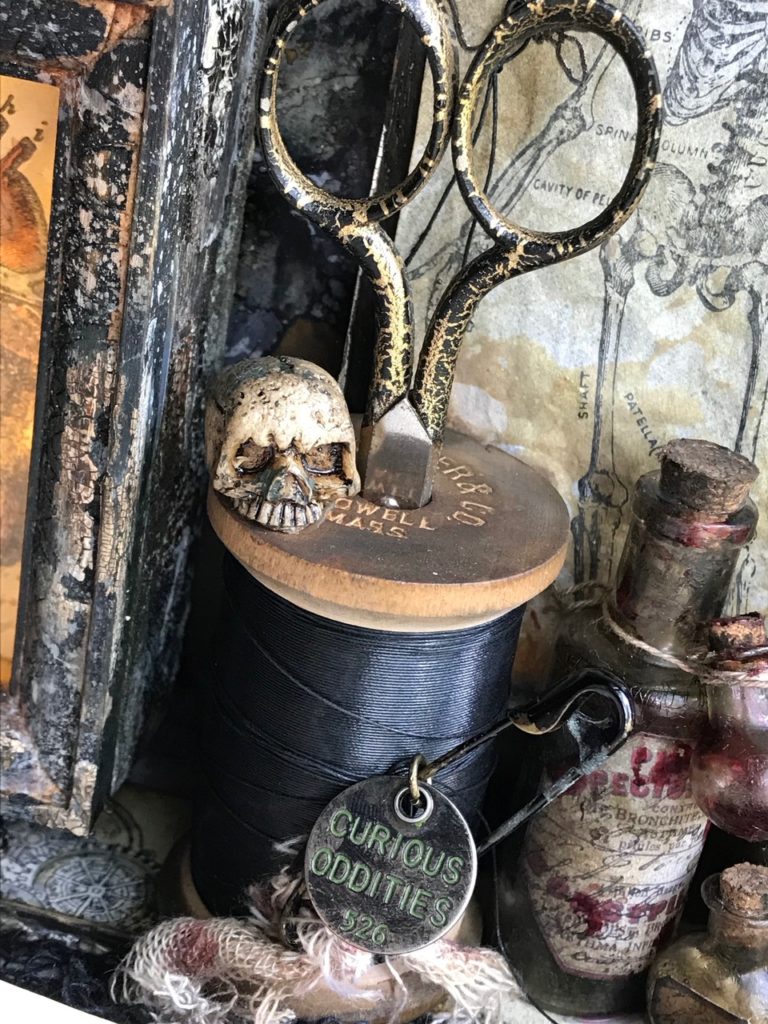
A creepy eye and mummy cloth were added to a corked dome. A skull and collection of tiny vials were put on display at the top of the small vignette box that contained the heart image.
The skeleton was stamped on a piece of vintage onion skin typing paper, distressed with a variety of inks and displayed on a vignette panel.
I added labels from the Halloween Ephemera packs to larger Corked Vials and embellished them with string, a Story Stick and typed token.
I added a vintage spool of black thread, safety pin and old pair of scissors.
I created a pin cushion using an old domino, vintage velvet and an idea-ology Deco Frame, then added some needles and thread.

Then the project was complete in all its creepy Halloween goodness.
Thanks so much for stopping by and have a wonderful day!
Creatively yours,
Stacy
What is an affiliate program, and why should I click on the link and buy through you?..
When you shop via the affiliate link on this blog, I receive a small commission, from the affiliate provider (Simon Says Stamp), at no extra cost to you whatsoever. These commissions help me to cover hosting fees and other costs to run my blog and be able to provide you with FREE inspiration. If you shop the links, THANK YOU! I truly appreciate being able to share my love of creating with you.
Gather Your Supplies-
Tim Holtz/Stampers Anonymous- Tiny Toadstools CMS377, Cadaverous CMS378, Weird Science CMS379, Ledger Script CMS241
Tim Holtz/ Idea-ology- Adornments Halloween Words, Vignette Divided Box, Tiny Vials, Glass Vials, Skulls, Vignette Boxes, Vignette Bases, Vignette Frames, Vignette Panels, Mummy Cloth, Tiny Lights, Deco Frames, Curio Knobs, Halloween Ephemera, Boneyard
Tim Holtz/Tonic- Tonic Guillotine Paper Trimmer, Tonic Shears
Tim Holtz/Ranger-Pitch Black, Mushroom, Teakwood Alcohol Ink, Distress Watercolor Paper, Alcohol Ink Yupo Translucent Paper, Water Brush
Distress Markers- a variety of colors
Distress Ink- Walnut Stain, Black Soot, Pumice Stone
Distress Tools/Mediums- Distress Sprayer, Media Mat, Heat it Heat Tool, Blending Tools, Distress Collage Matte Medium, Detail Water brush
Other- Vintage Onion Skin Paper, Thread, Spool, Safety Pin, Scissors, Mica Tiles, Domino, Dremel Tool


So totally amazing, Stacy! I loved it when I saw on the FB live; but seeing it up close and noticing all the details makes it even more spectacular! You are such a creative genius and the papers you created to use, are gorgeous; I love the different looks to each paper. Thanks for sharing your make and tutorial.❤️ Happy crafting!
This is great! Greetings from Belgium, Lizzy.
I love your work great job. Thanks for sharing
brilliant! I don’t even know where to begin, there are so many just incredible details in this one. the box alone with its texture and papers is eye candy then you add in all those special pieces, and i am blown away. thank you for sharing your wonderful talents Stacy!
You never disappoint! As always, it’s the details. Love the curved “stitching needle” on the pin cushion. You would certainly need that if you were exploring the human body and didn’t want to leave a mess. Hehe.
I haven’t got an adjective to describe this project. It is just so over the top! I’ll go with ‘brilliant’!! I especially love the way you group all your pieces together to really showcase the entire piece. I’ve seen your work at Frilly-n-Funky and love everything you do. Thanks for sharing…
WOWZA Stacy! This is incredible – love all the details xxx
“Eye” think this is a “heart” stopper….ha.ha,ha….Love all the details…
Love this piece. Every time I look I see something else. Love the colours and the info to maybe make one like it 🙂 Really a good piece Stacy!!! I love Halloween stuff.
Believe it or not, I have not seen the FB post, so this is the first time seeing this (maybe in THA FB page), and I am floored as usual with your level of detail! I’m loving the x-ray background; how incredibly clever! And the pin cushion and use of onion skin typing paper for the illuminated box blows me away! This reminds me of one of those I Spy books, only about 10,000 times better! I have a similar vintage carpet thread spool, and I would have had a hard time giving it up! Tim’s one very lucky guy to receive this and you are brilliant!!