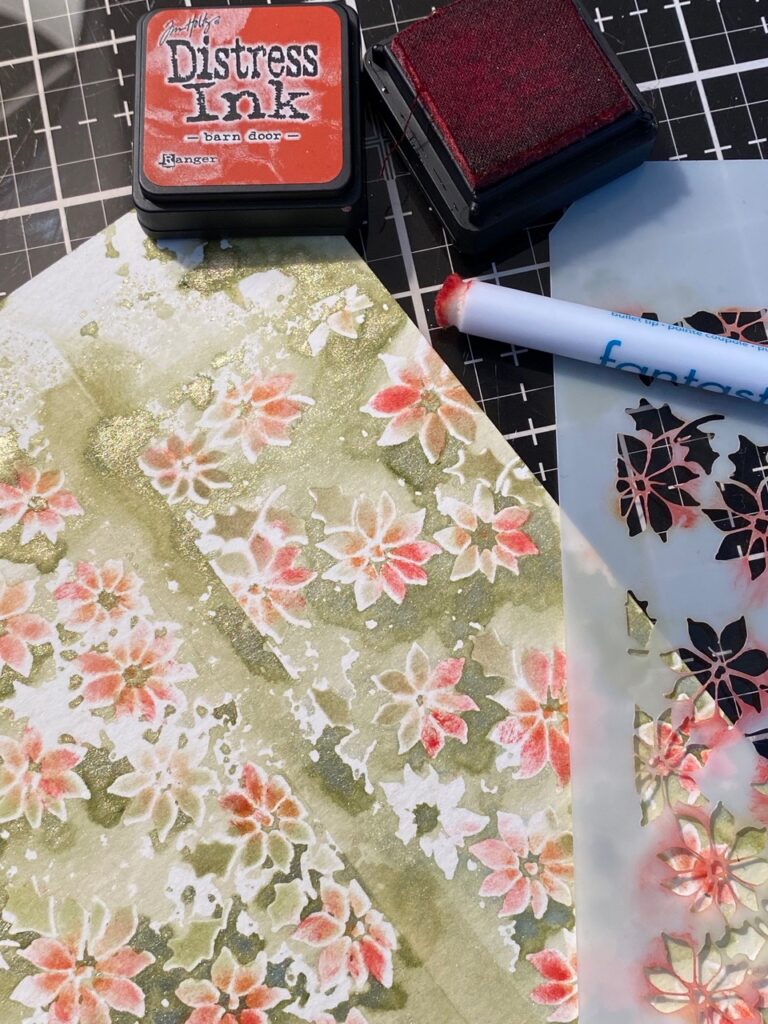
Hello friends! I am back again…this time with a card created using the new Tim Holtz Stampers Anonymous Christmas Layering Stencils. Ok, so I know that most of the hubbub during the release comes from the rubber-stamps but I really think it’s time that the stencils get more love, LOL.
Stencils are one of my most favorite tools in my Tim Holtz toolbox… and today, that is what my focus will be and how this card came to be.

It all starts with a background for me most of the time. I look at either a stamp set or stencil, grab a few colors that might set the design off and I just run with it, then my project takes off from there.
This tutorial will focus on these…the stack of backgrounds that I created with the new collection of Christmas Layering Stencils which include Tiny Poinsettia THS163, Pinecones THS164, Hollyberry THS165 and the Mini Stencil Set 54 MST054 ..see what I mean, stencils are THE BOMB..and backgrounds are the BEST, they are a fun jumping off point!


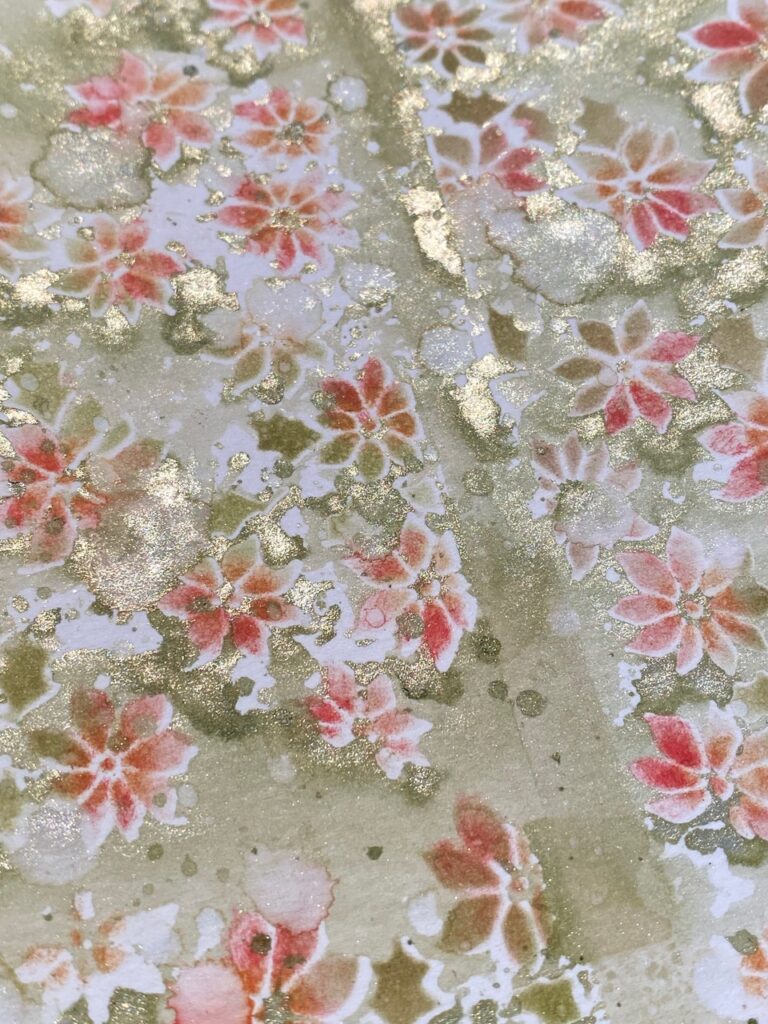
Here’s a close-up of that poinsettia background on the card. Along with the new stencils, I of course, had to use the new Mica Stains from the Holiday Ranger Release, because shimmer can only make a holiday card better!


So, let’s get to it!
I started by selecting my colors of Distress Mica Stains and Distress Inks, then I made a mono-print and filled it in with Distress Ink, then splattered it with both drips of Mica Stain and water. This is how to do it.
Gather your supplies…Splat box, Craft Mat, Stencil (mini poinsettia), Watercolor Paper, a couple pieces of Paper Towel, Mica Stain (Fresh Balsam) and water in a Spray Mister.


Spritz your stencil with Mica Stain and water.


Flip your stencil over onto your piece of watercolor paper that is placed on a piece of paper towel, then place a piece of paper towel over top of the stencil to catch the over flow ink that comes through the stencil cuts.


I took the stencil off, placed it back in my splat box, then sprayed it with Mica Stain and water again, then flipped it onto the other side of my watercolor paper to make a full piece of decorative paper. You’ll notice that the size of this stencil is small, but that’s ok.. filling in with splats of ink or water is the perfect way to fill in a distressed background. You’ll even notice I had a “seam” of ink in the center of my paper, it may not look quite right at this point but just wait to see it in the end.
Once I removed the stencil, I dried it with my heat tool.


I wiped off and dried the stencil, then placed the pattern over top of the mono-printed pattern. This is where the filling in of the ink begins…I took a blending tool and loaded it with Peeled Paint Ink, then very randomly began filling in little parts, but not all of the areas. I tried to focus the peeled paint over the leafy areas, but it was very loose and I was not very particular about it.


Next, I grabbed a tiny blending tool that I had in my stash called a Bullet Tip Fantastix. I have had these in my crafting stash for YEARS..and it works so well for tiny detail areas and worked like a dream for these stencils.
I inked up the tip of the tool with Rusty Hinge Distress Ink, then blended ink towards the centers of the poinsettias. Once I was done blending the rusty hinge, I cleaned the fantastix blending tool with a baby wipe and dried it on a towel.


Next, I inked up the fantastix again but this time with Barn Door Distress Ink, then blended very randomly over the poinsettias.


Once my blending was done, I spritzed the background with some drips of Fresh Balsam Mica Stain and some drips of water, then I dried it with a heat tool.


Here’s an up-close look at the finished background…yummo!


The Poinsettia Card…
I created some inky background papers using the new Mica Stain in Tart Cranberry plus Distress Ink in Rusty Hinge and Aged Mahogany along with some water to create background to cut out the poinsettia from the new Sizzix Holiday Brushstroke 3. The greens were from the same Sizzix Set but cut from paper that had been made using Distress Mica Stain Fresh Balsam, and Distress Ink in Shabby Shutters and Peeled Paint. I cut out all the pieces and layered them together using foam tape and adhesive. Once adhered together, I added sparkle to the flower and greens using Glossy Accents and Clear Rock Candy Glitter.
The tags used below were from the new Sizzix Framed Tags. They were cut from Watercolor paper, then stitched using my sewing machine and white thread. The smaller tag had a stamped piece of vellum added to the front to create a “pocket” to hold some of the greens. The stamped music was from the new Department Store Stamp Set, then embossed using Gold Embossing Powder.


I set a couple brass/gold eyelets into the top holes of the tags, then layered them together using foam adhesive and tied on a cream and gold piece of cotton crochet cotton thread. I stamped a phrase from the Darling Stamp Set and Embossed it with Gold Embossing Powder, I trimmed it to fit the front of the tag, then stitched the right and left side, then adhered to the front of the poinsettia.
The poinsettia background was stitched around the edge using my sewing machine and white thread then matted to a piece of white paper that had been trimmed using the Deckle Paper Trimmer. The Deckle edges were rubbed with an embossing ink dauber and sprinkled with Gold Embossing Powder and embossed with a heat tool. then they were all matted onto a white card base. With that, my card was complete.


Now..what about those other backgrounds that I made with the rest of those fabulous Layering Stencils?? 😉
The Pinecones…


These were all made using the same steps above just mixed up with some other colors… Winter Frost Mica Stain for the mono-printing, Peeled Paint, Forest Moss and Walnut Stain Distress Inks for blending, then spritzed with water and mica stain, then dried.


The Holly…


Decayed (from the Halloween Release) Mica Stain for Mono-printing, Peeled Paint, Forest Moss and Candied Apple and Walnut Stain Distress Ink, the Fantastix Blender Tool for the berries, water and my heat tool to dry.


Well, I hope you enjoyed this tutorial and the bonus backgrounds that I created using the new stencils. I just love them and hope that you give them a try.
Have a great day!
Creatively yours,
Stacy
Products used to create these makes… to shop at Simon Says Stamp CLICK HERE, to shop at Scrapbook.com CLICK HERE
Tiny Poinsettia THS163, Pinecones THS164, Holly Berry THS165, Mini Stencil Kit 54 MST054, Darling Christmas CMS457, Department Store CMS458, Distress Watercolor Paper, Holiday Mica Stains, Clear Rock Candy Glitter, Glossy Accents, Distress Inks, Sizzix Holiday Brushstrokes, Framed Tags, Eyelets, Sewing Machine and Thread and more…


What is an affiliate program, and why should I click on the link and buy through you?
When you shop via the affiliate link (linkdeli) on this blog, I receive a small commission from the affiliate provider (Simon Says Stamp & Scrapbook.com) at no extra cost to you, whatsoever. These commissions help me to cover the hosting fees and other costs to run my blog and be able to provide you with FREE inspiration. If you shop the links, THANK YOU! I truly appreciate being able to share my love of creating with you.


I don’t think there’s any one’s creations that are lovelier than yours. Your creativity helps me stretch my skills and I’m always thrilled with the results. Thank you for sharing your talents.
Your card is beautiful and this is such a fun tutorial. I really like the loose watercolor look of your card and all the sparkle from the mica. Thanks.
thanks for showing how you created the backgrounds!
Love everything about this card and the easy to follow directions.
Thank you.
Beautiful work, Stacy!
The poinsettia card has the most wonderful look.
Love its color combo,
It reminds me of a vintage lady’s hanky.
So lovely.
Thanks for your inspiration.
Wow! These are all fantastic! Thank you for the details and techniques you shared here. You give me so much confidence. You’re a wonderful artist and a great teacher!🤗
Brilliant!! I can’t wait to get my stencils and stamps! Thank you so much for sharing your wonderful creativity – I always learn a LOT! xxx
Gorgeous background and card, I just love the way you hid the seam of the stencil background and your layering of the tags and flower is so pretty!
Gorgeous cards!
I especially love the poinsettia card. The background looks so 3-dimensional. Very soft, pretty look!
Wow Stacy, your makes are so gorgeous! All the little details make this card just stunning. I love how you’ve created the backgrounds. I’m sold on it all lol!
This is clear and really shows the steps perfectly. I melted when I saw your card in the live. So softly gorgeous! Thank you for sharing this technique with us!
I am so glad you have given us this great tutorial on this gorgeous stenciled card! It was my very favorite of everything that was presented in Tim’s recent video! Kudos!
Bonjour, merci pour vos explications, vos réalisations sont très belles.
Bonne journée,
Astrid