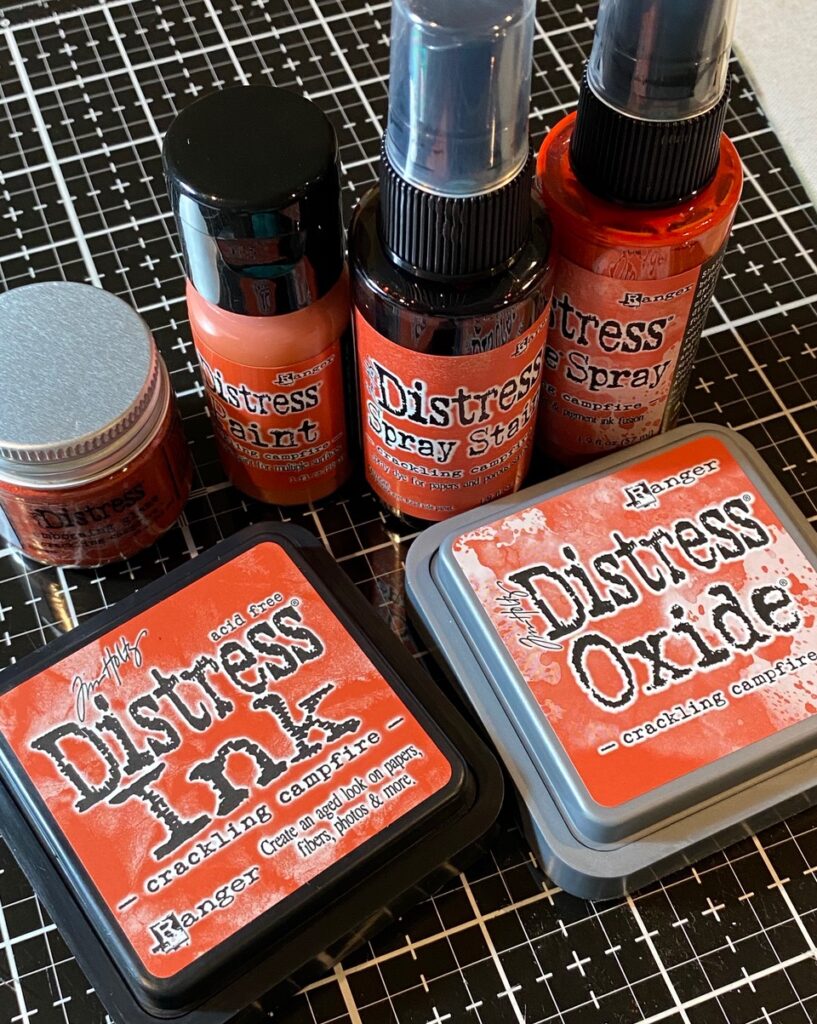
hello all! I hope that you are doing well. I am back today with a card that I created to help introduce the new distress color, Crackling Campfire. I was so excited to play with it and have some secret inking fun, thank you, Tim!
Of course, I’m in love already…but if you haven’t seen the new color in action, you should definitely take a peek at the Facebook Live that Tim hosted today, sharing this new illuminating color! See what I did there?
It is gorgeous and is surprisingly versatile for many different seasons…so it’s not only a BEAUTIFUL fall addition to the line. To check out the facebook live you can click here.
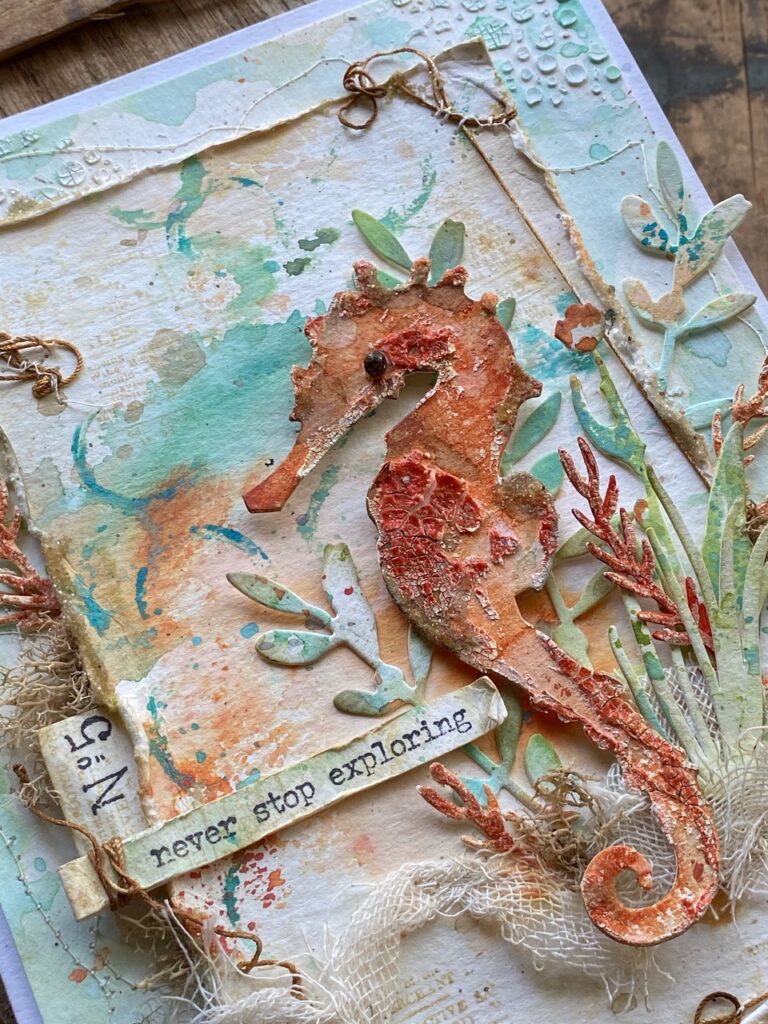
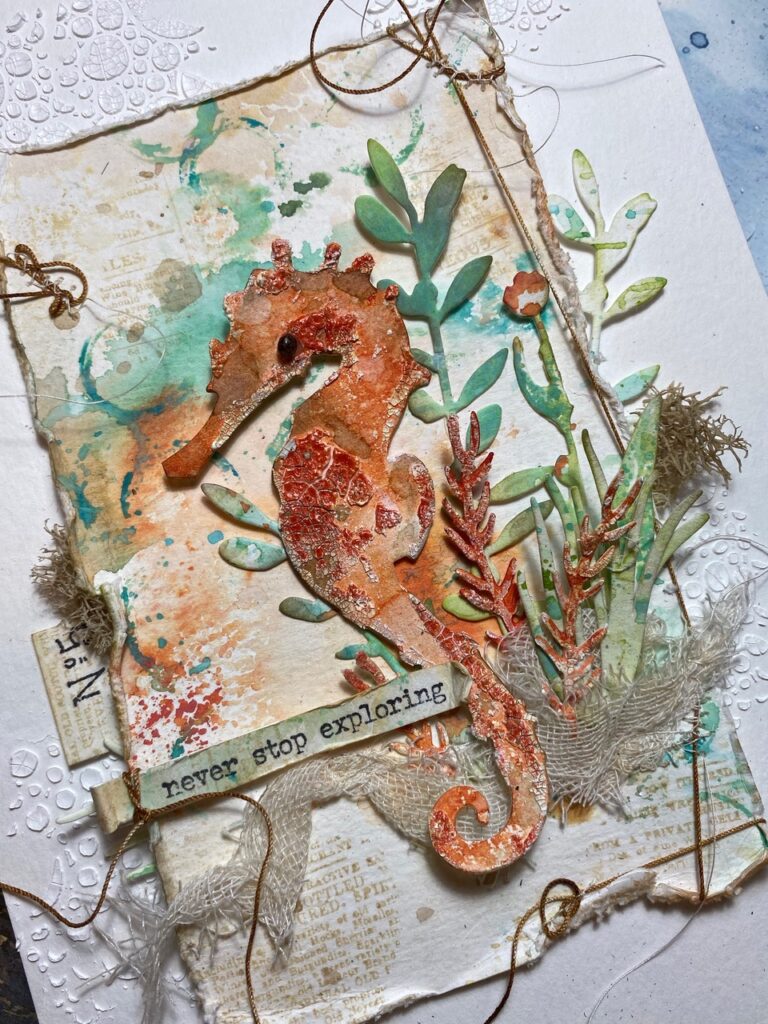
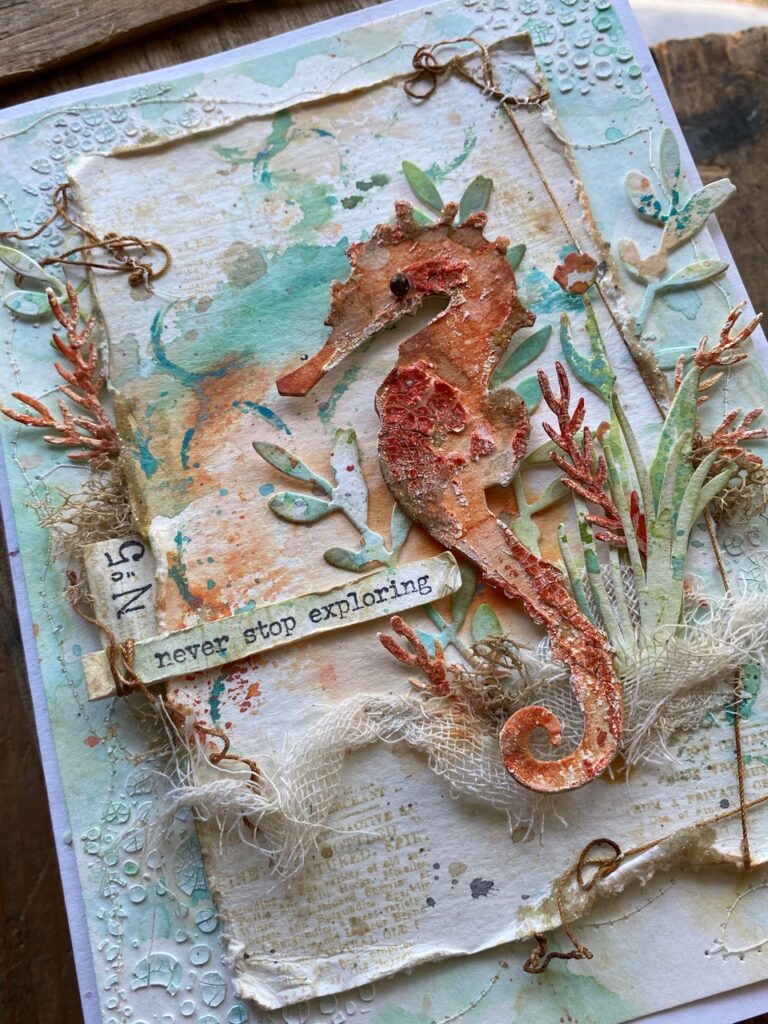
I chose to highlight the color today with a beachy kind of card! Crackling Campfire was the perfect color for my little seahorse. It also was used to create the beachy tropical background paper…but we’ll get to that in a little bit!
Hey, we all could use a little escape to the beach, right??

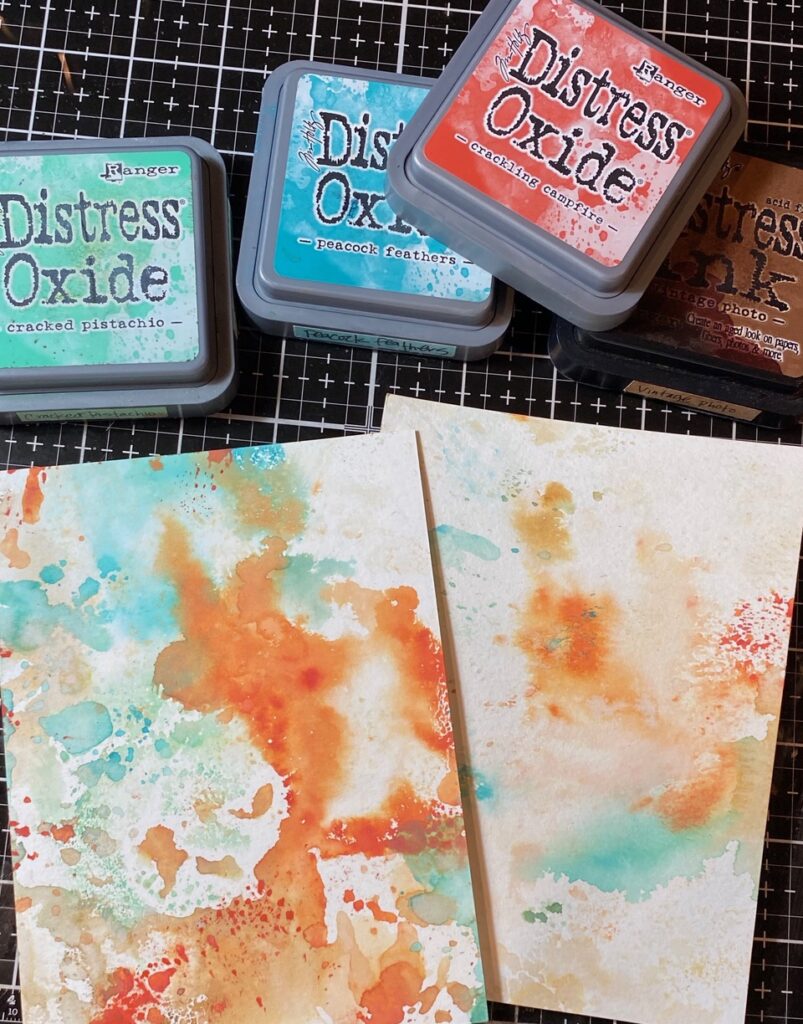
Let’s play around and make a few backgrounds with it…
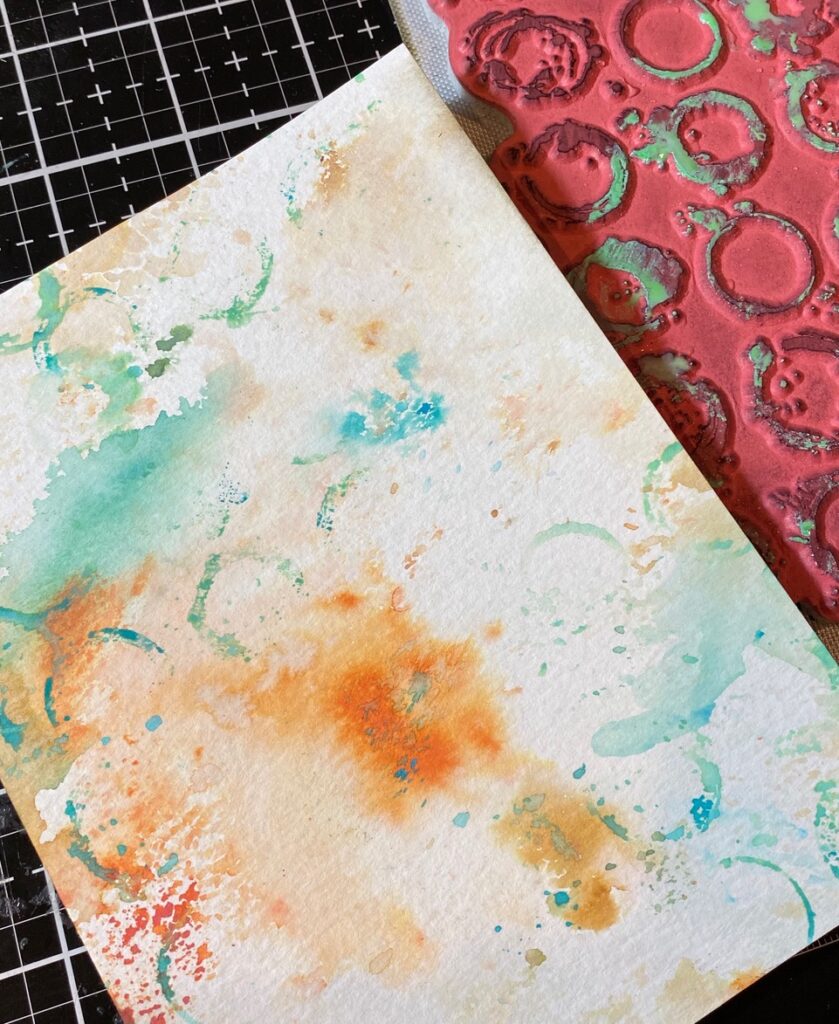
This is the paper that I made first and happens to be the paper that the little seahorse was cut from…isn’t it yummy?
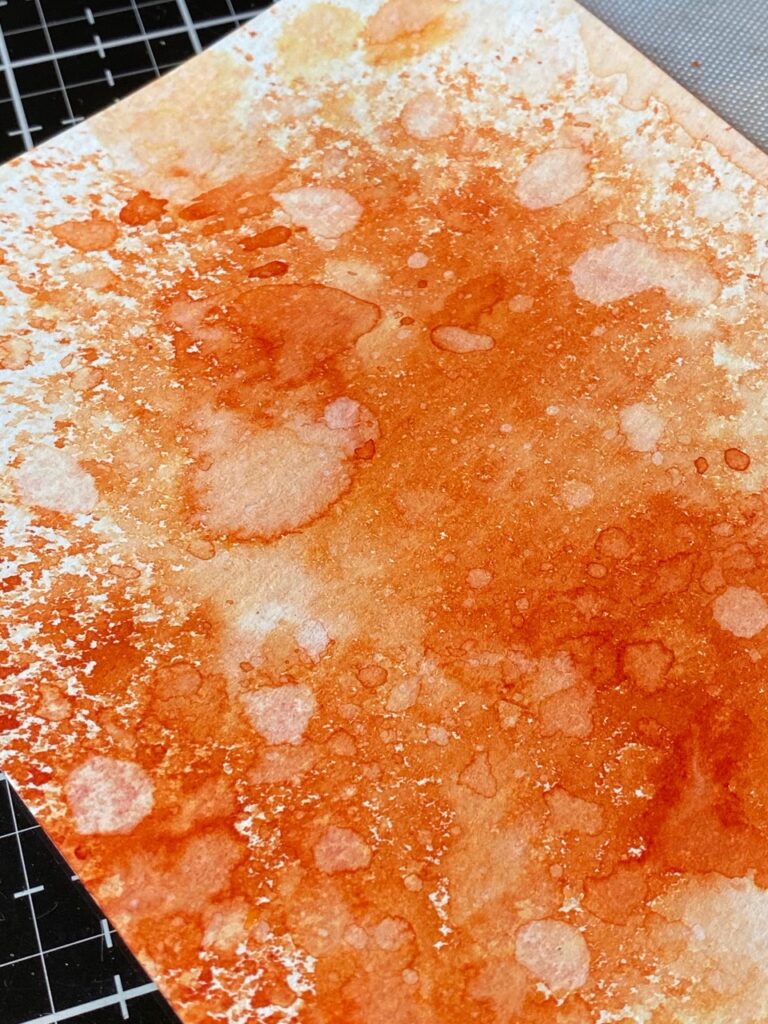
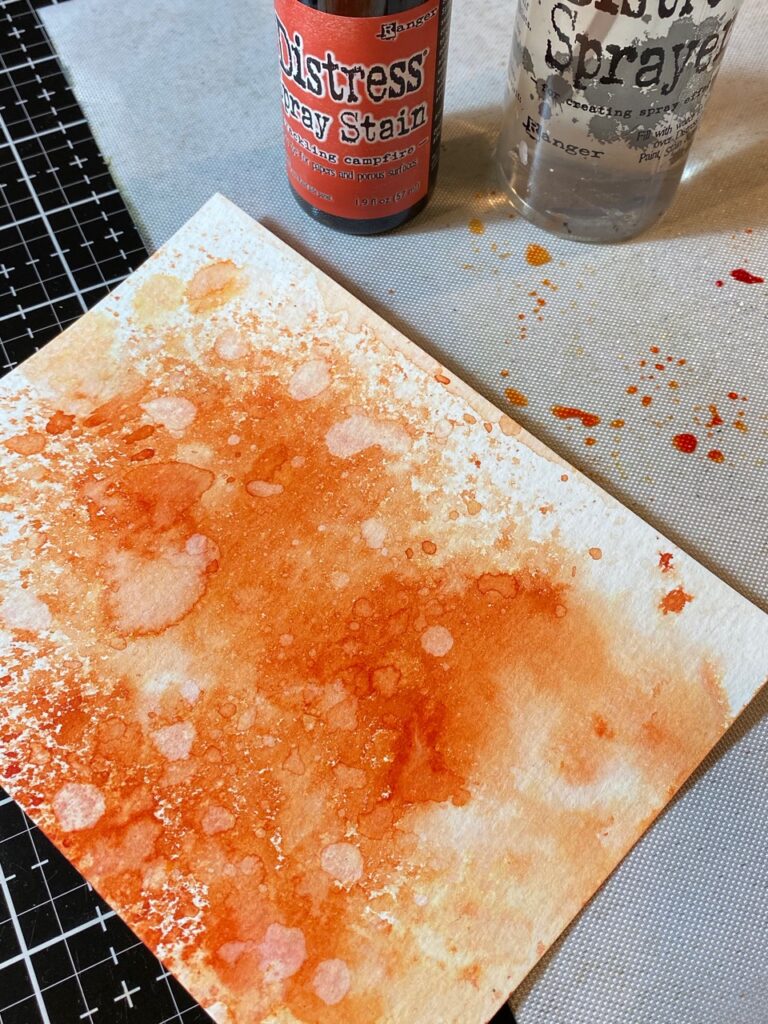
I simply spritzed the paper with water, spritzed it with Crackling Campfire Spray Stain, then dried it with my heat tool. I spritzed a little bit of the spray onto my craft mat, then spritzed it with water and dipped the paper into the drips, then I dried the paper again.
I spritzed the paper with a little water, let the drips sit for a tiny bit, then sopped them up with a towel. Easy Peasy!
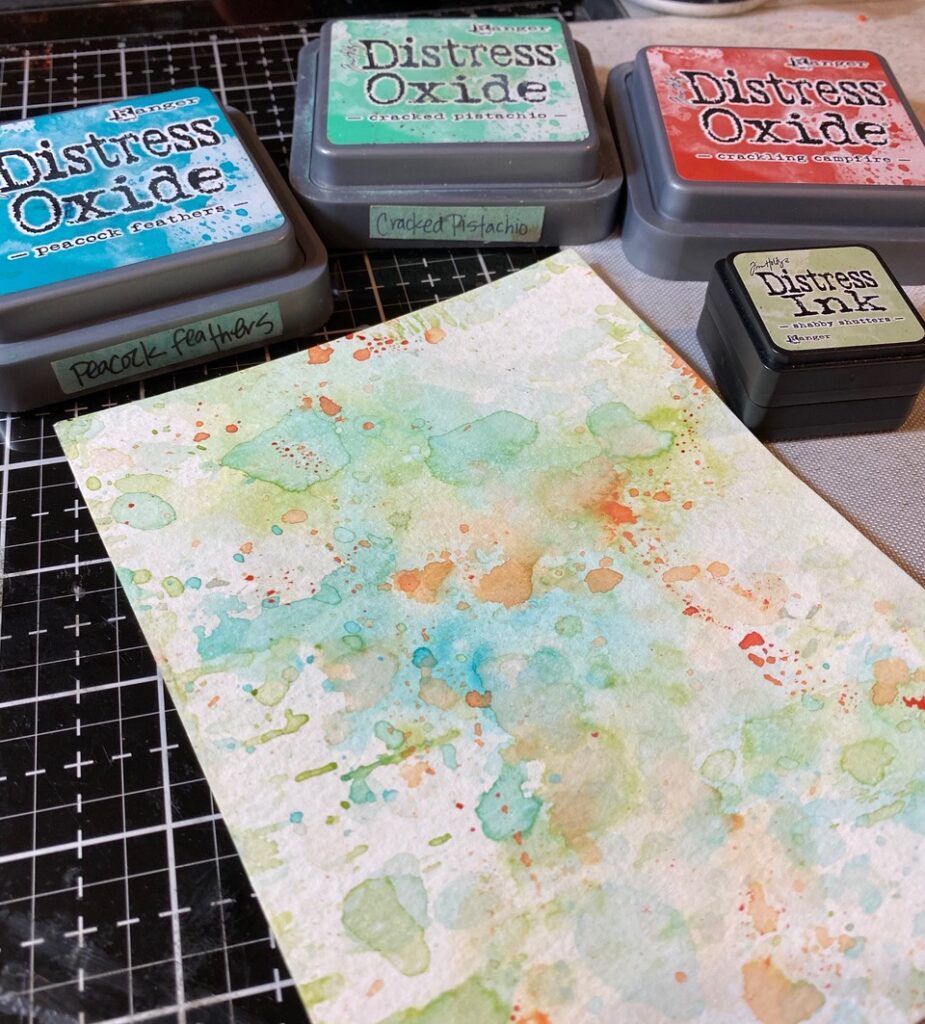
Next, I played around and combined the oxide version of Campfire with a few tropical colors which included Cracked Pistachio, Peacock Feathers and a little Vintage Photo Distress Ink…because a tropical theme needs a bit of a sandy beach.
I smooshed the inks onto my craft mat, spritzed the inks with water and then dipped my paper into the ink, then dried it with my heat tool. The background on the right is the one that I chose to use on this card.
The seahorse and coral…
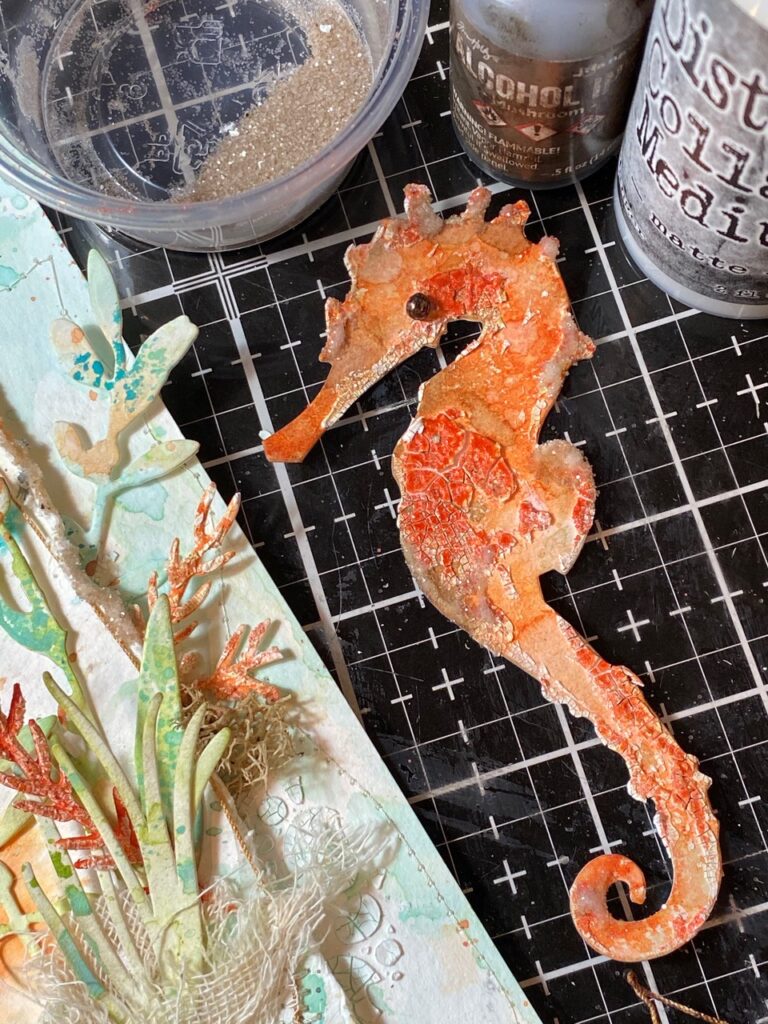
I used the first paper I created and cut out the seahorse from the Sizzix Bigz Sand & Sea, this is a discontinued die, but it may be able to be found on eBay or Etsy. Sorry about that, you can’t help when inspiration takes you down a discontinued path. LOL!
Then, with a palette knife, I spread on a tiny bit of Distress Crackle Texture Paste and sprinkled the pasted areas with some Crackling Campfire Embossing Glaze. He was then set aside to dry and crackle.
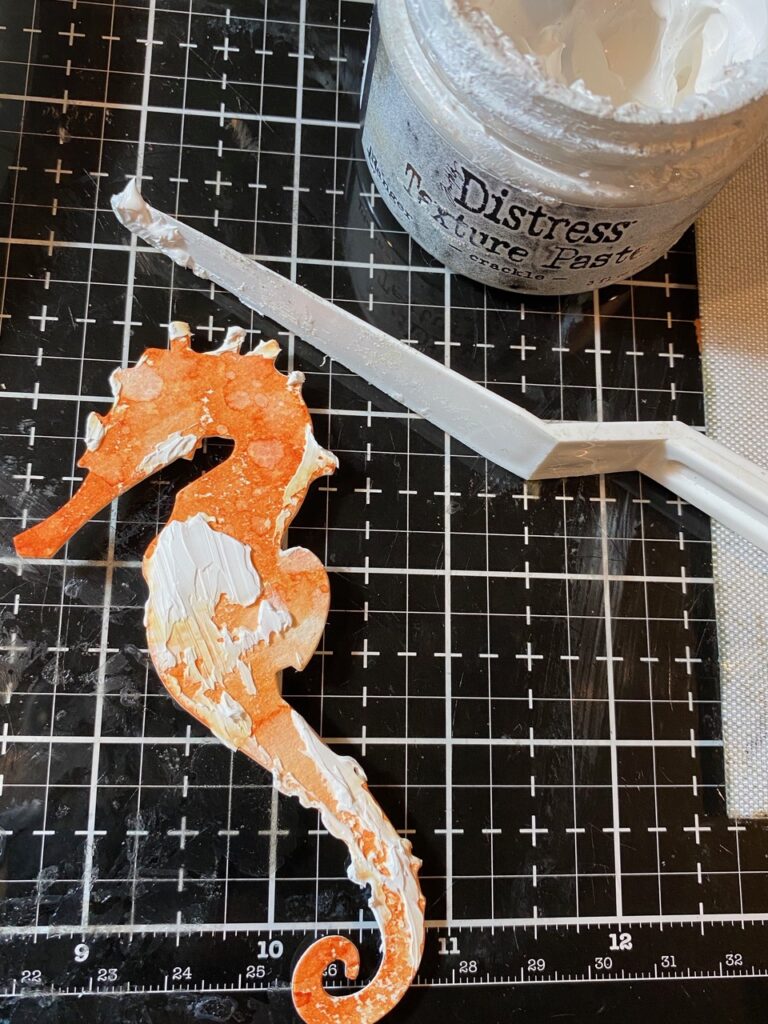
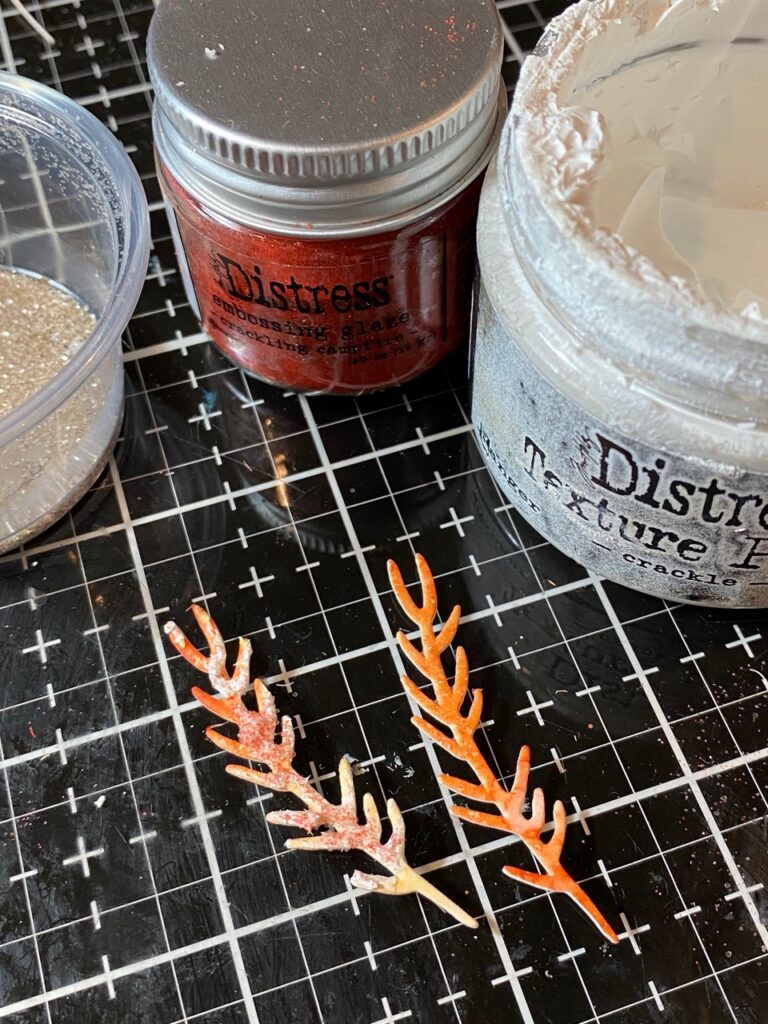
After I had him set aside, I thought hmmmm, wouldn’t it be cool to create some coral and add the crackle paste and glaze to them, it might make them look and feel like coral, and it totally worked!
Plus, to give a little extra something to them, I sprinkled the pieces with Clear Rock Candy Glitter, this was all done while the texture paste was still wet. After they were all dry and crackled, I embossed the glaze with my embossing gun.
p.s.-I always have a small container of the glitter that’s been tinted with Mushroom Alcohol Ink, turns out, it works perfect to add a little glisten to coral and as you’ll soon see, works for sand as well!
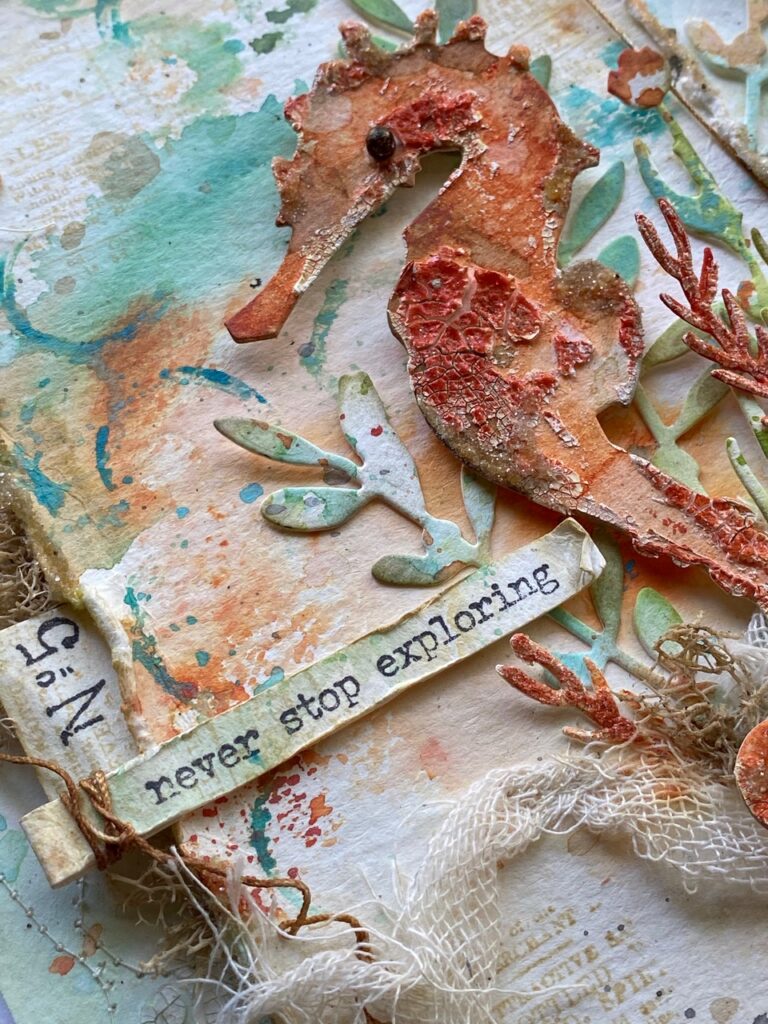

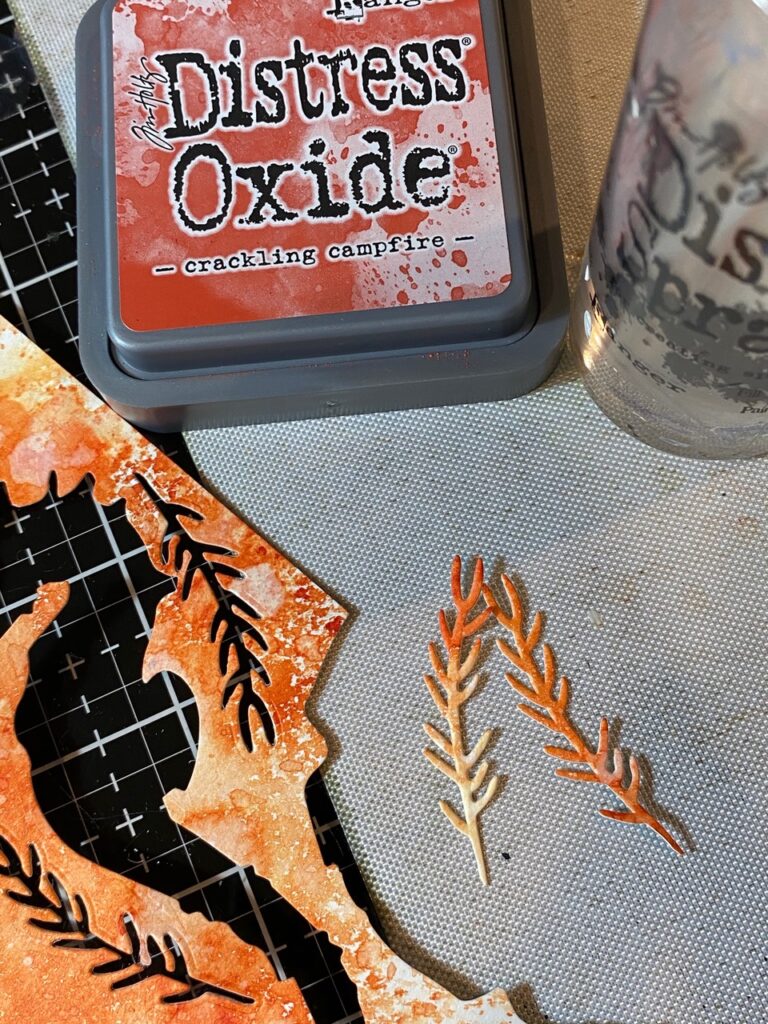
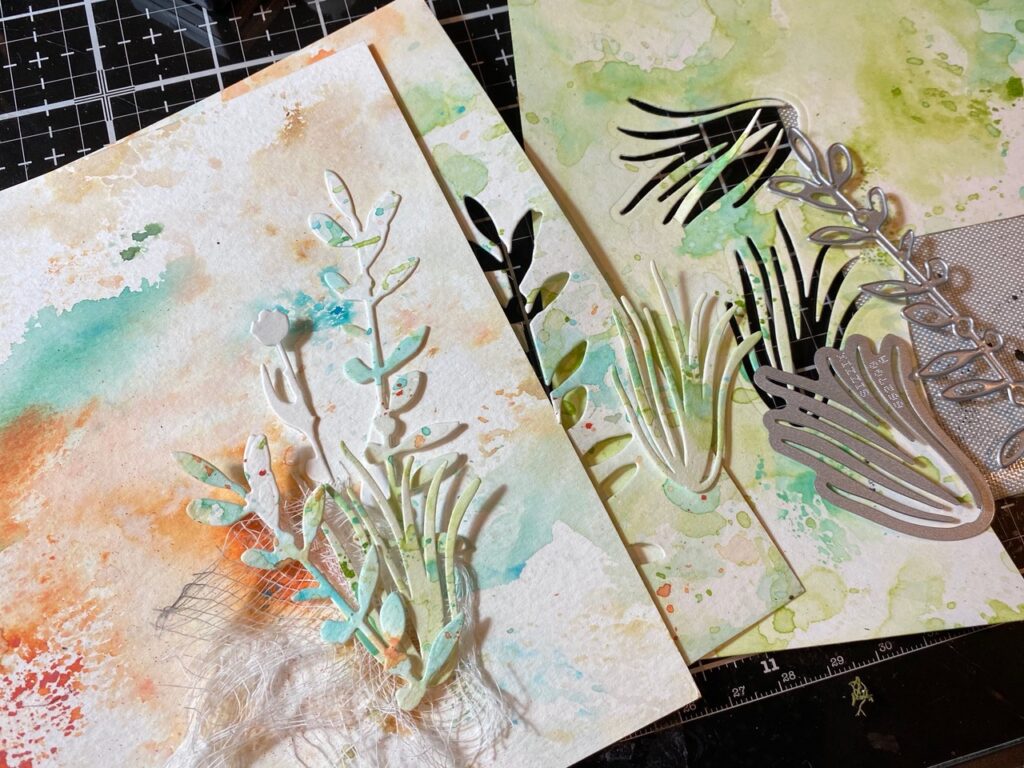
The seaweed…
The seaweed was created using some papers that were made using the same techniques that I previously shared, except that I made some with greens and blues and some with greens, blues, and flecks of the crackling campfire. I used the Funky Floral #1, Garden Greens and Wildflowers 2.
To add a little more depth to the background of the card, I smooshed Peacock Feathers and Cracked Pistachio onto the Rings Background Stamp (halftone & rings CMS260), spritzed the ink and stamp with water, then randomly stamped onto the background, and dried with a heat tool.
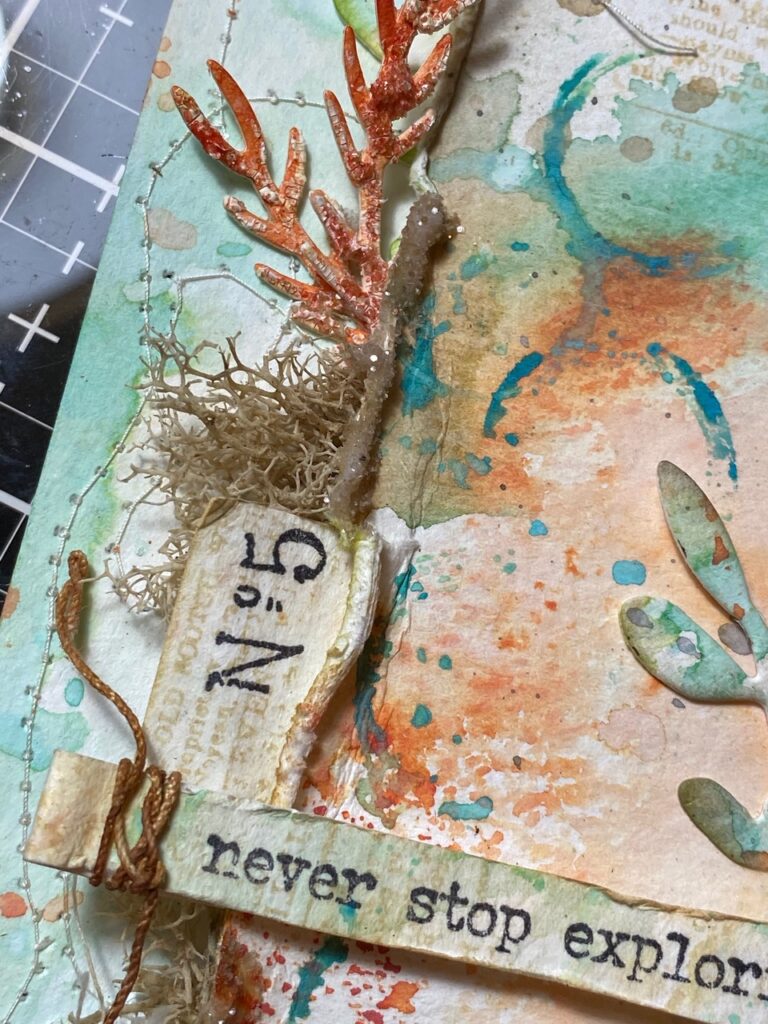
I blended the background with a little Antique Linen Distress Ink, stamped some random background text (newsprint CMS266) and trimmed it down. I drug the Paper Distresser along the edge to give it a well worn look.
I found a piece of string in my stash and wound it along the edge of the background, then using my sewing machine, ran a couple zig-zag stitches over top of the string.
A small vintage bead became the eye of the little seahorse and was added with collage medium.
The phrase (tiny text CMS394) was stamped onto a scrap of paper, trimmed and another piece of string wound around the end.
A short piece of mummy cloth was dyed using some drips of Antique Linen Distress Ink and water, dried and then added to the bottom of the arrangement.

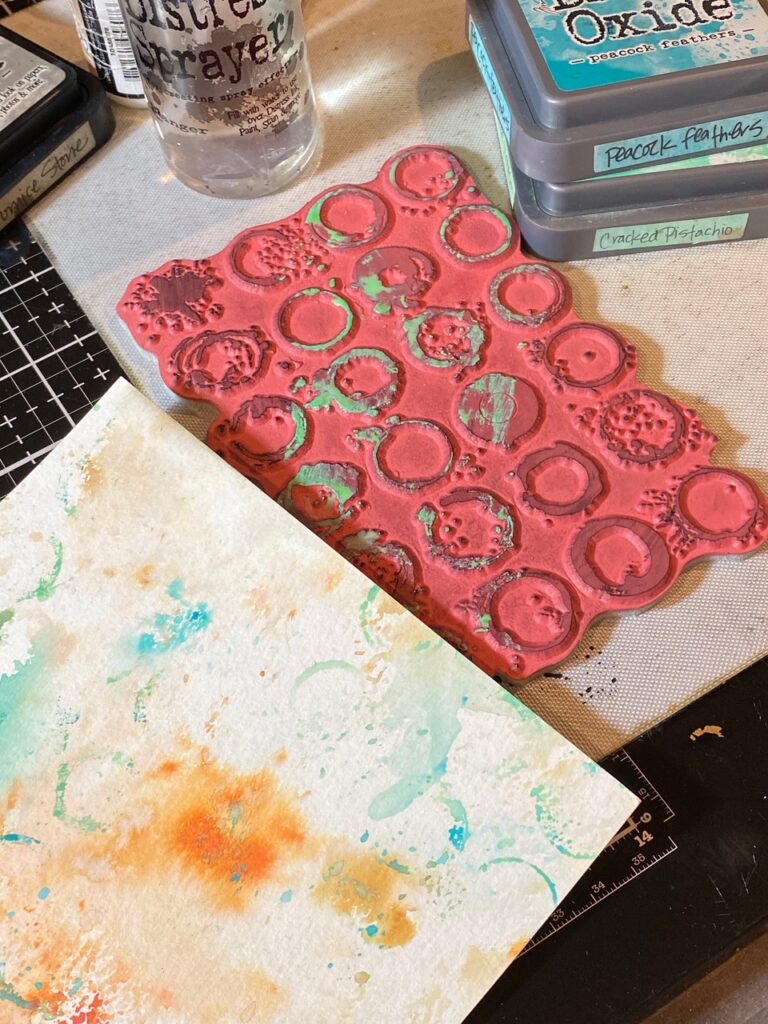
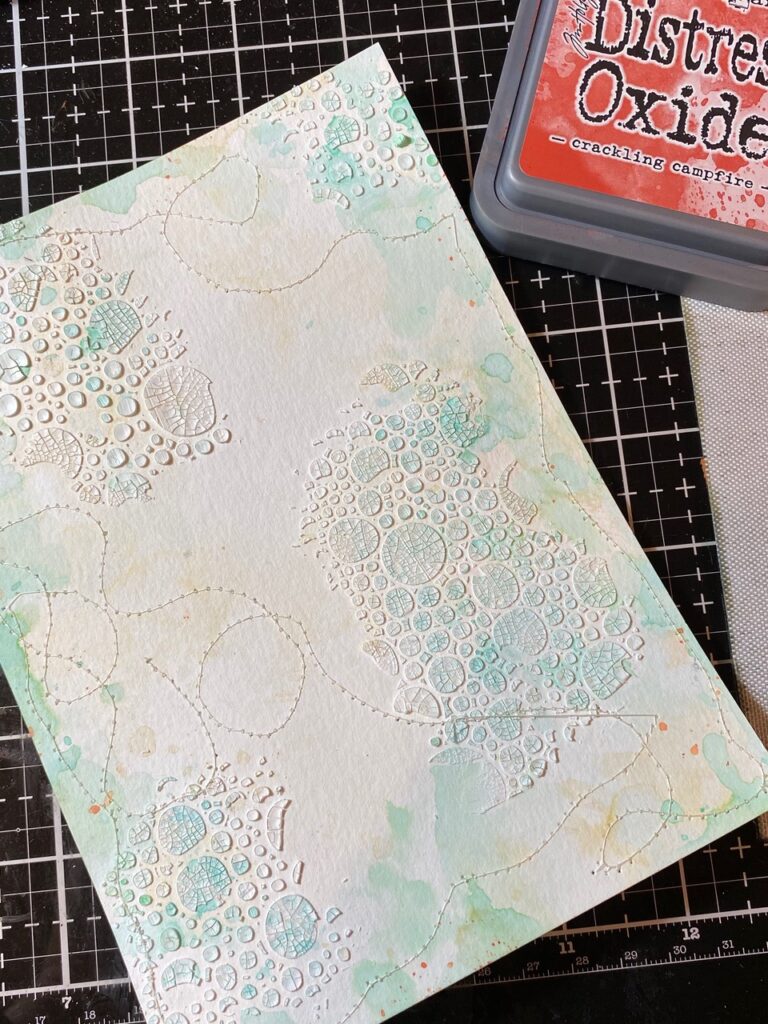
I created another background using the mini Bubbles Layering Stencil (mini stencil set #46) and Distress Crackle Texture Paste. I smooshed some ink onto my craft mat then, using my finger, dabbed the ink into the crackled bubbles.
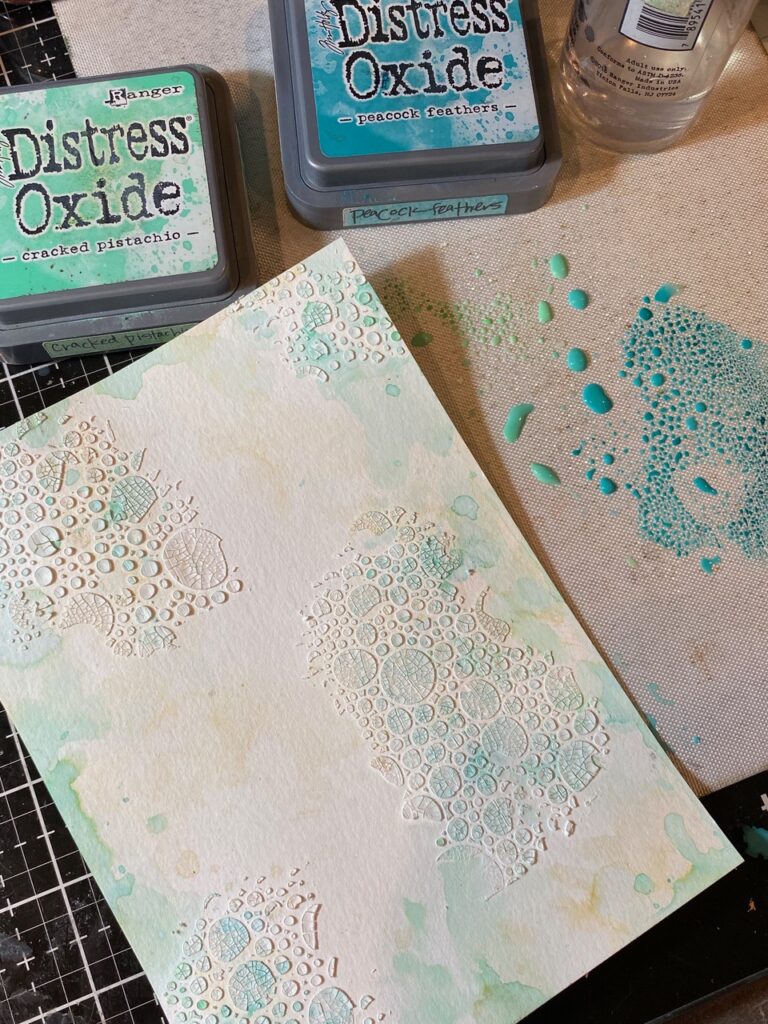
I found by using my finger to add the ink into the cracks, it left a softer watercolored look to the background. I dabbed the ink in, then dried it with my heat tool and added more until it was the look I was going for.
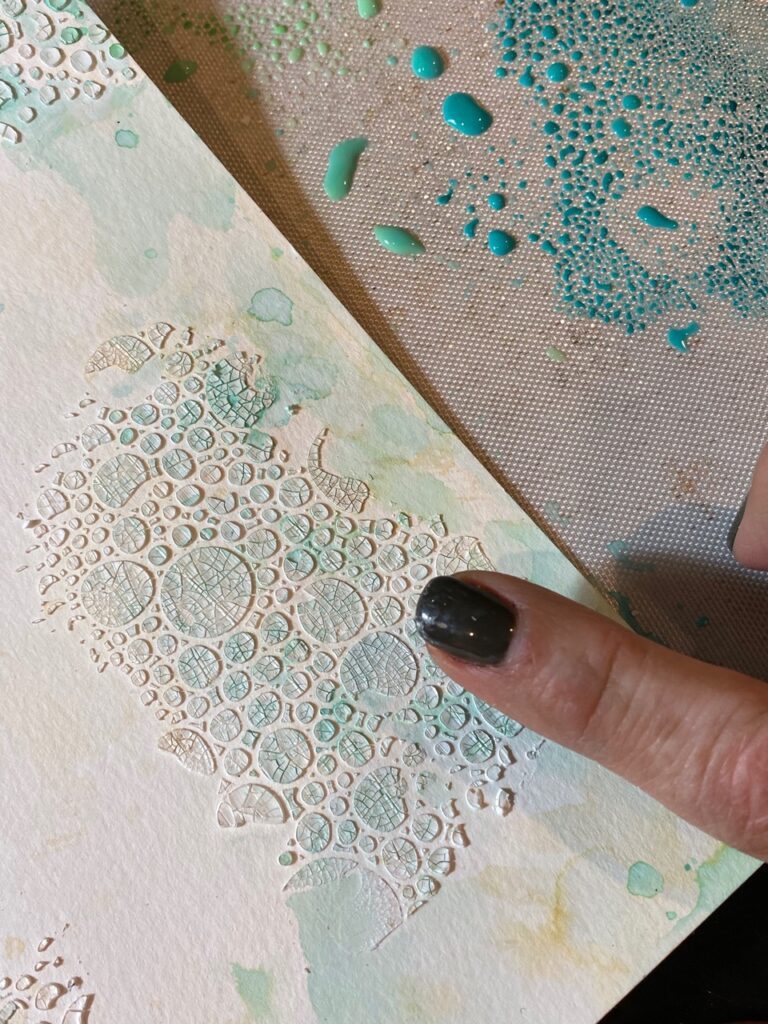
Using my sewing machine and white thread, I messy stitched loops and random swirls onto the paper. Some tiny flecks of campfire was added onto the background.
I added some more of that “sandy” glitter to the seahorse and onto a few areas of the distressed edge of the paper, using distress collage medium.
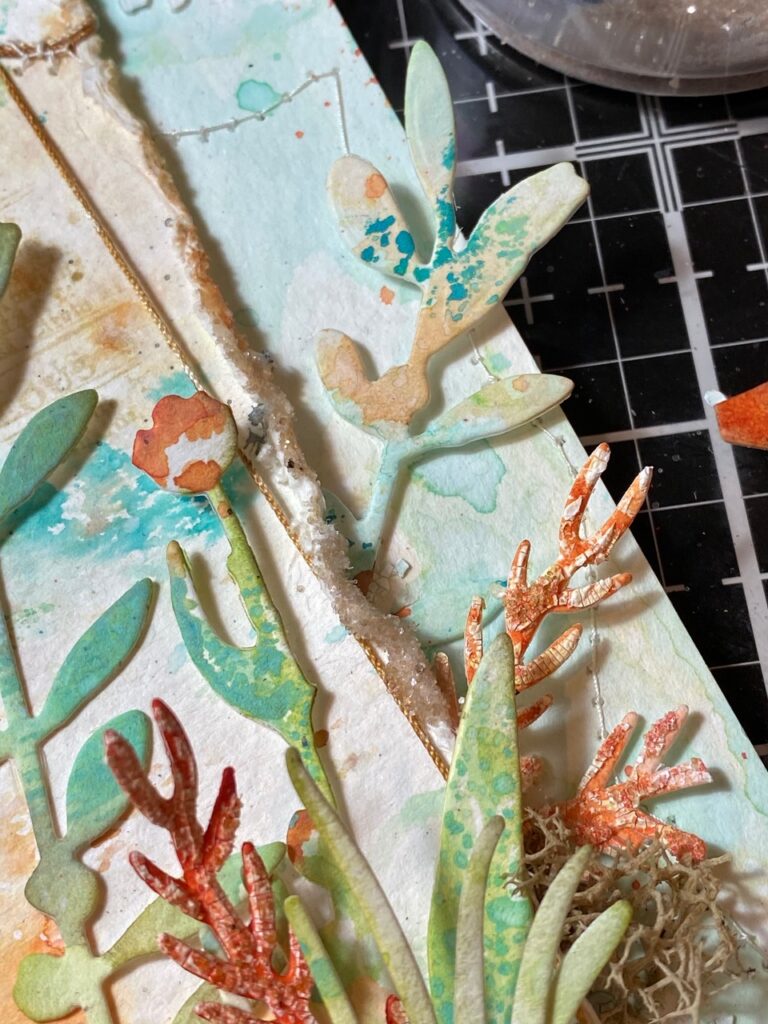
Some floral moss was added into the mix and all the elements adhered to the card.

With that, my card was complete…thanks so much for stopping by today!
Creatively yours,
Stacy
What is an affiliate program, and why should I click on the link and buy through you?
When you shop via the affiliate link on this blog, I receive a small commission from the affiliate provider (Simon Says Stamp) at no extra cost to you, whatsoever. These commissions help me to cover the hosting fees and other costs to run my blog and be able to provide you with FREE inspiration. If you shop the links, THANK YOU! I truly appreciate being able to share my love of creating with you.


Your makes on the release today were phenomenal! Can’t wait to see what you continue to do with his amazing color during the Fall season!
absolutely fabulous card. The detail is over the top amazing.
This is absolutely stunning. Thank you for the great tutorial.
I’m more of a shabby chic person so when I saw your card on the live that background really jumped out at me!!! Ab-solutely gorgeous! And the new color on the seahorse … wow. It really does pop! Beautiful card and appreciate you sharing how you made it.
Your artwork is stunning! Love the new colour, thank you for the tutorial!
Incredible work of art. Thank you for sharing the directions and photos.
This card is amazing, as are all of your creations! You truly are an artist!
Ditto to all the above – I have only recently become aware of your work and LOVE it! The amount of techniques and detail are wonderful. Thanks for the super clear tutorials too. xoxo Greetings from NSW Australia
Just beautiful!
Completely blown away by this – as I said, it made my heart skip a beat. The texture on the seahorse is just so beautifully done, and the gorgeous softness of the inky background colours sets off the vivid Crackling Campfire perfectly. An absolute showstopper! Thanks as always for sharing all the details of how you created it.
Alison x
Beautiful piece, love the seahorse with his texture…
LOOOOOOOOOOOOOOVE it!!
Super Gorgeous!!
I totally adore this piece! It made my day. Thank you for the tutorial……..will definitely try this out.
Stacy, all of your makes for the new color reveal were amazing! I really love this one; thank you for all the detailed tips, techniques, and inspiration. And weren’t you “Johnny on the spot” with your quick upload for this tutorial,😉
PS: I tried to comment yesterday, and was actually the first, but my device would not cooperate 😬😬😬 and then when I tried again it wouldn’t open your blog! Made me crazy🤪!
Stacy, I don’t think I can actually describe how much I love this…. it is just stunning and what a fantastic combination of colours. The texture on the seahorse looks fabulous and I really love the stitched elements that you added. A truly inspiring make! Anne x
Oh this color is my jam…lol! You rocked this project with the sea theme, and then knocked it out of the park with the textures and of course colors. LOVE!
so cool, love the texture and colors!
I am in awe of your work!
Thanks for sharing!
Wow, this is fabulous. Thank you for sharing your technique. 😊
Gosh this is beautiful! Thank you for the great step by step images and tutorial.
This is a work of art! Truly it is! I’d love to be able to make a card similar to this. I saw a card you made on the into. of the new colour, which is scrumptious by the way. The card had a butterfly on it & I’d love to know how you made it. Have you posted the process & I’m just not looking in the right area? This is my introduction to your blog & I’m very impressed by your creations. Talk about talent!
I love this card. While I don’t have the patience for all the wonderful details, you have me thinking about some of the techniques. You are an artist.
A really spectacular card, Stacy!!!