Hello and Welcome!!
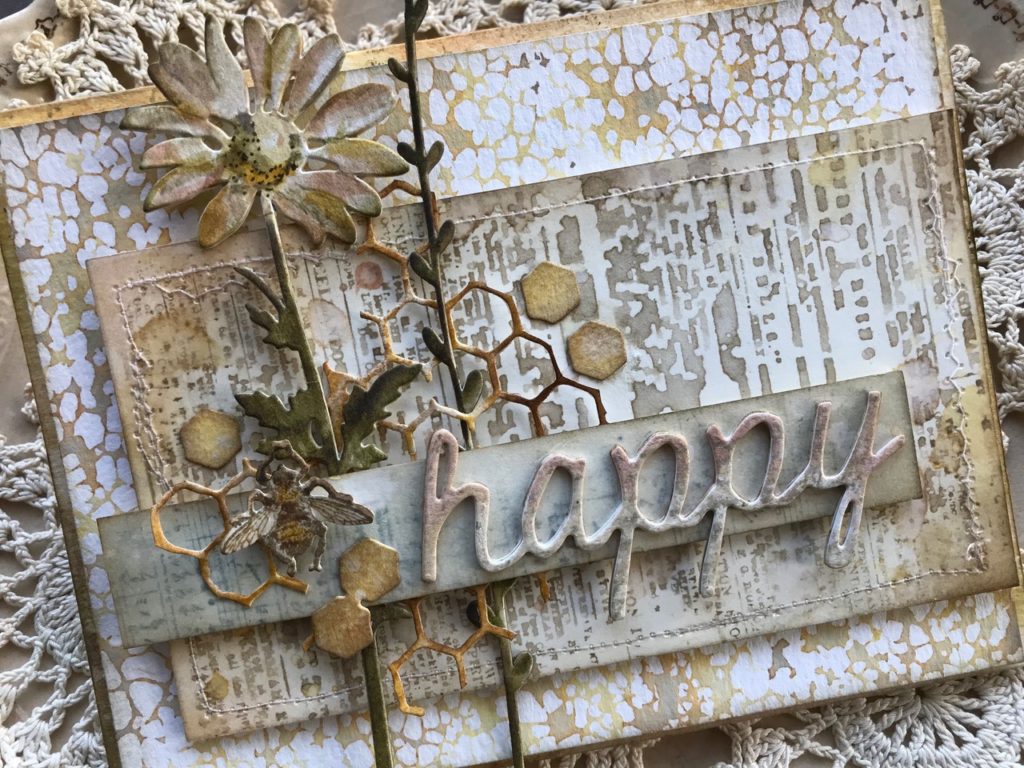
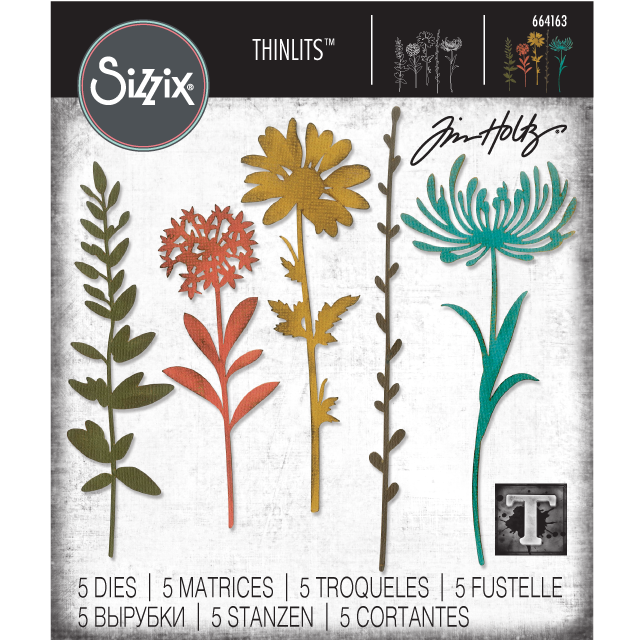
I’m back with another flower card…this time featuring the lovely new Wildflowers Stems 1 Thinlet die set released in the Tim Holtz Sizzix Chapter 1 Release. These flowers are BEAUTIFUL and so detailed. I fell in love with them immediately and I hope that you will to!
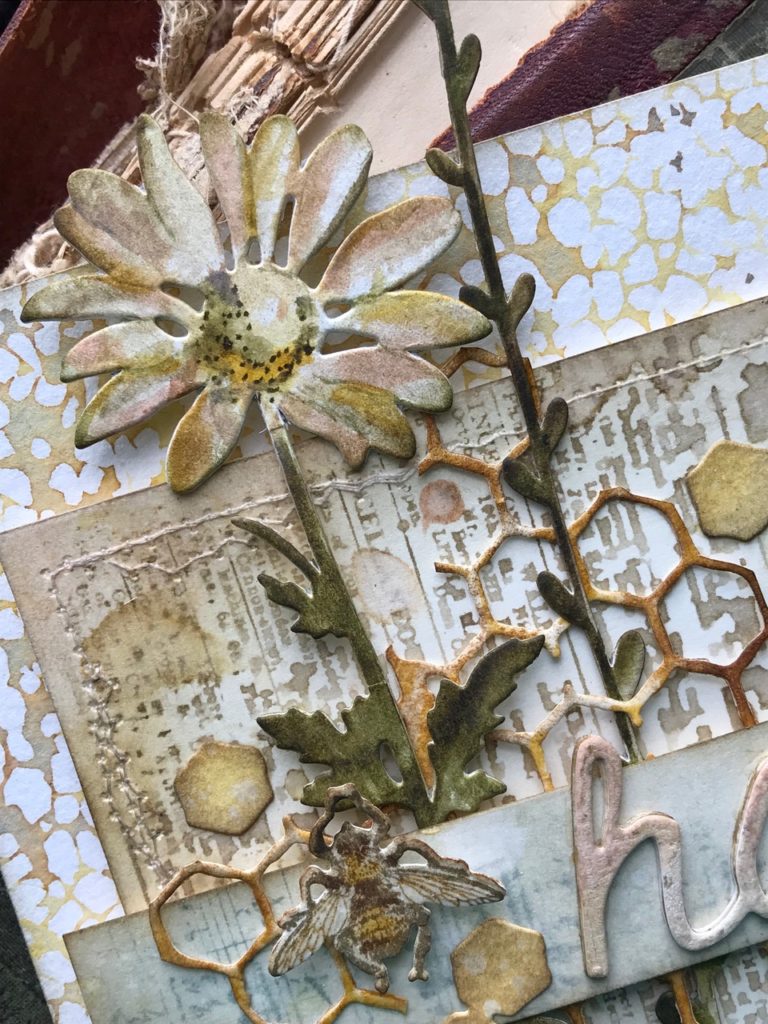
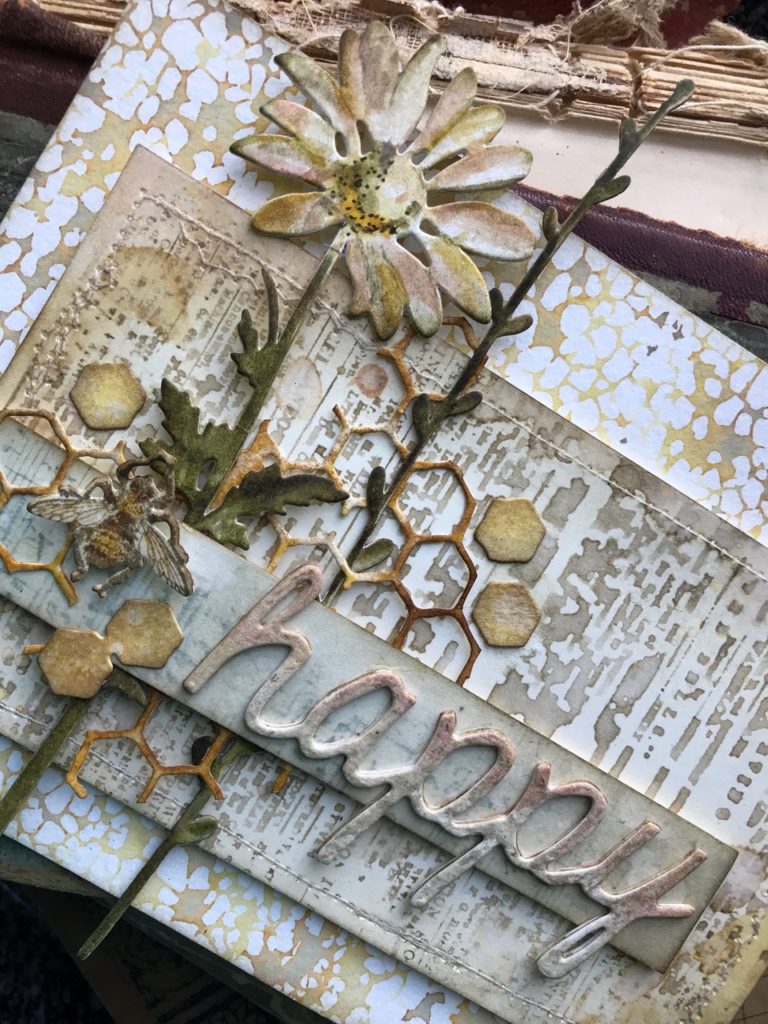
The Wildflower die set comes with 5 dies, 3 flowers and 2 greens. They are much larger then the previously released wildflowers which makes them the perfect focus on a card. I also had to throw in a bee from the Entomology Stamp set (CMS328) because you just can’t have the flowers without the bees!
When I received the die I was stumped as to what kind of card I should make. So I decided to have a “watercolor the flowers” day! I cut several of the flowers and greens out of Distress Watercolor Paper. Then began coloring them with Distress Markers and a Detail Waterbrush and then dried them with my Heat Tool.
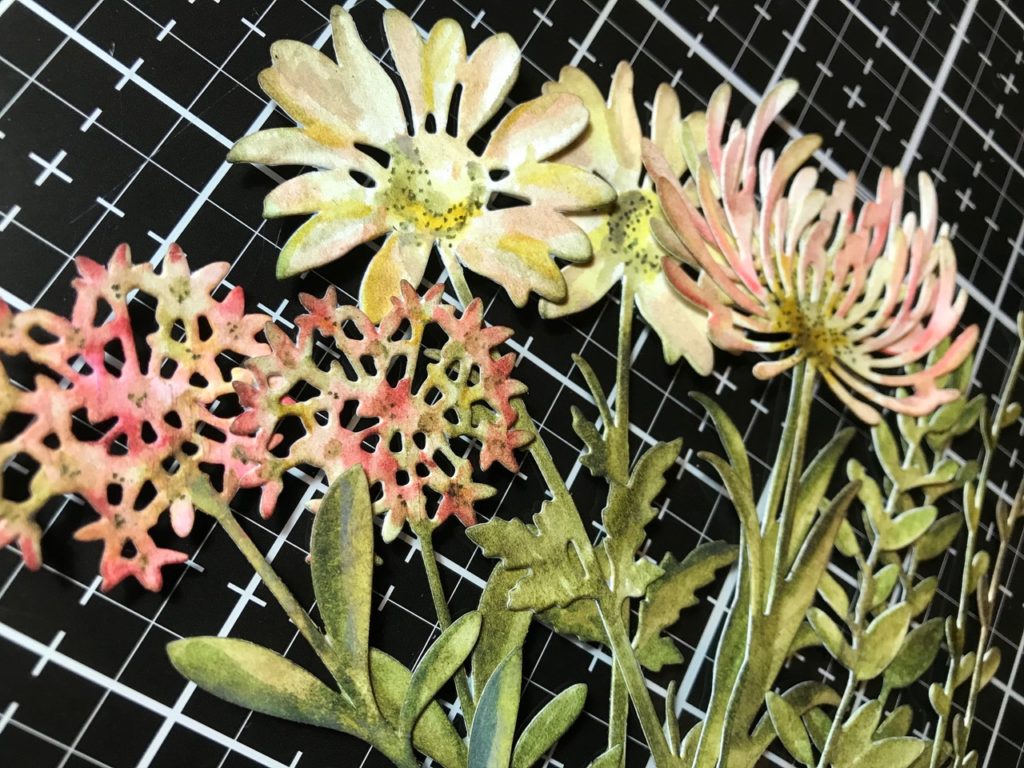
Here is a little sampling of some of the flowers that I created that afternoon. They turned out so beautiful and were just what I needed to get my creative juices flowing! Plus, it was nice to have a no pressure day of playing..
Along with this card tutorial, I’ve included some tips and tricks that I do to make my card making quicker …I hope you enjoy!!
Let’s get started by creating the daisy…
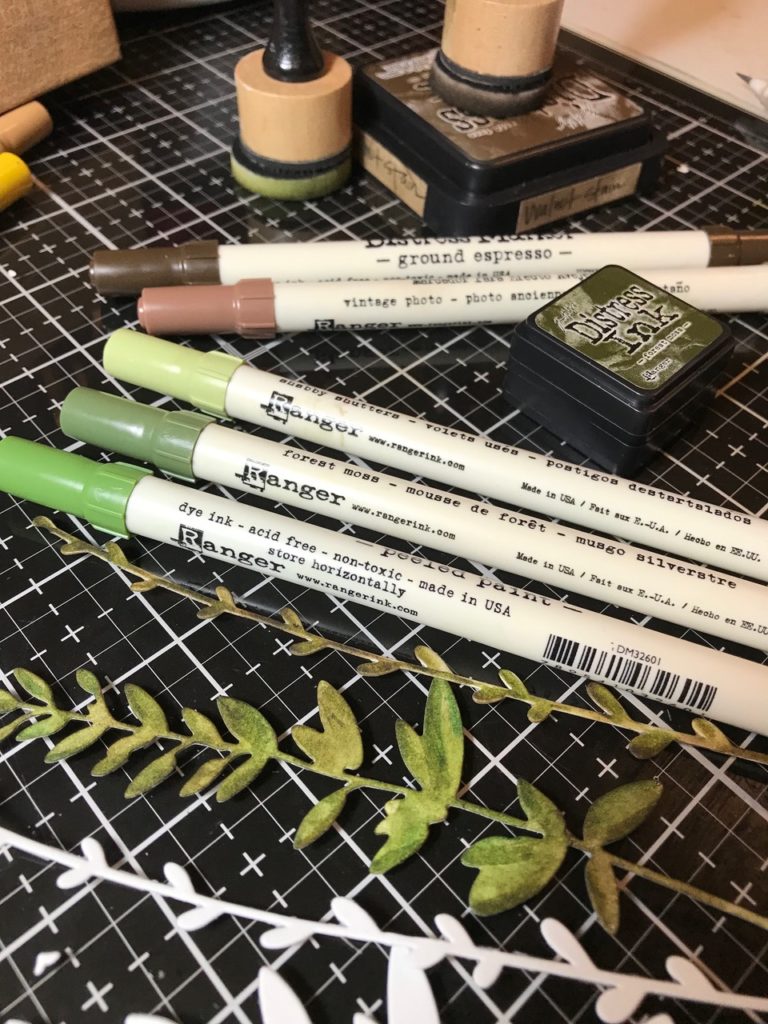
I colored the daisy with a bit of Tattered Rose and Brushed Corduroy Distress Markers.
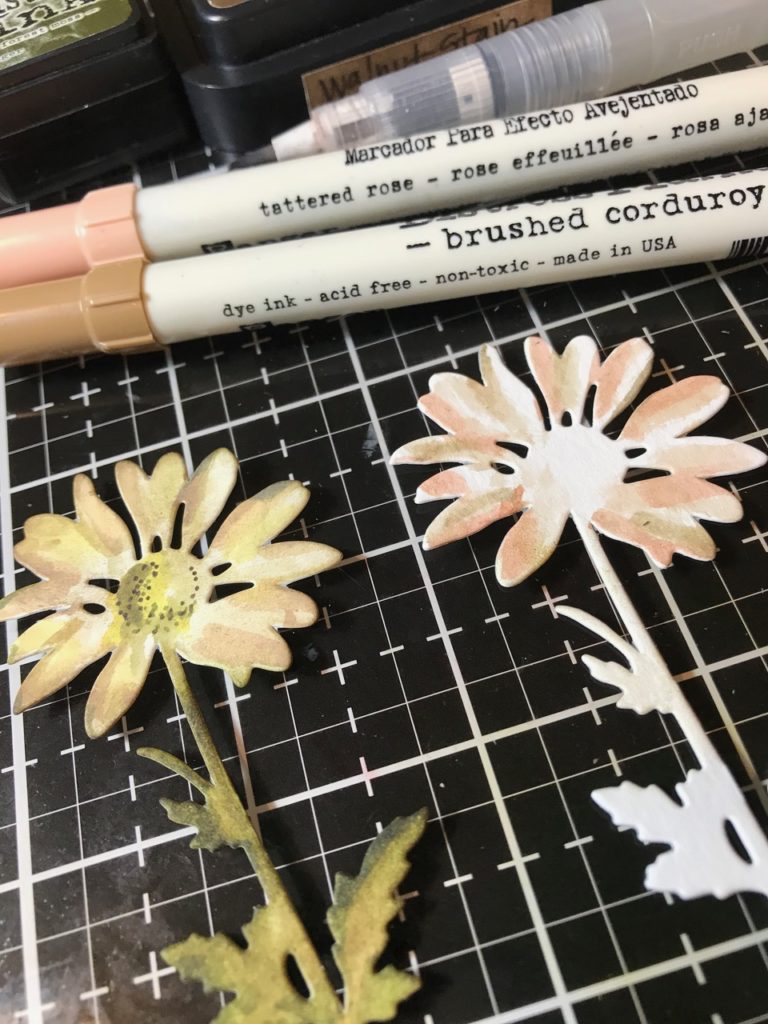
Then a bit of Fossilized Amber and Forest Moss… and don’t forget the stem.
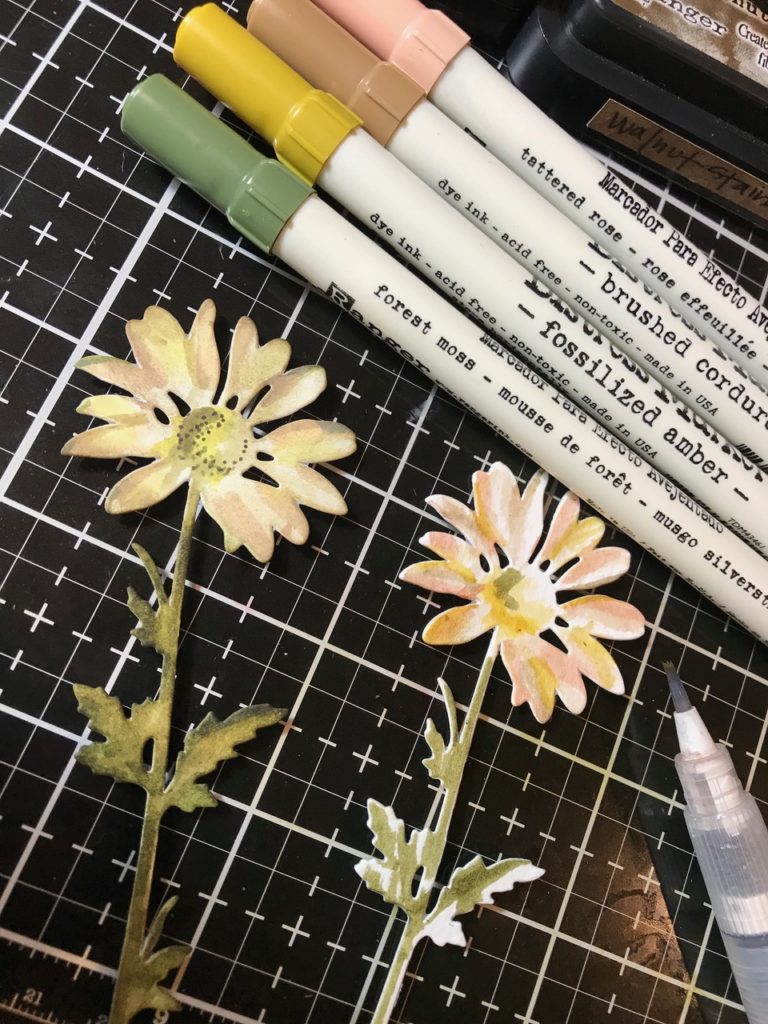
I blended the colors with a Detail Water Brush and dried it with my Heat Tool. After it was dry I added some tiny dots of Forest Moss into the center of the flower, and blended it with a bit of Walnut Stain around the edges of both the flower and stem.
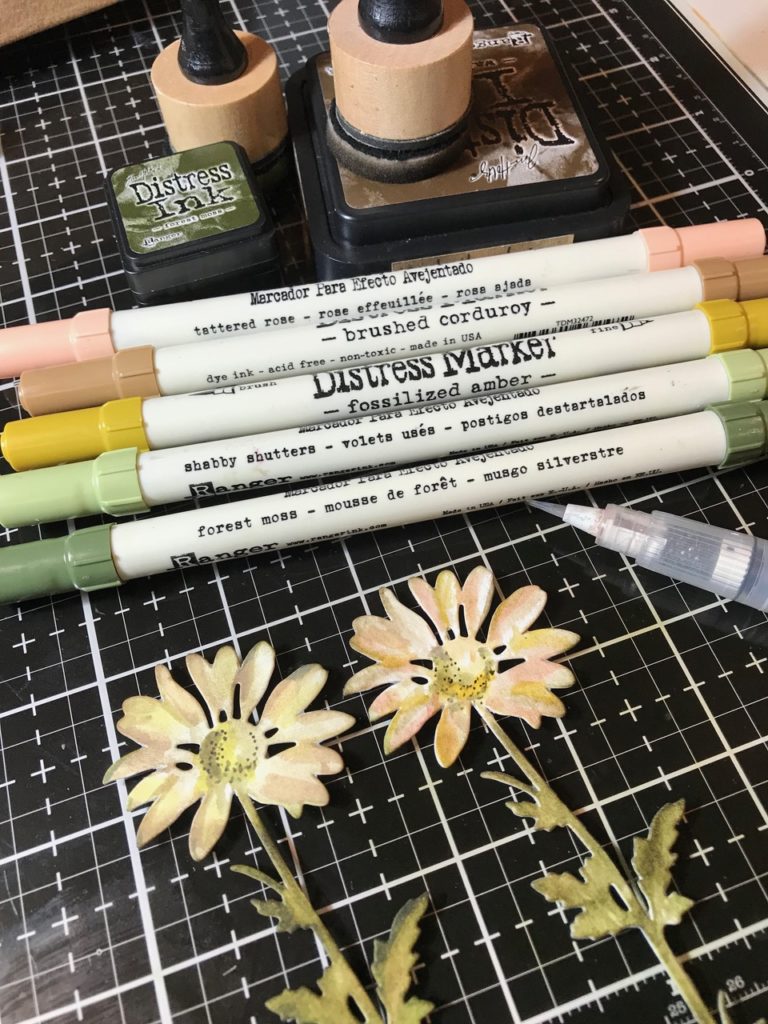
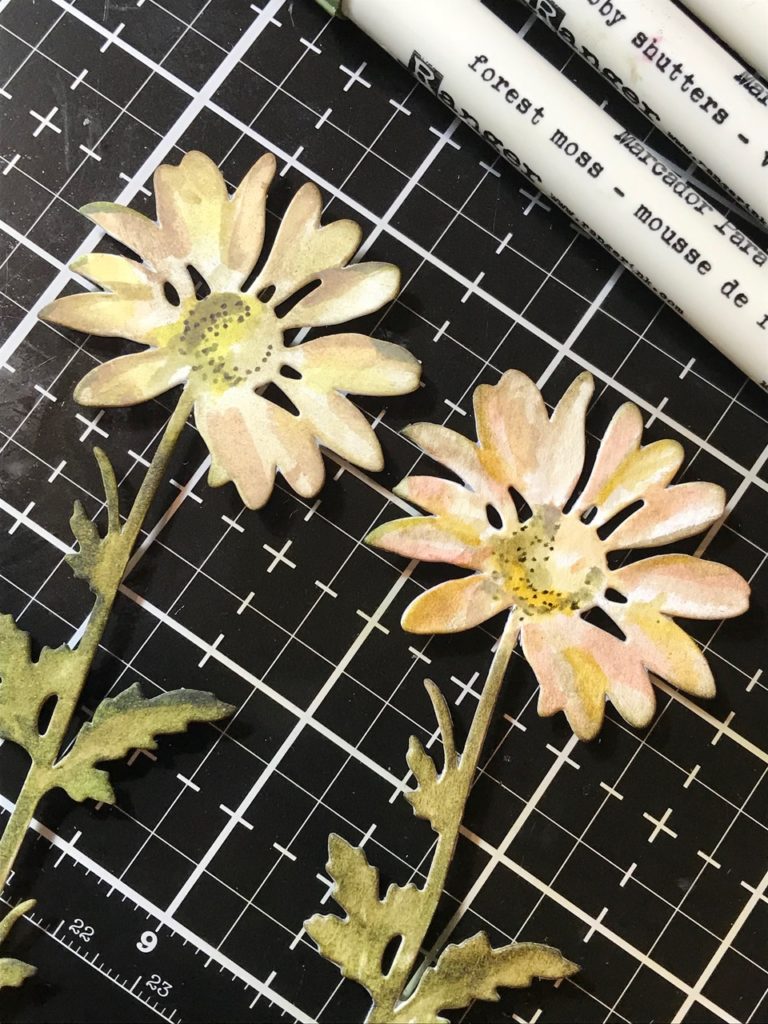
I colored a few greens to place with my flower and used the same technique, but this time I used Forest Moss, Peeled Paint and Shabby Shutters and blended the colors together with the waterbrush. Then I blended them with walnut stain.
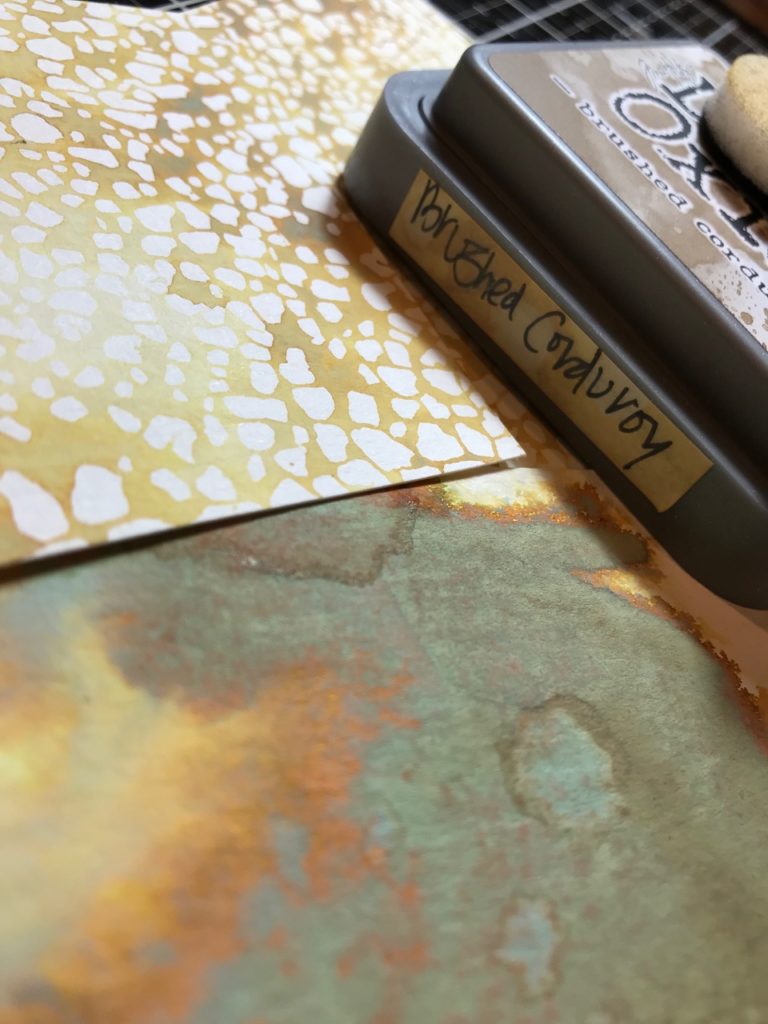
After I was done creating the flowers I decided on a background…this one came from a day of play I had a few weeks prior to making the card. It was made by inking up the Stampers Anonymous Craze Background Stamp (CMS344) with Brushed Corduroy Distress Oxide, spritzing the stamp with my water and stamping it onto a piece of watercolor paper. Then I let it dry for a bit naturally before hitting it with my heat tool.
It creates a gorgeous color blend, all sorts of amber, gold, teal, brown yummy goodness…oh, I sure love it!! The lower sample was done by smooshing the ink pad directly onto a piece of watercolor paper, spritzing it with about 3-4 spritz’s of water, then letting it dry naturally for a bit then dry it with the heat tool. Rusty tealy GOODNESS!!
…that one is still in my stash to use for another time or to cut diecuts from 😉
This is another result of a stamping play day…
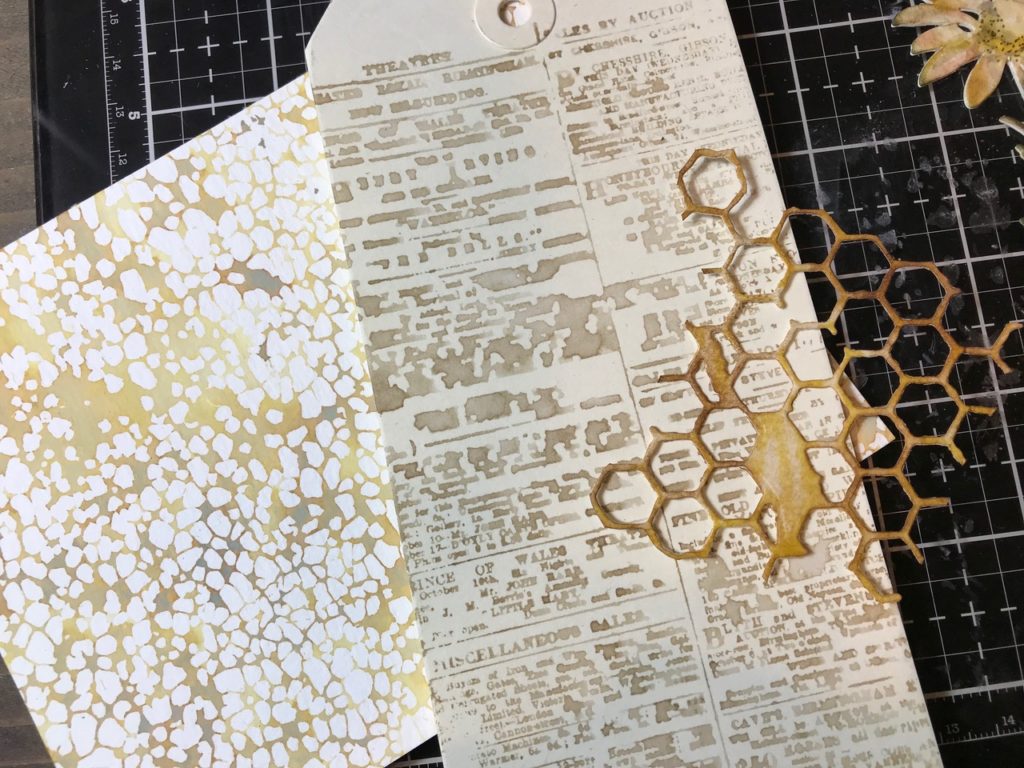
It was created by cleaning off a stamp that I had used on another project. It is the Stampers Anonymous Newsprint background (CMS266) and some dried Ground Expresso Distress Ink. I spritzed the leftover ink that was left on the stamp with water then stamped it onto a Mixed Media Tag. I dried it with my heat tool and set it aside to use for another time. In other words, it was a second generation stamping. I do this a lot when I’m cleaning up after a stamping session. It’s a great way to not waist the little bit of ink that’s leftover on the stamp. I’d rather use it, then waste it! 😉
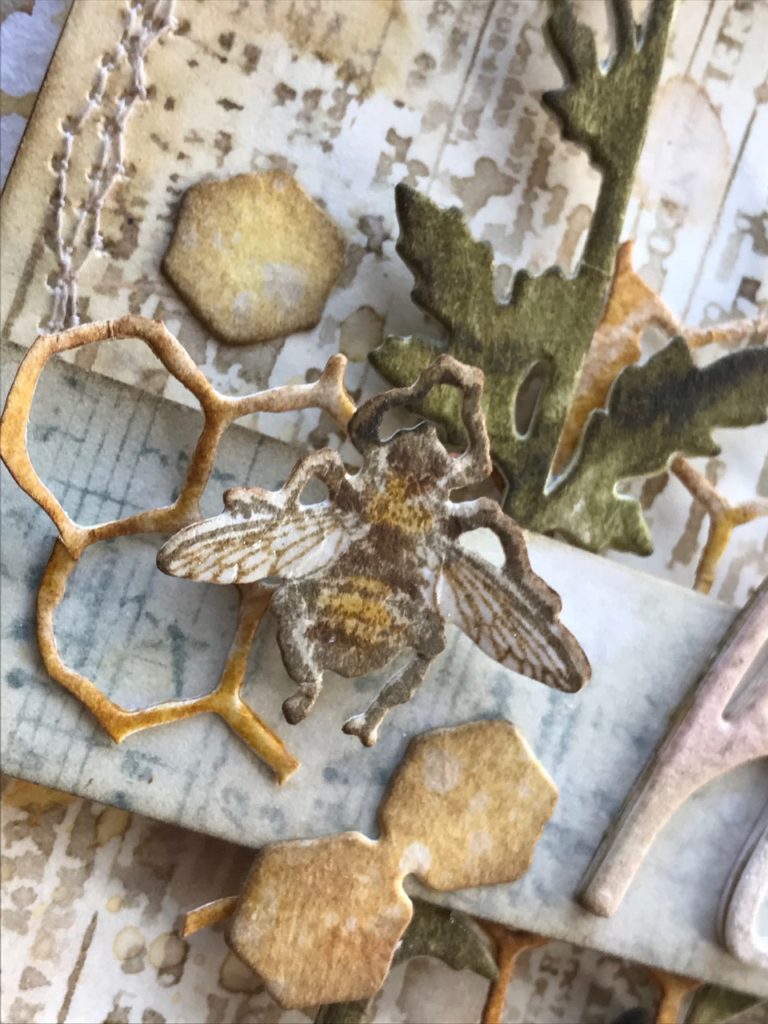
I cut a piece of honeycomb from the Mixed Media Thinlet Set from a scrap of watercolor paper and blended it with Mustard Seed and Wild Honey Distress Oxide. Then blended it with some Vintage Photo Distress Ink.
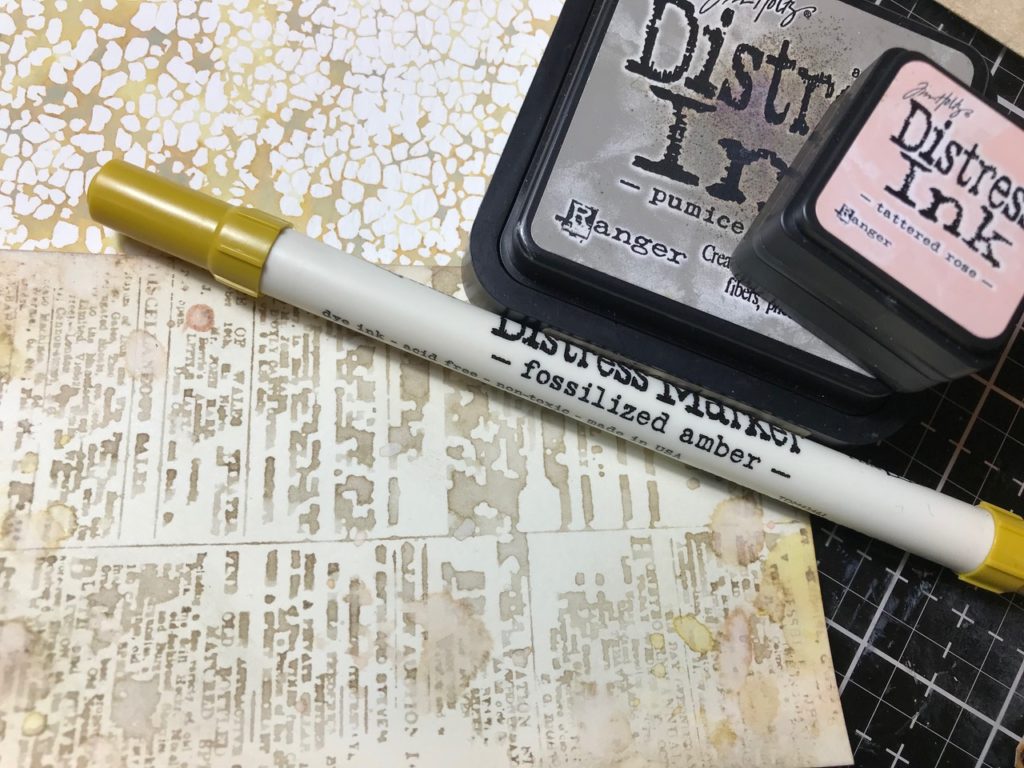
I trimmed off the top of the tag then dipped it into Pumice Stone and Tattered Rose Distress Ink and some Fossilized Amber Marker that had been smooshed and spritzed onto my craft mat. Then I dried it with my heat tool.
I stamped a bee from the Entomology Stamp set, cut him out with the matching Entomology Thinlet set and colored it with distress markers and a waterbrush. With a Clear Wink of Stella Glitter Pen, I colored the wings of the bee and embossed them with Clear Embossing Powder.
*Did you know that you can emboss things right after you color them? The Wink of Stella Glitter Pen works perfectly for it..you just have to do it quickly before it dries!
😉 The perfect little bee wings!

I cut out the word “happy” from the Shadow Script #2 Thinlet Set out of a piece of scrap paper twice, layered and adhered them together then blended the top of the word with Tattered Rose Distress Ink. This gave the word an ombre effect.

I began arranging the layout of my card. I found another piece of scrap paper for behind the word “happy”.
I stitched around the outside of the tag piece with my sewing machine and cream thread.
Then, I added a few of the honeycomb negative pieces to the front of the card and adhered it all together onto a card base.
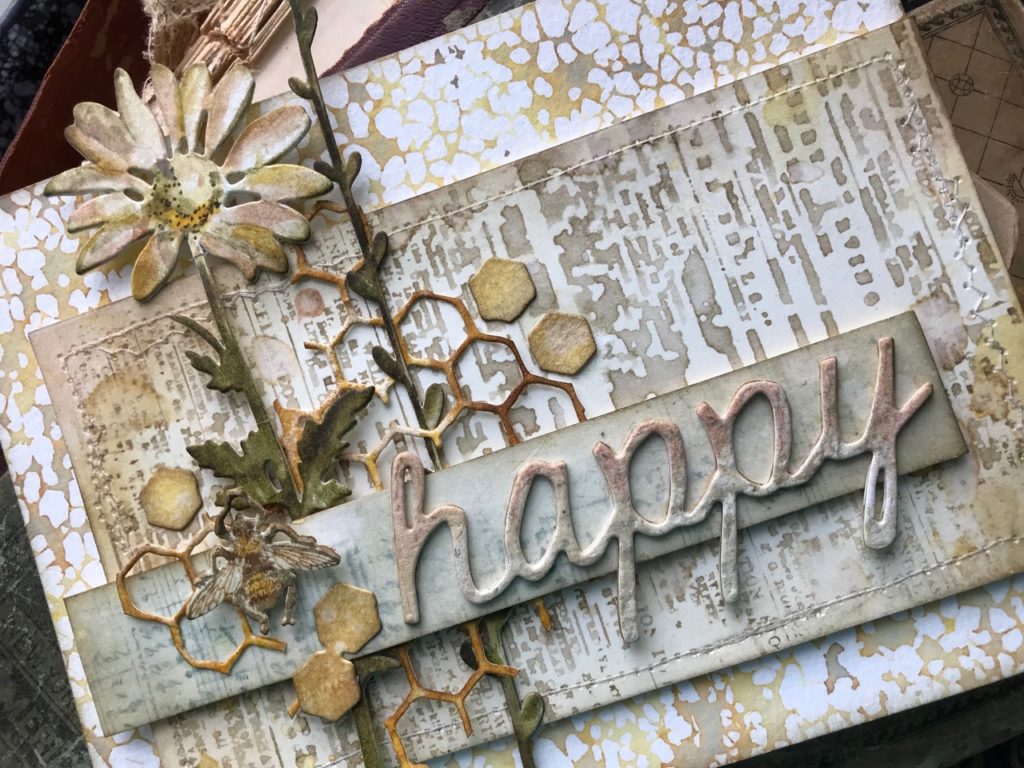
With that, my card was complete. I hope you enjoyed the tutorial and all the little tips and tricks.
Thank you so much for stopping by today! Have a GREAT day!
Creatively Yours,
Stacy
What is an affiliate program, and why should I click on the link and buy through you?..
When you shop via the affiliate link on this blog, I receive a small commission, from the affiliate provider (Simon Says Stamp) at no extra cost to you whatsoever. These commissions help me to cover hosting fees and other costs to run my blog and be able to provide you with FREE inspiration. If you shop the links, THANK YOU! I truly appreciate being able to share my love of creating with you.
Gather Your Supplies-
Tim Holtz/Sizzix- Wildflowers Stems 1, Entomology, Mixed Media, Shadow Script #2, Vagabond 2, Precision Base Plate
Tim Holtz/Stampers Anonymous- Craze and Planks (CMS344), Newsprint and Type (CMS266), Entomology (CMS328)
Tim Holtz/Tonic- Tonic Guillotine Paper Trimmer, Tonic Shears
Tim Holtz/Ranger-
Distress Ink and Oxides- Tattered Rose, Pumice Stone, Walnut Stain, Vintage Photo, Ground Expresso Distress Inks, Brushed Corduroy, Mustard Seed, Wild Honey Distress Oxide Inks
Distress Markers- Fossilized Amber, Tattered Rose, Brushed Corduroy, Shabby Shutters, Peeled Paint, Forest Moss, Vintage Photo, Ground Expresso
Distress Tools/Mediums- Distress Sprayer, Media Mat, Heat it Heat Tool, Blending Tools, Tonic Guillotine Paper Trimmer, Distress Collage Matte Medium, Distress Watercolor Paper, Mixed Media #8 Tags, Detail Water brush, Clear Embossing Powder
Other- Sewing Machine and Thread, Clear Wink of Stella Glitter Pen, Embossing Heat Gun


Lovely work, as always, Stacy. Great tips & tricks shared too. Thanks!
I always love your work; the colors and layering are so perfect. The simple elegance of this card is so gorgeous! I love the watercolor look to the painted flowers. I always so appreciate your tips and tricks that you share so willingly. And now, I think I need the wildflower stems die! Thanks for the inspiration!
a beautiful card, you did a terrific job with the coloring of the flowers, they make the card so beautiful, its perfect.
Another stunner. Thank for sharing your tips.
Another beautiful card.Thank you for the tutorial. I always learn so much from you.
Beautiful work, makes me want to rush to the shop right now and buy that die.
Love this card and the colours you chose, really like the subject. We need our bees!! Great piece of art.
Gorgeous, I adore the colours. Tracy ❤️❤️
Amazing card, layered together beautifully – really appreciate yout tips and tricks. Brilliant tutorial. Great to follow your creative journey, so inspiring,
Beautiful and ove all the tips and tricks you shared…thank you…I have a question??? There is one project…an Etcetera Tag with the new Potted Die and Yellow and Periwinkle Flowers, greenery of course and a 15 cent ephemera piece. It also has the new Scrolls, Adornment? I think it is called, not sure…thanks!…Did you do that or was it Emma? When I first saw it, I thought it was yours…If it is would you please be sure and share how you made that one?
Great, Sherry! I’m so happy you do, thank you!!! Yes, I know exactly the one you are talking about 😊that wasn’t mine but I believe it was Emma’s….I’m sure she’ll be sharing a tutorial about it down the road. ♥️
Thank you for the quick reply, I will go “bug” her about it now…hehehe!
I just love your work! Thanks for a great tutorial and continued inspiration.
Fantastic, love the colors, great bee wings and awesome coloring of the flowers!
That is really gorgeous….the colors you blended all work beautifully together.
SO very GORGEOUS Stacy! Love, love, LOVE this one!
What a beautiful project, Stacy! I love the way you combine elements and colors. That hint of tattered rose is a perfect accent.
Just love the watercolor on the flowers…. Gorgeous!
I am so delighted to have ‘discovered’ your web page – your work is exquisite – beautiful designs, beautiful and subtle colours and such generosity in sharing your ideas with us – thank you thank you xx
This is the most beautifully colored wildflower daisy that I have seen. Thank you for showing us all the details. What a wonderful project!
This is absolutely beautiful! I found the image on Google and came here! Wow! I’m going to follow your blog…